Showing posts with label outfit along. Show all posts

Wednesday, May 15, 2019

Outfit Along 2019 - Hello! I'm Still Alive!

Hello, All! Man has it been a long time - I've never gone so long without blogging since I started in 2009, and while the initial reasons for the absence are still unshareable (but getting ever closer to the epic share post), I've also bought a house and moved in the interim putting many of the things I love on hold for months and months just to keep myself going forward with all the "have to dos" of my life. BUT I am in my house and look forward to not moving for at least 5 years or so, meaning I can start thinking about making things again. In fact, all I can think about lately is making things since my wardrobe is getting pretty tatty and/or ill-fitting. I'm spoiled now - I can't go back to hours of shopping only to have poorly made clothes that don't fit my body. Aside from the odd Target t-shirt or thrifted bathing suit here and there, I have had no new clothes in this whole time. Craziness. Anyway, I am ready to just back on this sewing horse and love my clothing again. Very apropos to the announcement of this year's Outfit Along today. 
If you've read this blog over the past few years, you'll know I've participated in the OAL since it's inception except that I skipped last year (again due to the wonderful but unshareable info I'm witholding, lol). Here are my finished posts from 2014, 2015, 2016, and 2017, all of which I still wear on occasion (or wish I could but are now too small). I've been trying to pick what project to start my sewing habit back with for a couple of weeks and just can't seem to decide with the vast choices available. Thanks to today's OAL announcement I will be able to narrow things down much better :)

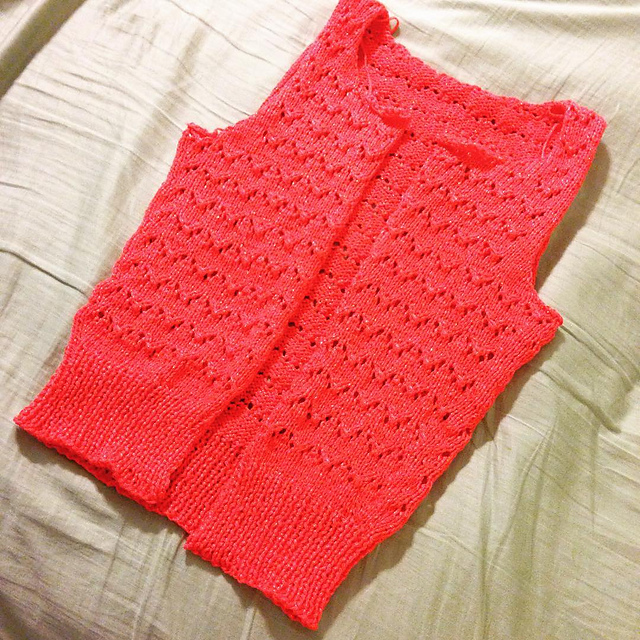
In previous years, the Outfit Along has always had 1 group knitting pattern and 1 group sewing pattern the tutorials were based off of, yet you could still choose something different if the suggested patterns were not for you. The idea was just to complete 1 knitted item and 1 sewn item that coordinated from June 1st to July 31st and make yourself an "outfit". I've used the suggested patterns here and there but if that pattern wasn't my style I went with something that was more me. This year though, the overall theme has altered a bit. This year's focus is on finishing works in progress (wips). At least one of the items for your project must be an old wip and the rest can be new if you choose. This works out perfectly for me because I've felt guilty for a while about how long my poor Dahlia cardigan is taking.
In 8 days I can celebrate that project's anniversary - exactly 1 year since I started it :/ Disgraceful! I used to finish 5 sweaters a year. So sad. Anyway, I've really wanted to finish this up and now i will have a small fire lit under my butt to get it done and a reasonable timeline in which to do it. I may have majorly decreased/non existent knitting time but I only have the last 3rd of the front of the body, the sleeves, and the seaming left to do. Now that I have a deadline of sorts, I know I can squeeze out the necessary time.
I don't have my sewing projects picked out to make this an "outfit" yet, but I plan to work entirely from my stash on this project, technically making everything I make qualify as a wip by the new rules since I plan my projects when I purchase the fabric and patterns. So now I just have to narrow down what will go with the coral Dahlia cardigan and run with it. I'll report back once I've picked my projects :)
Now that this post broke the ice with my dusty 'ole blog, you can expect to hear from me every now and then., including the couple of projects I've made since last September but never blogged. Sadly my output won't be what it once was, but I plan to share some of my home improvement projects as well as other endeavors I've taken up in my absence. I hope you can stay in touch! And if you are still here after all this time, thank you so much for still keeping my little blog on your radar :)

Wednesday, July 26, 2017

OAL2017: Mint Twig Renfrew

To see Part 1 of this series (my sweater), click here.
To see Part 2 of this series (my skirt), click here.
Here's my final piece for the Outfit Along! Part 3 :) 

After I decided against my newly finished black and white striped Renfrew for the Outfit Along, I had to quickly plan an alternative top to pull the other two pieces together. I pulled out any cut of knit fabric that I thought might coordinate and laid it inside the sweater itself, then wrapped the front pieces over to get an idea of the finished look. I posted 4 options on Instagram and Ravelry, asking opinions on which to choose. In the end I went with the one I thought would go but that I would also want to wear a lot, which technically was the most popular choice of others as well :) Always nice when that happens so I don't look like a jerk, ha ha.
So this is another hacked Renfrew - this is exactly like the black and white stripe Renfrew ended up, I just didn't have to reconfigure things on the fly with this one since I already did all that trial and error with the first one. Hoorah! I measured my black striped Renfrew and transferred the new neckline to my pattern and cut this one out. Easy :) I love easy.
The winning fabric was this cotton interlock from the Doodles line at Joann's. It has occurred to me that this is the most popular fabric in my wardrobe since it's really the only brand I'm loyal to as I love the softness and fun prints as well as the price and availability. This print is called Twig Floral in Mint and it's still available to buy. While this fabric line is technically designed for kid's clothes, I find this fabric really bridges the gap between toddler and adult. The pattern would be cute as a kids dress or onesy or t-shirt, but I think it still looks fine on this 32 year old. Also I adore the color - mint is one of my favorite colors to wear and this fabric is a bit brighter in real life (less pastel).
I deliberately made this shirt a bit longer than normal because I know this fabric tends to shrink up a bit more with time. This is also long enough for me to tuck in without it popping out all the time (a constant problem in this long torso'd life I lead). I actually don't feel it's too long even untucked - in fact I'm wearing this top untucked with my gray Melissa skirt as I type this :) So it can be worn either way and I love that.
And again let's take a moment to appreciate that neckline. No bra in sight! Love it. I did the same neckline finish as the black version and it worked out wonderfully. I just love being able to just sew something without worrying about the fit aspect. Because I had just made up this pattern a few days before, I was able to cut AND sew this top in less than 2 hours. That is record time for me. Gotta love a quick and reliable project that will get worn a lot.

So that's my whole outfit for this year's Outfit Along :) It was lots of fun as usual, and now I have 3 (actually 4, lol) great pieces to wear. Interestingly I just realized that all my pieces this year coordinate with all my pieces from last year's challenge. I guess I'm a bit predictable. Ah well, it makes for a cohesive wardrobe.

I can't wait for next year's Outfit Along to come!

Summary:
Fabric: 1.25 yards Mint Twig Floral Interlock from Joann's - $7.50
Pattern: Renfrew by Sewaholic Patterns
Notions: white thread - $0.50, woolly nylon thread - $0.10
Time: 2 hours
Total Cost: $8.10

Thursday, July 20, 2017

OAL2017: Gray Melissa Skirt

Today you get part 2 of my Outfit Along project: my skirt!
After deciding on my sweater pattern, I had to pick what to wear with it (to see Part 1 of this outfit - my sweater - click here). I'm a fairly practical dresser, and while I love the idea of dresses I almost never wear them on a daily basis because of my work. I'm a strictly separates gal everyday, so I decided to make a skirt. After throwing around a few ideas of skirt patterns I had planned, I decided to be boring predictable practical and make a pattern I've made a few times before and love: The Melissa Skirt.
This is the skirt portion of the Melissa Dress by Muse Patterns. I seriously love this pattern, and I've still only ever made the skirt! I have a Blue Jean version and a Basic Brown version of this skirt that I wear ALL.THE.TIME. For real. These are the skirts that I grab when I want to run out quickly or walk the dog or just need to be comfy but not look like a slob. These skirts are the perfect fit, perfect length, and even have the perfect pockets - thus they are worn to death. During Me Made May this year, I decided my old ones are looking a bit ratty (I'm looking at you, light weight denim!), so in a fit of "I can't decide what to make for the Outfit Along" I just grabbed this pattern and decided to kill two birds with one stone and sew up another great neutral version.
Having made this before and perfected the fit, sewing this was a breeze. Also having sewed this in 3 different types of fabric I knew what would work best. My denim version is a bit too light weight for the sea breeze where I live right now, and the green stretch heavy sateen was a very unfortunate disaster (I still lament you, green fabric!), but my brown version is just right. How's that for a Goldilocks statement? The brown fabric was a poly blend of some kind that is heavy enough weight o hold its shape in the wind, but it wasn't rough like a canvas tends to be and it doesn't have the diagonal weave that twill has. Maybe it's a gabardine? I thrifted the fabric, but that stuff is magical. I know it has some poly because it doesn't wrinkle much at all. With all that in mind, I started digging through my stash to try and find something similar to the brown fabric. When I unearthed this gray heavy cotton twill that was just the right length, I knew it was meant to be. I honestly have no idea where this fabric came from, which I very odd for me (I can't remember if I washed my hair or not, but I can remember where I acquired all of my fabric and how much it was - thanks, brain). I'm not sure if I bought it years ago at Hancock Fabrics in hopes of making some other project (as I was prone to do) or if I got it from a thrift store or what. I'm just happy I had it! This fabric is a great weight with just enough body to keep its flare and not blow up in the wind.
As far as fitting, I did the same adjustments that I did on my brown version: I added 1/2" to each side of the pocket panels (so my hands would fit in the pockets without straining the fabric), and I removed a 2.5" deep wedge from the center back. This worked out great and this is the smoothest fit I've ever achieved on the back of this skirt. Since this skirt will be worn a ton and therefore washed a lot, I overcast every seam and then top stitched them down. This really helps in keeping everything tidy inside no matter how much it gets battered in the wash. It definitely takes a lot of thread though.
And finally the aspect that makes this design so great: the pockets! These are seriously the best pockets. These skirts get so many compliments when I wear them and they always refer to the pockets and how cute they are. I can fit my entire phone in them. Or my hand. Or my keys at work. They are a very useful but cute touch and I adore them. I also love that this skirt has a button front, and I lucked out with buttons again as I bought a tube filled with miscellaneous buttons at The Sewing Studio in April for $3 and it had the exact amount in this size. I like the lines across the center - it kid of echos all the top stitching I think. Also this was my first time using the button sewing function on my sewing machine, and man I am hooked! It was so nice not to have to sew these by hand. I'm keeping an eye on them to make sure they stay on, so I will report back on that.

So there's my new Melissa skirt! I'm thrilled to have this in my wardrobe and I know I will get a lot of use out of it (especially as it looks fantastic with my favorite gray embroidered Taos shoes - you can see them in the first photo). Yay for useful basics!

Come see my final piece of the outfit up next!

Summary:
Fabric: 1.75 yards of 50" wide gray cotton twill - $2.00?
Pattern: Melissa Skirt by Muse Patterns
Notions: Pellon SF101 interfacing - $0.75, gray thread - $0.75, 7 gray buttons - $0.25
Time: 5 hours
Total Cost: $ 3.75

Tuesday, July 18, 2017

OAL2017: Anaheim Wrap Sweater

It's that time again! I just completed my outfit for the Outfit Along 2017! I'm really loving my outfit  as a whole and as individual pieces, so it feels like a successful challenge. Just like last year, I will be blogging each piece separately, so check back over the next week for all 3 pieces. First up: my sweater!
This is the Anaheim by Andi Satterlund - this was her new pattern she released for this challenge. It's a wrap front style with an allover lace design. I was on the fence about the design when I was planning my project, but I decided to just go with it and I'm very happy about that decision. The finished sweater is much more versatile then I originally thought. Since the sweater is the portion of this challenge that takes the most time, I planned and made this piece first. Happily it only took 1 month and that was with mostly only knitting on the weekends.
The sweater is made with Andi's usual top-down in the round construction and with set in sleeves. The sleeves are plain stockinette stitch and a nice airy, loose gauge to keep things from being too hot (a thoughtful detail given the summer style of this sweater in my opinion, but be aware that the gauge is loose).
Gordo bomb! lol my dog really wanted to be a part of this whole picture taking business. The back of the sweater has the same all over lace pattern as the front. As far as lace goes, this is the easiest chart ever and it's very quickly memorized. Normally with Andi's patterns I knit a size Large but increase to an X Large at the waist as well as lengthening for my long torso. In this sweater I was actually able to just keep increasing along the neckline until I got the stitch count of the XL size waist. I have no shaping at the sides - my size worked out so that the lace pattern fit in perfectly, so the design is never interrupted. This extra increasing not only gave me the waist size I needed, it also gave me extra length - problem solved! I will say that while it made the knitting easier, it doesn't really help my figure much to not have any shaping at the sides. I'll still wear it, but this contributes to me not wearing it closed.
Which leads me to another cool aspect of this design - it can be worn 2 ways - there are buttons at the side seams and buttonholes at the points, so you just wrap the sweater over and button it at the sides. But you can also leave it open for a waterfall look.
I had the perfect buttons in my stash! I got an entire tube of these buttons for $2 at The Sewing Studio back in April, and they are the perfect color and size. I love the kind of 80s vibe they have with the triangle holes. I also like the i-cord bind off. I've done i-cord bind of before, but never where it went around the entire sweater before. I seriously thought this binding would never end, but I persevered and I'm glad I did because it's a nice effect.
I've never thought I would like the waterfall style, but I really like the look of this one opened up. To be honest I will probably always wear the cardigan open like this unless I maybe wear it with a dress. Because it sits right at my waist, a lot of my skirts and tops can cause the sweater to bunch up a bit. Also I don't love that the doubled up knitted fabric visually thickens my tummy. I do love the v neckline though. So we'll see how I end up wearing it most.
I guess I should probably talk about my yarn, huh? Whoops. I wanted to work from my (ridiculously large) stash for this project, and I'm happy to say that all the fabric and yarn were stash busts :) The yarn is Bernat Cotton-ish, a cotton/acrylic blend, in the Jade Jersey colorway. The color is a nice teal-y emerald green (it's not quite that teal in real life). I originally bought this to make a different sweater a few years ago, but looking at that pattern now it's not really a style I would wear much so I decided this yarn would work well for this project. It's a DK weight and cotton like the pattern calls for (the original suggested yarn is Knit Pick Cotlin), and after swatching and blocking I decided it would work out. I'm happy I was right (sometimes you never know!). This yarn was nice to work with especially considering how inexpensive it was. I would certainly recommend this yarn if you're looking for cotton DK yarn.
Little side story - usually I take blog photos on my own with a shutter release, but now that my husband is back around he wanted to help me. Both of us out on the porch was just something my dog had to be involved in, and he kept walking over to be in the shot  - which is so odd since he typically hides when we start pointing a camera at him (I think he didn't like that I was getting all my husband's attention). So now blog photos are a family event, lol. He is a pretty cute photo bomber though.
So that's my Anaheim sweater!It's so nice to have have another sweater finished (I was starting to think I wouldn't hit my sweater quota this year compared to the previous few years!), and I really enjoyed this as an easy but not boring knit. I love how it goes with the rest of my outfit, but I also know it will go with other things in my wardrobe. Yay for basic items!

Check back throughout this week to see the deets on the rest of my outfit!

Summary:
Yarn: 3 skeins of Bernat Cotton-ish in Jade Jersey - $9.75
Pattern: Anaheim by Andi Satterlund - $5.40
Notions: 2 buttons - $0.10
Time: 1 month
Total Cost: $15.25

Wednesday, July 27, 2016

OAL2016: Eyelet Collar Parisian Top

Since I finished my sweater for the Outfit Along with 2 weeks to spare, I decided to go ahead with a project I had planned a while ago that would work perfectly to combine the cardigan and skirt: a white shirt. I know what you're thinking: A white t-shirt. How boring. But this is not a plain white tee :) I have the same type of thoughts with making something as boring as a plain white shirt, yet white shirts are absolutely the workhorse of my wardrobe and are one of the only things I actually wear out. I wear mostly separates day to day, but I'm not a fan of pattern on pattern and some of my skirts are odd colors that are very hard to match in a solid fabric. White shirts are the answer for me. They go with everything! But it still bores me to tears just thinking about making a completely plain white shirt (you know - scoop neck with short sleeves). So I had the thought months ago to make one with an eyelet collar. I actually had ordered an eyelet white jersey material from Fabric.com last year, but they ran out so they couldn't fulfill my order. At that time I wanted to make a Sorrel top with an eyelet collar. When that plan was dashed (the Sorrel has to use a knit and I couldn't find any more eyelet jersey), I shelved the idea hoping to find the right fabric to no avail. Fast forward to this year and I had the idea to use the Parisian Top pattern and make the collar in woven eyelet. Done! It just had to be.
When I first made this pattern years ago (here and here - wow, I can't believe it's been that long), I thought that all the fabrics you used had to be a knit (body and collar). I thought it might work though, so after researching the versions other bloggers have made I knew it would work with a woven collar and a knit body. Huzzah! I had a 2 yard cut of white Robert Kaufman Laguna Jersey in my stash that I could use for the body, but finding an eyelet I liked for the collar was a bigger challenge than I anticipated. All I had in my stash (inherited from others' stashes) as well as most of what I could find for sale was eyelet border print, which wouldn't work with the curved shape of my collar, and the few all over eyelets I found were crazy expensive (Some were as much as $45 a yard!). I only needed about a fat quarter worth of fabric! Ugh. I found one at Joann's that I was getting ready to buy, but online they now have a minimum of 3 yards to order (what's with that?) and I haven't had the justification to drive 1 hour to get to the nearest store. Happily (actually, it's sadly) I swung int o my local Hancock Fabric's going out of business sale and they had one that was an all over floral embroidered eyelet. I had to buy a minimum of 2 yards, but since it was 80% off, it was cheaper than just the 1/2 yard would've been at Joann's. Also I technically got 1/2 yard free because there was a big snag in the middle of the yardage and the lady cutting it for me just threw that in on top of my 2.5 yards I asked for. I was easily able to cut my collar around the snag, making this collar technically free :) So now I have plenty of eyelet and I still had enough for this project, lol. Long story, sorry.
The Parisian Top was actually the first knit project I ever made. What attracted me to it then are still the things I love about it now - what's not to love about a t-shirt with a peter pan collar and puffed sleeves?! I did make some fit changes to this shirt though just like I did to my Classy Parisian long ago. I like a tighter fit than the pattern suggests for my size so it accentuates my waist, and while I fall in the range of the size Large, I kind of end up with a size Medium from the bust down. To do this I cut the pieces in the size Large, constructed the shoulder seams and sleeves, then laid my Classy Parisian top on top of it to see where to contour the side seams more and sewed from sleeve hem to main hem with a much larger seam allowance. After trying it on, I thought I might like a smidge more ease, so I tried to unpick my side seam - holy cow what a nightmare that was for my eyes! My thread was the exact color of my fabric and I used a lightning bolt stitch so it was near impossible to unpick. I made a small hole in my efforts about mid waist and just said the old fit was fine and resewed the seam (adding knit stay tape to the hole and making sure it was in the seam allowance.
So the shirt is slightly more snug than I would like, but I can live with it. The part that kind of annoys me now is how sheer the laguna jersey is. I understand it's white and white is sheer, but I feel like I am constantly on the hunt for a slightly thicker but still nice and not polyester knit in white. When I find it, Watch Out! Anyway, it's a little sheer, but that's normal in white even in ready to wear, so I'm not that worried about it. I did make another change to the pattern by leaving the hem bands off at the sleeves and body - this is just my personal preference. I love a good twin needle hem and it's so much less fiddly to wear than a hem band. I just lengthened the body to account for the hem band being gone. I made the sleeves shorter anyway, so I just turned them where I liked the length and stitched (the pattern comes with 3/4 length sleeves). I wanted the sleeves to be short so i could wear them under a cardigan easily (which I totally can!).
I love how the sleeves fit me on this shirt though - they ended up not as tight as the body, so they are able to keep their nice little poof at the top. And the length is good for me :) One advantage to the jersey being a bit thin is that the puff on the sleeves easily lays flat under a cardigan - yay!
Now for the real star here: the collar. I can't lie - I did settle for this eyelet fabric, but now that it's all finished I really love it and think it's a better choice than one with more holes. There is a rose pattern embroidered on it in a shinier thread so it stands out from the white background better. I wanted the pattern to match as well as possible, so I cut the collar top in two pieces with added seam allowance at the back instead of on the fold like the pattern calls for. This was I was able to lay the first cut piece on top of the fabric to make sure they matched. I deliberately made is so that the larger rose motif was on the main part of the collar with the eyelets ending up above them and I think it worked pretty well :)
Here's a close up of the collar front and pattern matching - not bad. Not perfect, but not bad. The eyelet fabric was very sheer, so I opted to use fusible interfacing to the eyelet pieces of the collar instead of the bottom to help hide the seam allowances inside. I didn't want the under collar to be bulky with another layer of eyelet, so I used a plain white mystery fabric from my stash (it seemed like a cheap poly cotton) and this worked great. I followed the pattern and trimmed 1/8" off the outer edge of the collar before sewing the top to the bottom to keep the seam line securely under and it worked like a charm! This is the first time I've done it correctly since it's the first time it actually worked, lol. I also really love how neat the binding inside the neck turns out on this pattern. It's undoubtedly the most fiddly neck binding of any of the knit patterns I've used, but very much worth it since everything is encased and smooth when you're finished. I stitched the neckband binding on with a zig zag stitch. The final shot is of the seam at the back of the collar - since it worked out so well it deserves a photo :)
Let's look at that collar one more time :) I really love that this idea worked out and the fact that it's white on white makes it seem like a shirt you could buy somewhere (hopefully that makes sense). I guess I mean that it feels like a good design choice. With this collar and the puffed sleeves I think Anne Shirley herself would be envious :)
And there you have it - my final piece for the Outfit Along that really makes the whole outfit come together and I can't imagine this project without it. I adore this shirt, and I might be tempted to do the eyelet collar again in other colors - how cute would yellow or teal be?!

I've said it for all of my Outfit Along pieces, but this will get so much wear with other things in my closet! I'm excited to have each separate item to wear together or apart. While I do love my crazy print dresses, there's something to be said about easy to wear basic items that you know will be worn much more often, which all of these items are :) So I'm really happy that I was able to complete my goal of the Outfit Along and end up with such practical items in the process!

Did you join in the Outfit Along? I'd love to see your projects!

Shirt Summary:
Fabric: 1.25 yards Laguna Jersey in White - $7.50, 0.5 yards of embroidered cotton eyelet - Free, 0.25 yards white broadcloth (?) - Free (stash)
Pattern: Parisian Top by Go To Patterns
Notions: Interfacing - $0.50, knit stay tape - $0.25, thread - $0.50
Time: 4 hours
Total Cost: $8.75

Tuesday, July 26, 2016

OAL2016: Deep Purple Hollyburn Skirt

This project was a bit of a splurge for me (definitely guilty of retail therapy). I was going through a hard time in my personal life (I was still living split between two places and things were breaking at both locations plus a bunch of personal life junk), and I had a 15% off code to Fabric.com (affiliate link) that my mom and I planned to use together. I was already making my Hetty cardigan out of my stashed coral colored yarn, and when I went to pick a fabric for my Hollyburn skirt I kept coming up with nothing but less than thrilling options in my stash. This is ridiculous since my stash is ridiculous and I still can't believe I didn't have anything. Maybe it was my mood, maybe it was the planetary alignment - I don't know, I just knew nothing that somewhat worked seemed like anything I wanted hanging in my closet and I didn't want to waste time and resources sewing something I wouldn't wear just to fulfill an online challenge. It was about to be my birthday, and I had a coupon ... so in spite of my strict budget I splurged on some Robert Kaufman Brussels Washer Linen in a lovely deep purple color :) I adore linen skirts and wear them quite a lot, and this fabric is a 55% linen and 45% rayon so it had a lovely drape that would be great for this pattern. Elegant drape plus cool and breezy linen? Sign me up, friend. So, it may not be quite as eye catching and exciting as the dress I made last year for the Outfit Along, but this is a great wardrobe staple that will mix and match with a zillion things I've already made or thrifted so I find it very exciting :)
Given the fit issues I had with my first Hollyburn earlier in June, I added to the waist of the pattern. I made the waistband finish out at 40" so I would have a little bit of ease (I'm actually around 39" at the waist) and I added 1/2" to the sides of each panel piece before cutting. After sewing up the whole thing and inserting a beautiful lapped zipper, I tried it on to discover it was too big :/ It just sagged and really looked dumpy. *Sigh* such is my old bad habit - thinking I'm bigger than I am when it comes to sewing. Because of the order of construction, I was able to fix this issue by just taking out the lapped zipper (sob) and pulling the excess in at the center back seam. This worked out better for my body anyway as my front is longer than my back as far as my waist goes, so this made the side seams actually sit where they should on me. I took out 3/4" on each side and re-did the lapped zipper and it was great :)
I went with a lighter purple zipper because it was all I had in my stash. It turns out that purple is the color that I am lacking, so the choices were slim to none and I was lucky to have this lavender one in the right length (you can see it a bit at the top of the waistband - oops). As far as the finished skirt - I absolutely love it. This fabric is kind of magical and I'm so glad I decided to take the plunge with it. It drapes beautifully! Don't believe me? Check this out:
Look at how fluid it is! Ah, lovely. Interestingly enough, the drape seems to make this skirt fall a bit more like a circle skirt would when I wear it. Also the dark color completely hides the center front seam, so you know I'm happy about that :) The pockets are great too - as ever. Man I love these pockets...
Details! There's a close up of the lapped zipper - seriously my new favorite technique. It just feels like magic. And you can see the lavender zipper when it's open. I think it's kind of a cool touch, like it's close enough to the color family but not the same because it's cooler than you. I had to show off the pockets because they are just wonderful. The last pic above is of the hem that I HAND STITCHED. Good golly that took forever, folks. I also hand stitched the waistband closed, so you know I was really dedicated to this project. The invisible hem adds just a touch of classy to the skirt and makes it borderline fancy for my wardrobe :) All my inside seams are just pressed open and overcast (you can kind of see one there).
And let's look at that drape one more time ... Love it. I'm really happy with this skirt in case you can't tell, lol.
And here's me showing how it swishes. I feel down right girly in this skirt even though it's just a basic solid color and doesn't seem like much to write home about.
So there is Part 2 of my outfit :) Check back for the final installation very soon!

Skirt Summary:
Fabric: 2.5 yards of Brussels Washer Linen in Dark Purple - $16.50
Pattern: Hollyburn Skirt from Sewaholic Patterns
Notions: light purple zipper - $0.10, thread - $1.50, knit stay tape - $0.25,
Time: 6 hours
Total Cost: $ 18.35

Monday, July 25, 2016

OAL2016: Sparkly Coral Hetty Cardigan

It's a big day, folks! I've finally finished my entry for the Outfit Along and I'm ready to share it with you. I've participated in the Outfit Along all 3 years it's been going on, and I've managed to complete the challenge of knitting 1 sweater and sewing at least 1 item to be worn together two of those times (here and today's post). In previous years, the suggested sewn item has always been a dress with a cardigan, so while I didn't sew or knit that particular pattern, I would still make a dress and a cardigan. This year, they switched it up on us, making the official knitting pattern Zinone (a linen tee) and the sewing pattern the Hollyburn Skirt by Sewaholic. The Hollyburn was on the top of my list to make up this year, so I was keen to use the suggested pattern this time around, but being that I never wear pullover style sweaters (even if they are light weight) I decided to stick with my style and knit a Hetty Cardigan.

All this is to say that I actually made 3 items this year for this challenge (a cardigan, a shirt, and a skirt), and I know that would be an absolutely enormous post to talk about all of them. This first post will be about the sweater (the biggest part by far) and there will be 2 other posts over the next few days about the shirt and skirt. *Spoiler Alert* I love every piece and they are great basics that will match a ton of stuff in my wardrobe, so I definitely feel like this project was a success. I did use all the 2 months allotted (I moved during these 2 months, so I cut myself a break), but most of that was just with the sweater, then the shirt was an after thought. Anyway, onto what you're here for: My completed Outfit!
Here is the whole she-bang all together (complete with Swedish Hasbeens - I am a sewing blogger, after all) :) When I posted a quick picture of my whole outfit to the board on Ravelry, I got what might possibly be the best compliment of my life...
So if this outfit makes people want to ask me about books, I take that as a major win, lol. I do love recommending and reviewing books. I'm glad I achieved that level of Librarian Chic :)
My post today is all about the sweater. I've had the Hetty pattern for quite a while intending to make it up long ago. I just always pushed other projects forward. When the OAL came along I knew it was the perfect opportunity. We weren't required to make one of Andi's patterns to participate, but personally I just love how her patterns fit me - since I've made so many I already know what to do to make them fit me well. For this pattern I just lengthened the body (I have a long torso plus I like them to sit a little lower than my waist) and I spaced out the decreases more to accommodate the added length. I made up a size Large but I did leave off a couple of decreases to make the waist a little bigger (not quite up to the next size though).
Because this is all over lace it's just as pretty on the back as it is on the front :) I love how it fits on the back! Not too tight where it dips in at my bra in an obvious way (a pet peeve of mine). I won't lie - I did my fair share of mess ups on this project. The whole sweater is knit in the round, so when I joined the fronts to the back I kept knitting away ... only to realize several inches later that I left off one of the lace rows on the back! It wasn't crazy obvious since it's a fairly busy pattern and I contemplated just leaving it until I noticed I did the same thing farther up on one of the fronts - which means the fronts wouldn't match. Now THAT would drive me nuts because I could see it. Frankly I blame knitting this while watching The English Patient - Ralph Fiennes is pretty distracting in that movie, amiright? Anyway, out it came back to where I had 3 separate pieces so I could make them all match. There is still one other bad area that I didn't even notice until I was completely finished with the body of the sweater, but I don't think anyone would ever be able to tell unless I point it out and I will never tell!
The sleeves are just as lovely as the body, Ah, knitting perfection ... I did shorten the sleeves by 1 repeat just as my preference. It sounds silly, but just that extra inch or two can really make a difference in how warm my sweaters make me. Maybe it's all in my head, but still - I'm knitting it, I made it shorter.
As usual, I lined my button bands. This time around I decided to try using some printed cotton tape I got a while ago at The Sewing Studio. It was natural colored with black butterflies printed on it. It's not bad, but not my favorite. The tape has a bit of stretch to it, making it ripple between the buttons plus it just doesn't have that stable heft of ribbon that makes it easier to button up. So this can stay, but I won't use it again...
I had a little drama with my buttons (when don't I?). I brought the completed sweater with me to The Sewing Studio sale on the 4th of July in hopes of finding some buttons. Man did I ever find the perfect ones! Look at those! They are the perfect color, the perfect size, they have a shank, and they even have a little sheen to the top to go with my yarn. There was only one catch: I made 10 buttonholes and the store only had 9 buttons. Ugh! I was left with the choice of either a)using a decorative button for the top one or b) re-knitting the button hole band AND the neckband (since the neckband comes last, it had to be taken off to make any button band changes). I deliberated for over a week, but in the end I just didn't love the look of the 1 button being different. I took an evening and pulled out the neckband and the button hole band and re-knit them.
I wanted to work from my crazy stash of yarn and pulled out this because I thought it would be a little fancy. It's Muench String of Pearls that I grabbed for a crazy clearance price from Jimmy Bean's Wool over a year ago ($10 for 10 skeins!). This was a stupid cheap deal so I bought it with no idea what to make from it (I have a purple colorway as well). It's 70% cotton, 20% rayon, and 10% polyester which is a pretty strand of iridescent thread that is twisted into the yarn. I was worried it would be too glitzy for me, but once it's knit up it's a very subtle sparkle (as you can see from these photos - the only photo you really even see it is in the one of the button band). I love how it came out and since this is cotton PLUS it's lace this is a great sweater to wear almost year round in Florida. Plus THE COLOR! I love this color. It's a very bright color in real life, but it still very wearable for me. This did make it a bit challenging when picking a fabric for the skirt to wear with it, but that's a tale for another post :) It's also worth noting that this yarn is a chainette weave, but it is wound like a tape yarn (meaning it's flat like a fettuccine). I was worried it would stay that way and knit a strange texture, but my gauge swatch showed me that after blocking it puffs up nicely - which the full sweater did as well. Yay gauge swatching!
So that's my Hetty cardigan :) If I hadn't been for the Outfit Along, this might have never come to pass. It's the sweater I never knew I wanted, lol. It's a comfy, pretty cotton sweater in one of my favorite colors. What's not to love?!
And since you've stuck around this long, here's a swishing photo (*swish*). I will post about the skirt and shirt throughout the week, so check back for more details!


Sweater Summary:
Yarn: 9.25 skeins of Muench String of Pearls yarn - $12.00
Pattern: Hetty by Andi Satterlund - $5.50
Notions: 9 buttons - $1.50, 41" butterfly printed cotton ribbon - $1.40, coral thread - $0.25
Time: 1.25 months (while moving)
Total Cost: $ 20.65

Thursday, June 16, 2016

Outfit Along 2016, Etc - Progress Thus Far

Many projects have been going on behind the scenes here lately, but my biggest projects are still in the works so I don't have a fun finished item to share yet. I do, however, have a few in progress shots since I feel like posting today, lol.
First, the Outfit Along. This project has consumed all of my knitting time this month and I've deliberated long and hard about what fabric to use for the skirt. I entertained about 8 different choices from my ridiculous stash, but none of them thrilled me. Turns out bright coral with sparkles is not that easy to color match :/ As there's no point in sewing something for a challenge if you're not going to wear it in real like, and since I had a coupon for Fabric.com (affiliate link), I decided to just bite the bullet and get something that did thrill me for this project. I ordered 2.5 yards of Brussels Washer Linen in the Dark Purple colorway. I figured coral and purple will look nice together, plus the purple skirt will go with tons of things already in my closet. Also since I'm using this immediately, I'm not counting it as stashed fabric, lol. The fabric is a linen/rayon blend, so it has the texture that I love plus a wonderful drape. I can't wait to sew it up!
The Hetty sweater itself is coming along quite nicely :) I cast off the body a few nights ago and the fit is just like I wanted - yes! I did mess up when joining the fronts and back (I forgot a row of the lace and didn't notice until I had knit 3 inches more), so I had to rip back and fix it - not too big a deal since it's a fairly quick knit. I lengthened the pattern and spread out the waist decreases over that extra space, so now it hits my waist where I want it to (I am long waisted and Andi's patterns come out very short on me as written). Because of the longer body, I am afraid I may be playing yarn chicken with the sleeves. Because of this, I plan to knit the button bands and neckband first, then I can make sure both sleeves get an even split of the yarn. I just hope I make it to elbow length at least. We shall see. I've never worked with 50 gram balls before, so it feels like I'm always starting a new skein. Think good thoughts for me, peeps!
My other big project that was getting lots of attention until the Outfit Along started is my Alecia Beth cardigan. I managed to separate for the sleeves and join the body before I had to set it aside, which I feel pretty good about time-wise since this is knit in fingering weight. It's a really fun pattern to knit, so I'm excited to pick this back up once I finish my coral sweater.

I've also been sewing up a storm (for me, anyway), so there will be a few new projects here next week :) In the meantime, I share all my projects in real time on Instagram, so you can check me out there if you;d like to see the in progress makes (my name is showandtellmeg, bug surprise I know).

See you next week with some finished projects!