Showing posts with label scarf. Show all posts

Friday, January 12, 2024

FO: Ravenclaw Scarf & Hat


In deciding to knit hat and scarf sets for all the kids, I first started off with a pokemon one for my nephew. I used the Sentro 48 pin machine and cranked out a yellow and black version, which was mostly fine except the machine had tucked stitches no matter what I tried to avoid it. I had a heavily tucked section in the most visible area when worn and I really wasn't thrilled with it. I decided to try the second scarf on my flat bed knitting machine to compare the two - if I couldn't get the flat bed machine to do better then I would just use the pokemon one as it was. Anyway, this was what started my adventures in finally making things on my flat bed machine, lol. 

The scarf was my first project even though I finished it last. Since I was trying to make the same size as the Sentro machine, I made this 50 stitches wide - 48 stitches and then 2 stitches as seam allowance for sewing it into a tube. I like a scarf that is long enough to really wrap you up, so I made this 72 inches long. 
The yarn was a very fortuitous situation. I was planning on buying some navy blue yarn and striping this scarf myself with some gray I already had, but one day on a visit to the local library one of the lovely ladies asked me if I would like some yarn. She knows I'm an avid knitter and brought me into their classroom where they stored yarn for knitting classes and pulled out 5 trash bags and a few tubs filled with yarn and told me to take whatever I wanted. They had too much on hand and people tend to bring their own to the classes, so this was all going to go. It was mostly all acrylic, but I found 3 skeins of Red Heart Team Spirit yarn in Navy and Gray stripe. This is a self striping acrylic yarn and I immediately knew it would be perfect for my Ravenclaw project. My boyfriend's son discovered Harry Potter this past year and he saw he is a Ravenclaw, so I knew I had to facilitate this. Sometimes the universe just makes certain projects a possibility, you know?
So I made this using my 1988 Babylock knitting machine. I watched the series called Know Your Bond by Cheryl Brunette on YouTube and just knitted until it was 72 inches long. Since I didn't have to change colors, it went extremely smoothly. I think I made this in about an hour on the knitting machine. I'll admit it probably took me another 30 - 45 minutes to seam it up and then another 30 minutes to sew the patch on, but still for a plain stockinette scarf that's 72" long, I'm fine with that time frame, lol. I originally wanted to add tassels, but in the end I didn't think they were needed. I ordered 2 of these patches from Joann because they were on sale for $3.25 each and that's cheaper than I would have been able to buy the embroidery file let alone spend the hour to stitch them out myself. Work smarter, not harder, right? For the scarf, I just used a mattress stitch along the sides to sew it into a tube and I used a kitchener stitch to close up the end, then I steamed it heavily on the seams to get them to sit flatter.
Next up - the hat! I actually made this hat twice. At first, I used my own numbers for how many stitches it should be and it turned out way too big even for my head. It was good practice though and I was able to make the next one according to the numbers I got from this YouTube video. I was grateful to find this video made on the machine I was using. It was a nice walk through. When making this hat on the flat bed machine, at least 75% of the time is making the brim. You cast on every other stitch, knit a few rows, then add in all the rows and knit some more, then you go in with a latch hook tool and drop down every other row and re-knit them by hand to be knit stitches on the wrong side, giving you a ribbed brim that is already cast off when you're done. It's very much worth the time and effort, but it just feels like it takes forever in comparison to the time of the entire hat.
Once the knitting is done, you draw up the crown to cinch in and seam the back. I try to be very accurate when seaming anything striped and I think it turned out really well for this one.
I used a mattress stitch for the seam, which leaves a very small seam in the center back. It actually looks very clean inside thanks to this being machine made.
Once again I added the patch from Joann - I did sew these on even though they are iron on. The iron on always fails eventually and I want this to be easy to wash and wear for an 8 year old.
And there you have my first scarf and hat set of this Christmas :) I love how this turned out and the recipient seems to like it as well (even if the scarf was a bit large, lol). Even though I knit these first, they weren't "finished" until after everything else because I was waiting for the patches in the mail. C'est la vie, eh? They didn't arrive until 2 days after Christmas, but they were done and in the mail before the mailing cut off, so I still count that as a success.

Summary:

Yarn: 3 skeins of Red Heart Team Spirit in Navy and Gray = Free

Pattern: Scarf - None, Hat: Here - Free

Notions: 2 Ravenclaw patches - $6.50

Time: 4 hours

Thursday, January 7, 2016

Christmas FO: Wings and Cable Scarf

Ok, I'm finally blogging about the Christmas gifts I made. I made all but one of my gifts to give out this year, and I'm pretty happy with how they all turned out. I'll start at the beginning with the one I made first:

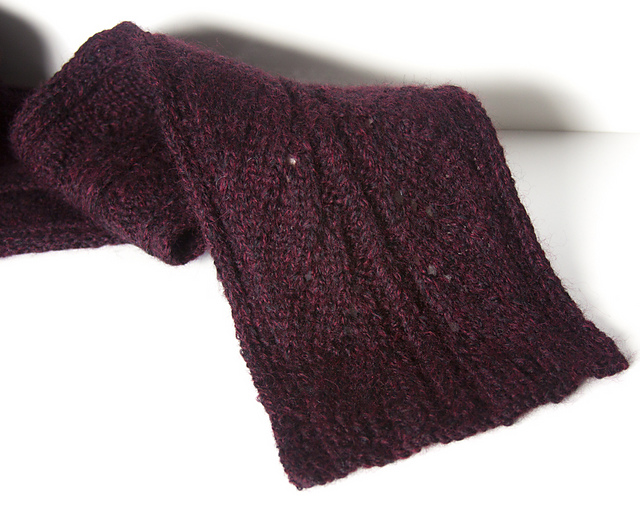
Months ago when I first started asking around for specific Christmas requests, my sister Shannon asked for a scarf. She moved to Oklahoma this year and the winter can get pretty chilly there. Knowing that I get bored easily with scarves and that they take longer than other projects for me to knit, I made sure this was the first project I worked on and I started at the beginning of November. Earlier this year I had picked up a lovely skein of Aarlan SwaLaine yarn at a thrift store for just $3.00. This is a really lovely yarn that is a chainette weave - so it's basically like knitting with a loosely woven icord. The chainette of fibers was made from burgundy as well as black, so you end up with the wonderful neutral burgundy with black flecks throughout when it's knitted. Shannon is a big fan of neutrals and deep colors, so I knew it would be perfect for her scarf, plus the wool would help keep her nice and cozy.
The hardest part of this project was deciding on a pattern. I only had one skein of 240 yards of this yarn (which is very much discontinued now) and I knew she'd still like it to be long enough to wrap up in. In the end I decided on the Wings and Cable Scarf by Gale Ulvang which is a free download on Love Knitting (you have to sign up for a free account, but then you can download the pattern for free). The pattern was a very simple lace repeat with a really neat way of doing the cable stitch that runs down the center - no cable needle required! I found myself making great progress on this scarf and finished it much quicker than I anticipated once I got the real swing of the pattern. The only issue I had was with the yarn - more specifically with the dye. The colors are really dark and this is a hand dyed yarn, so I wasn't too surprised when the colors started to rub off on my fingers if I'd knit for a long stretch. It got to where I'd have to stop and wash my hands after a few pattern repeats or else I'd get dye on everything else I touched. This made me paranoid about the dye running off on Shannon's clothes, so when I blocked this I risked felting with how much I rinsed and agitated the scarf. I had to rinse this project with Eucalan about 8 times before the water stopped having dye in it. That's crazy, right? I guess it's to be expected with that much dye in such a dark color. I just hope I got it all out!
The scarf ended up being 5" wide and 60" long which was enough for me to do my typical tie, so I think it should be a good size. I love how this turned out. It's a bit difficult to see the details in the pictures because of the dark color, but the lace pattern makes a leaf-like design and there's a 2 stitch wide cable twisting all the way down the center. Simple but pretty.

Shannon said she really liked her gift on Christmas :) I hope she stays warm in her snowy weather with this. Merry Christmas, Shannon!

Monday, January 19, 2015

FO: Christmas Edition #2

Our journey through the items I made for Christmas gifts this year continues today with a few more :) First off, I'll show you the two gifts I was most excited about months and months ago.
They're Shibe Doge beanies! lol My husband loves the Shibe Doge meme (click that link if you don't know what I'm talking about), so when I was looking around on Ravelry one day and I came across a Shibe Doge themed hat pattern, I knew I had to make it. I will confess to being a bad ... supporter? I guess? ... The pattern I originally found was on sale for $4.50 and it come with instructions for a colorworked brim hat or for duplicate stitch words (like I made). Well, I just couldn't see spending $4.50 for a pattern when the part I wanted to use it for was just a basic beanie with words stitched on - I can do duplicate stitch without any pattern, you know? So, I used the Basic Hat pattern by Ooo Baby Knits (which is a free pattern) to make the hat, then I looked at the photo of the "inspiration hat" to figure out the spacing for the words.

I got a bit sneaky with my hats - the pictures above are of two separate hats, by the way. See, my husband has a bigger than normal head (love you, babe). I planned on making my brother in law a hat so he and my husband could match, so I started making this back beanie and told my husband it was for "the other Justin" - this wasn't entirely a lie, but the one I had my husband try on repeatedly was actually for him. This was a good plan because I would have made the hat too short for my husband otherwise. This was my first time using duplicate stitch and I swear to you stitching on the words took as long as making the hats - craziness! But it was all worth it because they came out great. Each hat says, "So Chill, Much Brr, Such Cold, Wow." In retrospect, I kind of wish I had added "Very Hat," but you can't have everything, lol. The beanies are made with Lion Brand Wool-Ease in Black and the words are stitched in Lion Brand Lion Wool in Pearl Gray. This combo makes for nice and snuggly hats :) Both my Justins loved them, so I hope they get a good amount of wear.
Next up was a fun experiment that ended up being a few well liked gifts :) I've always been curious about Red Heart's Sashay yarn, but I just never wanted to pay $6 for something I might not like. One day a few months ago I came across a clearance section that had this particular color (Waltz) for only $1 each - I bought several skeins not knowing what to make at the time. Come Christmas making season, I knew just what to do with these skeins! I made two frilly scarves for my Mother-In-Law and Sister-In-Law :)
I the color combo of this colorway, and I love that it has a shimmering silver thread throughout for just a little bit of sparkle. For each scarf, I just used one skein and look how long they came out! By the way, my lovely model is my younger sister :)
As far as working with this stuff ... it was tedious. You have to open up the yarn as you go to expose the lattice structure since you actually only knit into the very outer edge. Once I got the hang of it, it wasn't really hard, just more annoying than normal yarn. Happily, these went very quick - maybe 2 hours each scarf - and I waited several weeks between making each one so I didn't get sick of it, lol.
My two recipients were both pleased and seemed surprised that I made them, so I take that as a success.
Another item I made early on is this pretty shawlette for my husband's Grandma. I asked my husband what her favorite colors are and when he told me teal and pink I immediately thought of this yarn I've had in my stash for ages. I purchased this yarn when I was still in high school (!) back when I used to do a lot of Swedish Weave projects. I used a little bit, but had most of the skein left ... it's been sitting in a bin for at least 12 years. I'm just not a huge fan of variegated yarn, personally. I was so happy to have recently organized my stash so that I knew I had it and was finally able to use it all up!
I used the Garden View Shawlette pattern, which is free, and I really enjoyed this pattern! It's nice and simple, but with just a bit of lace to keep things interesting. It ends up having 7 of the leaves along the edges.
The end is where things got a little interesting. This is the cast on side, so everything looks good, right? Well, when I reached the end ...
I ran out of my antique variegated yarn! Oh my gosh, I was so mad, lol. I ALWAYS buy extra yarn for my projects. This is my first time using a really specific yarn like this and running out. Because of how the pattern mirrors its decreases and increases on each end, I couldn't just pull back one leaf to make it a smidge smaller - I would have had to pull out all the way back to the 1st leaf at the cast on edge and redo it all. Well, that was absolutely not happening, lol. So I dug through my stash and pulled out all the solid yarns I had that were represented in the variegated skein. I only had 3 that matched, so I just alternated between them for the last 2 inches. Then I had to weave in the ends - 67 ends of yarn! In a 2" area! Ugh, it's so nasty, lol. It was just an awful experience. It was the best I could do though, and she didn't notice anything about it on Christmas. I certainly won't tell her, lol.

The other three items I made were not knitted or sewn and I forgot to take pictures of them. I made my mom, my sister , and my aunt all magnetic pin plates. I actually started a post about them way back in July, but never finished it, lol. Maybe I will get around to it this year. They are super cute and useful.

So, this wraps up the Christmas gifts I made this year :) It was certainly a lot of work, but I am proud that I started early enough to get them done while still working on other projects. This saved my sanity and I didn't begrudge the gifts I was making by the end. I'm happy with how everything turned out, and I hope the recipients enjoy their presents!

Friday, December 20, 2013

FO Friday: Christmas Gift Edition

Since I have utterly failed at posting my finished objects as I finished them this month, I figured I would just put them all together in one epic post today :) Just to warn you, this is a long one, but there are plenty of pictures.
First up is my husband's birthday hat. I actually finished this in November and never posted it  here.
It's all just knit in k2p2 rib until the decreases at the top. He chose the color and everything, although he has yet to wear it, lol.
I love looking at the nice swirl going on at the top. It was incredibly easy to make and I hope my husband enjoys it.
Next up is the Hello Kitty for my sister. Isn't she cute?! Honestly I couldn't be happier with how it came out. The face may have given me some trouble, but the rest went very smoothly.
And the back shot. I love that she has thumbs! I will probably use that technique on other animals to come just because it's so cute.
I freehand-designed the dress myself. I was really going for the classic Hello Kitty and I just couldn't find any patters already out there that were right. So, I started off with foundation single crochet and made a strand long enough to go around her hips. I just went up and down from there, connecting and decreasing/increasing, etc. I'm really happy with its shape.
Also for Shannon, I made this Hello Kitty style headband, lol. She's in Japan, so I think this will help her fit right in, don't you? I used this free pattern for the headband and then just used circles overlapped for the bow. Embroidering the black took some patience, but it paid off.
Here is another requested item. My sister Marisa's Lattice Cowl. This baby has 2.3 skeins of Lion Brand Hometown USA! I had to go buy a third skein a few weeks after buying the initial 2 skeins, and do you think Walmart still had any of the same dye lot? Of course they didn't. So, the front section is a slightly different color in certain lighting. Hopefully she likes it other than that. I think it matches the inspiration photo really well :)
The buttons all come undone and can be fastened pretty much anywhere you want since it's all double crochet.
I also finished the broomstick lace scarf for my mother-in-law. I'm really loving how it came out and I really have a new found respect for Lion Brand Microspun yarn. At first i hated working with it, but I've really become attached to it now. It drapes so nicely!
I added a picot edging just for extra flare.
And the scarf was started in foundation single crochet so I was able to neatly pick up to do the edge. It looks a little different than the other side, but honestly I don't think anyone but a knitter/crocheter would notice.
In EPIC news, I was able to finish my Red Rosie Hat! It was a small miracle, and one that convinced me that I needed a set of Knitter's Pride Dreamz interchangeable needles :) I was really having a problem with the Boye fixed circular I was using, but I ordered the Knitter's Pride Comby Set to see which type of needle set I wanted for Christmas from my parents. It just so happened that the set included a size 8 which is what this hat needed, so I just switched over to that new needle and had a grand time. It's amazing the difference when you have really flexible cables while you're trying to do magic loop knitting.
This is the Rosie Hat pattern from Knit Lab: Hats Four Ways class on Craftsy. It's my first experience with magic loop knitting, cables, a purl background, blocking on a plate, and my Knitter's Pride needle :) I love how all the cables converge in the center - it's so pretty!
And here it is from the bottom just for good measure. I haven't gotten to get pics of me wearing it yet, but hopefully they are to come soon. Also, the yarn is a much deeper red than it shows up in there photos - these shots make it look red/orange but it's more red/blue. It's made in Cascade 220 Superwash in Ruby.
I also finished the ties for my latest wig :) I can't wait to unveil this project, but I have a few more wigs to make first.
And last but not least, my FINAL HOMEMADE CHRISTMAS GIFT - the Bobble Beard Beanie for my brother, Briggs. He specifically requested this, I made it all except the last 1/2 of the last round of the beard because I ran out of yarn. Luckily, I was able to swing by Joann's on Wednesday night and grab a new skein of the brown yarn, phew, and I finished this up last night.
I altered the pattern so that the beard is removable. I added button loops to the corners on the beard and buttons to the inside of the ribbing on the beanie. The result looks pretty good, I must say :) I'm excited to see he face when he opens it!
So that's pretty much what my last few months of knitting and crocheting has looked like, lol. If you want to see what others have finished this week, head over to Tami's Amis' blog!

Wednesday, November 27, 2013

WIP Wednesday

So, I'm still in full gift-making mode here. Most of my time has gone into this little number:
I'm making a broomstick lace scarf for my mother-in-law. She's a beachy lady, so I knew she would like the color. This is Lion Brand Microspun in Turquoise, and yes I apparently am a bit of a masochist. This yarn splits like the dickens, folks. Seriously. I'm getting better with it, but I would absolutely not recommend this to a newer crocheter - you'd get all tied up in knots very quickly. I've had this yarn in my stash for a long time for that very reason, but I really love the drape of it so I finally bit the bullet and used it for this. I'm really glad I did too, I'm loving the way this is coming out. I think it will be a nice light scarf, perfect for wearing in Florida.

I'm also cringing over my red hat still. I spent all spare time on my day off last week knitting it, and I really kicked butt on it and it now measures 8" tall. From mid-needle it looks great:
And I love how the cables look when they are stretched out (my first cables!):
The problem is ... this thing has the worst ladders I have ever personally experienced.
That is one picture of each needle joint. Isn't it horrible?! I shouldn't have kept going when I first noticed them after crossing my cables, but being me I just kept on knitting thinking I could correct it or maybe block it out. Now, I've just given up hope and resolved to frog it and start over - YET AGAIN! I've tried everything - yanking the first and last stitches really tight on each needle, moving the stitches from needle to needle so it's less noticeable (this just caused a diagonal line of ladders - nice), inserting the dpn above the needle, below the needle, etc. I finally asked a fellow knitter at church (one with many more years of experience than me) if she knew of anything else I could do. The only things I hadn't tried yet are 1) using 4 dpns instead of 3 or 2) just using a circular needle and doing the magic ring. Which is what the pattern is written for anyway (grrr). At the time I started it, I thought, "I don't have a size 8 circular, but no big deal since I have pretty much every size of dpns and I'm comfortable with them. I'll just use those." Oh, poor, naive little me. I had never made anything with mostly purls on dpns before and now I am a cautionary tale. I know there are some out there who would just finish it like this and not worry about it, but I know that those ladders would drive me crazy as long as this hat existed and I would never wear it. So, I will be investing in a circular needle for this and trying again.

This hat is lucky I really like it and that I am determined to conquer it - otherwise it would be thrown back into my stash never to see the light of day again, lol.

Any advice for a desperate knitter? Or are purl stitches at dpn joints just a no-go across the board?

So that's what I've been consumed with lately. To see what others are up to, head over to Tami's Amis' Blog and check it out :)

Friday, November 15, 2013

FO Friday: 2 Projects - 1 Year In The Making!

I actually have 2 finished items to share today! These are both very exciting items because they have been in the making for at least a year each, lol. I know that sounds crazy long, but both of these were for me and I would just set them aside when I needed to make a gift or something else more pressing, so they have been worked on little by little in between other projects.

Without further ado, here is my finished Cambridge Scarf! I started this on July 20, 2012 (don't you just love Ravelry for remembering things like that?) and it is the second project from the Knit Lab class on Craftsy. This is technically my 5th ever knitting project.
I remember it being very difficult to wrap my head around seed stitch as an English knitter. I kept creating a zillion yarn overs, lol. It wasn't until I looked up a youtube video for English Knitters that I corrected the mistake and got this project going. It's a really simple scarf and it is really just altering between regular seed stitch, 2 by 2 seed stitch and 4 by 4 seed stitch. It creates this wonderful basket weave texture throughout and I absolutely love it!
Sorry for the goofy squinting face, lol - it was bright out. Every time I worked on this scarf, people remarked on how much they liked it. It's nice that such a simple project looks so impressive.
I knit this using Caron Simply Soft in Gray Heather. At the time I just grabbed this yarn because I had half a skein or so on hand from before my knitting days. I ended up buying another skein (thankfully this yarn has no dye lots). The whole thing took about 1.3 skeins total, but this sucker is 90" long! I just kept knitting until I liked the length of it when I tied it my favorite way (like in the photo). The 1x1 seed stitch is only on the ends and the main section alternates between 2x2 and 4x4.
I absolutely love this scarf! It's super long and a nice neutral color so I know I will get lots of wear out of it. Also, I finished it just in time for the little bit of cold we get here in Florida, so I will actually get to wear it!
The second item I finished is the Hope Shawlette by Stefanie Japel. I bought this yarn and pattern as a kit through Craftsy in October 2012. They had a special promotion that donated a nice chunk of the proceeds to Breast Cancer Research, so I decided I might as well try out my first "expensive yarn" and help a good cause at the same time.
This is my first experience with a shawl as well as with a large scale lace pattern. The bulk of the shawl was very easy, but the lace section was a whole different animal. I would get to the lace section, start knitting it according to the pattern, then realize there was a mistake somewhere because it wasn't lining up right. At the time, I hadn't knitted long enough to know any better, so after pulling back several times, I would just set it aside for months at a time. I looked into the pattern notes of others on Ravelry and it turned out everyone was having this same problem - there were errors in the lace chart that were never fixed. So I waited and one day I noticed another Ravelry user (shirleykaiser) posted a corrected lace chart. I am seriously forever indebted to this kind person! Apparently she is friends with a knitting type editor for Leisure Arts and that friend was able to fix the problems and she was kind enough to post the changes in her project on the site. So, if you do get this pattern, you can go here, click projects and look for shirleykaiser's project and find the real directions there.
I'm thrilled that this is finally finished! I started it November 12, 2012 and I finished it November 10, 2013 - just 2 days shy of a full year, lol. In spite of the problems I had with the pattern originally, I really do like the design an dI may even make another one day. This is made using Lorna's Laces Sole Mate in the Flamingo Stripe colorway. This is the most expensive yarn I have even bought (even now), and I will say it was nice to work with. It has a lovely drape and it's so soft and silky.
The lace section is designed to look like hearts. It's a little hard to see in the photos because of the white background, but they are there :) This was also my first ever experience with wet blocking. I soaked it in warm water with Eucalan for 30 minutes, wrapped it in a towel and stepped on it to remove excess water, then pinned it to the carpet in the only room in my house that I can keep the dog and cat out of, lol.
This is how the shawl looks pre-blocking. It measures about 21" wide and 18" tall. Thank heavens I have a zillion quilting pins! 
I laid a ruler out and pulled the edges until it measured 46" wide and 21" tall. I pinned the corners first to make it straight and then stretched out the lace little by little and pinned wherever looked wavy. I easily used over 100 pins and I pinned it right to the carpet. I left it all night and all day and it was dry the following night, so I removed the pins and it looks great :)

Anyway, I don't have any photos of me wearing it yet, but I just couldn't wait any longer to share :) I'm so excited to have it finished and be able to wear it this winter. I've never worn a shawl before, so we will see what my preferred method is. After all the gifts I've devoted most of my time to the last year, it's nice to have something I can enjoy for myself.

So that's my excitement for my projects this week :) To see what others have made, check out Tami's Amis' Blog!