

Wednesday, May 23, 2012
Free Father's Day Card from Treat
Tuesday, May 22, 2012
Free Target Summer Beauty Bag

Me Made May: Frenchie Bag for My Mommy's B-Day
So, May is a busy month for our family because it's not only Mother's Day, but the 21st is also my mom's birthday. This always puts us in a bit of a weird position with presents and whatnot - kind of like having your b-day on Christmas or something. I always feel like a heel when I have a nice gift for one and not the other. On top of not knowing what to buy her, I also have seriously zero dollars to buy anything with. So, I pulled out yet another sewing project that has been planned for years and never made.
Back when I was getting married, my mom and I found the Frenchie Bag by Amy Butler at our favorite sewing store during a sale and thought it would make for cute bridesmaid gifts. So, I made them up in black with white polka dots on the bottom and yellow with little starts for the top to go with my wedding colors. When we bought all that fabric though, we also picked some out for ourselves with the intention of making them together. That was about 4 years ago and I made my bag, but my mom's never got done.
So, since I had the fabric and the pattern and I'd made about 7 others in between, I decided to whip out one for my mom in the fabric that she chose. Here is what it came out like:
 Isn't it cute? The fabric is a Michael Moore print of flowers with a coordinating stripe from the same collection. I think this is easily the nicest looking one of these that I have ever made, so my mom definitely benefited from hers taking so long :) Originally we had purchased the fabric to make the handbag size, which is much smaller than this one. But from my previous experience with all the other bags, this pattern leaves a lot of extra fabric after cutting, so I figured I would have enough to make the bigger size and I was right. The only difference because of this is that the pattern tells you to make the main fabric and the straps the same, but with using the flower fabric for the bigger size, I didn't have a long enough piece to do the straps. Plus, I figured it would be cool to have the long stripes on the straps and I'm really glad it worked out that way.
 Here is a closer view of the top :) I actually finished this one like the instructions say - it really wasn't much more work, I was always just lazy before. See the cute stripes on the handles :) And I made sure to keep them perfectly straight on the lines of the stripes. I think it came out very well.
 Another cool thing about this bag is that is has 2 pockets inside :) So it can help to separate your stuff - most other bags I have made in the past are just an open shape inside with no pockets. Next time I make this bag, I'm going to sew one of the pockets up the middle so it has 2 smaller compartments instead of the big one.
So, I started this at 9pm last night and had it finished and taking pictures of it by midnight :) Not bad - I've gotten it down to a science. My mom was thrilled to have it and while it took a whole night away from me, I'm glad she liked it so much and that makes it worth it :) Happy Birthday, Mom!
Back when I was getting married, my mom and I found the Frenchie Bag by Amy Butler at our favorite sewing store during a sale and thought it would make for cute bridesmaid gifts. So, I made them up in black with white polka dots on the bottom and yellow with little starts for the top to go with my wedding colors. When we bought all that fabric though, we also picked some out for ourselves with the intention of making them together. That was about 4 years ago and I made my bag, but my mom's never got done.
So, since I had the fabric and the pattern and I'd made about 7 others in between, I decided to whip out one for my mom in the fabric that she chose. Here is what it came out like:


So, I started this at 9pm last night and had it finished and taking pictures of it by midnight :) Not bad - I've gotten it down to a science. My mom was thrilled to have it and while it took a whole night away from me, I'm glad she liked it so much and that makes it worth it :) Happy Birthday, Mom!
Me Made May Update: My Dress
Well, I got my dress all together last week on my day off. It's not finished yet - I still have to do some alterations and put in the zipper and hem it - but at least you can tell it's a dress now!
 Here is a full view of the dress :)
 I need to fix how wobbly the waist band seams are. I thought I was doing ok, but I was paying such close attention to making sure the pleats laid down right that I forgot to pay attention to my lining fabric making it slip around.
 This is one of my favorite parts - pockets! Not only are they pockets, but they even have pleats over them so they go with the design across the front :)
 Here is another part I am particularly proud of - the lining. I have never made anything with a lining before, but I decided to go full boar on this one and not only line the bodice like the pattern says but also line the skirt as well. This will help the white parts of the skirt not be so see through plus it will give the skirt a bit more oomph. And it makes a lovely swishing sound when I walk :) I'm really proud of how professional it looks inside (aside from that waist seam that I still have to neaten up).
 See how nice all the lining looks? Honestly, this is a big thing for me that tells the difference between a store bought dress and a homemade one. It just finishes everything off and feels so much nicer to wear.
I can't wait to finish this baby up so I can wear it officially! I really hope I can finish it during the month of May, though I'm not sure if this will happen. I've kind of done everything that I can do by myself. I had my mom help me pin it on to check the fit last Friday (the day after I sewed this much), and it was really slumpy fitting. It was very upsetting - I almost cried a little because I had worked so hard on it and was afraid it was going to look awful on my. How depressing would that be? But my mom is good at sewing and she is going to help me fit it better. That has been the biggest problem - you can't just pin it on yourself and mark what needs to be fixed - you need outside assistance. Luckily my mom is happy to help me out.
So, I just wanted to document that I have been working toward my Me Made May goal :) Even if I don't make it completely by the end of the month, at least I am proud of what I have accomplished! I'll be sure to show off the finished product as soon as it's all done :)
Monday, May 21, 2012

Sorry For Being MIA

I've also had a few photography jobs lately, which is nice for a little side money and we desperately need that right now. I love taking portraits and wedding photos and such (my husband and I made our own little business of it), but it is very time consuming to edit the photos. I have still been keeping up with the freebies and deals, but honestly there has been kind of a drought with that too. Add that to the fact that I haven't been coupon shopping since my Publix fiasco a month ago, and I just haven't had the motivation to keep up with the coupons right now. I am taking a little bit of a coupon break - have no fear, I will be back at it again soon. I can't bear to pay normal grocery store prices when I know I can get things cheaper.
So, I will still be around and post whenever I can, but I know it will not be as often as I have usually done. As always, you can check the other coupon blogs I post along the left side of the blog to keep you in the know on the coupon goings on. I hope your life isn't currently as busy as mine :)
My Doctor Scholl's Bzz Kit Is Here!

- Dr. Scholl's For Her High Heel Insoles
- $4 off coupons to give away
- Information on the product
Free o.b. Tampons Sample

Sunday, May 20, 2012
Bloom Review: LashFood Mascara and Eyeliner


How was the application?


The final verdict:
I give these products both a 3 out of 5. They aren't really my favorites in the realm of eyeliner and mascara, but they certainly aren't the worst I have ever tried. If you are wanting to promote healthier lash growth and you don't mind brushing out your lashes a few times after each product, then this product would be perfect for you. I just have a pet peeve for clumping lashes, so it's not my cup of tea.
Bloom Review: Alchimie Forever Kantic Mask
Another item I was given to review in the May Bloom Ambassador set was this fancy face mask :)
 This is the Kantic Mask from Alchimie Forever. This Swiss mask is packed full of botanicals that aid in reducing redness, brightening, soothing, and protecting your skin. Now, I am a confessed girlie-girl when it comes to face masks. I just love using them :) It makes me feel so pampered, and with all the things this mask promises I was stoked and ready to give it a whirl.
*Disclaimer - you are about to see my face with no makeup whatsoever. You have been warned :)
 I started off with a fresh-from-the-shower cleaned face. As you can see, I am very pale. I also have a few patchy dry spots, especially around my mouth and chin as well as the tip of my nose. I also have some redness from recent blemishes as well as just areas that are more pink on my complexion.
 Sorry for the doofy cross eyed-ness again. Oh well :) Here is my forehead, which really just has blemish spots, but they will fade in the course of a few days. My biggest issue with my skin: dark circles. I joke sometimes that I look like a person with a terminal illness when you look under my eyes with no makeup to aid them. I know the mask didn't mention it, but I'm really hoping it will have some kind of brightening effect under my eyes.
So, how about the application?
This mask was a breeze to use. Just spread a liberal amount over the face and let it sit for 15 to 20 minutes. The mask does not dry, it just remains kind of tacky on you face. Once the full time is up, you just rinse off with lukewarm water. No muss, no fuss.
 A neat aspect of this mask is that is is pretty much translucent when it is on your face. The above shot is while I am wearing the mask. I read a review by another user that said she wears it around her house and doesn't have to worry about her roommates teasing her, and I have to say I would never know I was wearing a mask if I hadn't in fact just put it on myself (lol confusing sentence, I know).
What's the verdict?
The mask felt great while it was one - actually very cooling for how goopey it is. It was easy to rinse off too, which is nice. I hate it when you have to scrub them off. That being said, I don't have an after shot to show you because I was a little embarrassed on how those came out. My face was very red from the mask and it took an hour or so for it to turn back to my pale color again. After my color evened out, I couldn't see any visible difference - my skin looked exactly the same. I still had my red blemish spots and dark circles (shucks!). I could definitely feel a difference though. Immediately after I took it off, my pores felt tightened yet moisturized at the same time.
I'm going to give this mask a 3 star rating mainly because I would like to give it another few chances before I make my official decision. The directions say to use it 1 to 2 times per week for best results, and I have only had it for a couple of days. So, I will try it again to see if I can notice any visible results. This is another review that should be read knowing a little other background info: this mask is for moisturization and I live in Florida. I get a lot of humidity all the time, plus my skin is oily anyway. All of the reviews I read from women who live in drier climates were all 5 stars, so if you are needing some extra moisture then this certainly seems to be a great option for your skin :)

*Disclaimer - you are about to see my face with no makeup whatsoever. You have been warned :)


So, how about the application?
This mask was a breeze to use. Just spread a liberal amount over the face and let it sit for 15 to 20 minutes. The mask does not dry, it just remains kind of tacky on you face. Once the full time is up, you just rinse off with lukewarm water. No muss, no fuss.

What's the verdict?
The mask felt great while it was one - actually very cooling for how goopey it is. It was easy to rinse off too, which is nice. I hate it when you have to scrub them off. That being said, I don't have an after shot to show you because I was a little embarrassed on how those came out. My face was very red from the mask and it took an hour or so for it to turn back to my pale color again. After my color evened out, I couldn't see any visible difference - my skin looked exactly the same. I still had my red blemish spots and dark circles (shucks!). I could definitely feel a difference though. Immediately after I took it off, my pores felt tightened yet moisturized at the same time.
I'm going to give this mask a 3 star rating mainly because I would like to give it another few chances before I make my official decision. The directions say to use it 1 to 2 times per week for best results, and I have only had it for a couple of days. So, I will try it again to see if I can notice any visible results. This is another review that should be read knowing a little other background info: this mask is for moisturization and I live in Florida. I get a lot of humidity all the time, plus my skin is oily anyway. All of the reviews I read from women who live in drier climates were all 5 stars, so if you are needing some extra moisture then this certainly seems to be a great option for your skin :)
Bloom Review: LashFood Natural Eyelash Conditioner
As part of the May Bloom Ambassador program, I was asked to try and review a really neat new product line: LashFood. LashFood is a natural line of treatment cosmetics designed to give you thicker, stronger lashes. Their products are drug-free, cruelty free, synthetic fragrance free, gluten free... basically just a pure and natural solution that is similar to Latisse. Now, Bloom didn't know this before, but I am a former Latisse user, so I was really ready to put this natural alternative to the test. Even better - LashFood is approved for sensitive skin. Needless to say, I was excited to give it a try.
 I was given the Nano-Peptide, Natural Eyelash Conditioner. The packaging is very nice and I was given an informational pamphlet on the whole LashFood line. So, before I get do to the nitty-gritty, I had to take some before photos of my eyelashes. After all, the main point of the product is to product thicker, stronger lashes. *Please forgive my goofy looking cross eyed shot - it's difficult to take close up pics of your eyes without that happening I have found.


So, not to toot my own horn or anything, but you can see that I already have pretty full lashes. This is partly natural and I guess partly due to other serum-filled eye products I use everyday (but I'll get to those later).

As far as application goes, it is very easy to use. Just sweep the brush over the lash line exactly like you would with a liquid eye liner at night before you go to bed. Just wait for the liquid to dry before using any other eye products. And that's it! Easy-peasy. It doesn't smell weird, doesn't sting. It also doesn't discolor your eye lid or colored section of your eye (which is a big warning on the Latisse box).

As far as everything went when I first received the product a month ago, I was very happy with it :)
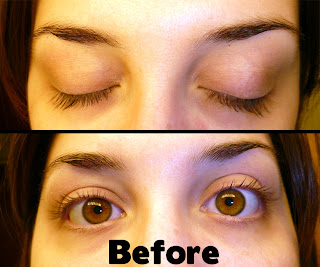
So, how did this product perform? Let the pictures be the proof.

Honestly, I don't see much difference at all. Here is a combined shot of my eyes closed so we can see a direct comparison:
What do you think? If there is any difference at all, I can't see it. I had high hopes for this product and have used it diligently for 1 month. I even made sure to postpone this review until the last possible moment just so I could make sure my pictures were accurate to the full time.
As a little bit of a disclaimer, I'm honestly thinking that the reason I saw no difference is just because my lashes were already so full and long. Maybe mine are tapped out as far as they can go, I don't know. I really don't doubt that if I had an issue with my eyelashes, this product would deliver. Like I said, I have used Latisse before, but that was several years ago. With the Latisse, I definitely saw results, though at the time I was not a blogger, so I took no pictures of the progress.
As far as a direct comparison between Latisse and LashFood, there are differences other than just the results I saw. Like I said earlier, Latisse issues a warning that it may darken your eyelids and it may darken the colored part of your eye - that scared the heck out of me at the time and it was a constant worry. The LashFood has no side effects like that. Another thing I liked better about the LashFood is its applicator. It is all contained in one bottle, brush and serum together. With Latisse, it is much more eye-doctor-ish because the liquid is in a little dropper bottle and you have one time use brushes that you have to open from their sealed packages each time with strict instructions not to reuse them. I always felt the was wasteful and unecessary - I think the LashFood got it right on that. A strange similarity I found was that when I started using either one, I had more lash loss initially. I've always thought that was weird since these products are supposed to make you grow and retain lashes, not lose them. Also with either product, my lashes did grow back in, so I guess the initial loss is normal.
In Conclusion...
I'm going to have to give this product a 3 star rating. I really was rooting for it, but for me it just didn't work out. I think it would be a wonderful product for anyone who has eyelash problems, or cancer patients that have lost their hair, but for someone like me whose lashes didn't really need any help from the get go, it just isn't necessary. So, please take my review with a grain of salt and just judge for yourself. If your eyelashes aren't as thick as mine, then you should definitely give LashFood a try :)
Subscribe to:
Posts (Atom)