Showing posts with label anna hrachovec. Show all posts

Friday, March 1, 2024

FO: Coo and Coy for Valentine's Day

This project has been planned for a few years now and I'm so glad I finally made it up :) This is the Coo and Coy pattern by Anna Hrachovec of Mochimochi Land. It's twin birds that make a heart when put together, so what better surprise gift to make my twin girls for Valentine's Day?
I managed to make this entirely at night after my kids were asleep over the course of a few days. The body shapes are very simple and I finished one body per evening and then one more evening for the limbs and assembly.
One very cool touch of this pattern is that one of the wings gets a strap on the back, which enables you to make the birds hold wings! Isn't that cute?! lol It also keeps them together very effectively.
The feet are littles hearts, which I think just adds to the cuteness factor even if they were a bit tedious to make. For this project, I dug in my stash and came across this unloved skein of Loops and Threads Impeccable in the Rich Orchid colorway and then I paired that with Red Heart Super Saver Perfect Pink for the wings and whatnot.
I did change the recommended hair style to make my birds more girly - think pig tails. I think it turned out very cute. The only head scratching part of making this was assembling the limbs so that things looked even but still made them face the right way and mirror each other. It was a bit of a challenge, but not too bad. 
So that's my latest cute creation :) My kids loved them, but of course they fought over who got the bird with the strap on its wing. Oh well. It made for a very cute and personal Valentine's present and I hope they love them for years to come.


Friday, August 25, 2023

FO: Hungry Snake

When my first nephew was born, I had no children and a lot of free time so I used to knit and crochet him all kinds of toys. My sister had another boy a year after my kids were born and that poor guy has hardly anything I've made him at all. So this year for his 4th birthday, I wanted to make him something he would really like that was made by his favorite aunt :)

This is the Sleepy Snake and Mischievous Mouse pattern by Anna Hrachovec of Mochimochi Land. This is another pattern I've had for years and always wanted to make up but just never took the plunge. The snake is essentially a double layered tube sock with a snake head and the construction is pretty interesting.

Once you have 2 snakes that are kissing, you shove the smaller snake inside the bigger one and then stuff the head and seam it together. I was working with stash acrylic yarn again and I ran out of the main color in the middle of the lining snake, so I switched to the blue from the mouse. The glory is that no one will ever know but me because that piece is completely hidden inside the outer snake. I used Red Heart Super Saver in Spring Green and Burnt Orange for the snake.

I deviated from the pattern for my snake and made him awake. I used embroidery floss and embroidered a chain stitch for his outer eye and then used a it of yarn in the center. I think it came out well without looking too creepy.
Next came the mouse :) This guy was so easy and I completed him in about an hour. I used I Love This Yarn in Soft Blue and Gray. Embroidering his eyes and whiskers took the longest, honestly.

The coolest part about this toy is that the snake can eat the mouse. Since the snake body is all ribbing, he's like a tube sock. You can shove the mouse down his throat to eat it.
And this gives you the tell tale lump of a snake who's just eaten. Cool, right? What little boy wouldn't love this? 
I had so much fun taking pictures of this project lol.  This was part of my nephew's birthday present this year and I'm happy to report that he loves it, which is always nice when making a toy for a kid.
My kids liked it so much they have asked for their own ever since I finished, lol. They both had fun pretending the snake was eating their hand. All in all, this was a fun project and I'm happy that my nephew has something that he knows I made for him that he can play with for a long time.

Summary:

Yarn: Red Heart Super Saver in Spring Green and Burnt Orange, I Love This Yarn in Soft Blue

Pattern: Sleeping Snake and Mischievious Mouse by Anna Hrachovec

Time: 2 weeks

Friday, August 4, 2023

FO: Baby's First Toilet

And now for one of the weirdest items I've ever made: a knitted toilet. But wait! There's more! It's a baby toy, complete with jingly ball inside :)
Kind of a strange story. My youngest sister was having a baby (she's had it now, this was made back in the spring) and when she was younger she used to always doodle our family as butts and toilets. Any time she had a school drawing project, she would make a toilet. It because her signature thing. We've given her various toilet themed items over her life, but when I saw that Anna Hrachovec had a toilet pattern, I bought it with the intention of making it for her one day. I've had the pattern for several years now and it was her getting pregnant that finally got me inspired to finally make this up.
This pattern is Flushie by Anna Hrachovec of Mochimochi Land. Even though I always wanted to make it, I never did because I knew it would be a fairly complicated shape so I just never felt up for the construction. Now that I've made it up, it's really not that bad if you are used to knitted toy construction. It's definitely not a beginner pattern if you want it to turn out like the example one.
You knit the toilet in parts and then seam it together. You start with the base, then the bowl and water, then the lid and tank. I used all stash acrylic yarn for this project: Vanna's Choice in white, and Caron Simply Soft in gray heather and baby blue. I've used these yarns countless times for baby toys and they hold up great over time.
Sewing everything together and stuffing it was interesting to keep things shaped correctly. You want it stuffed enough to stay the right shape, but not so stuffed that it looks too stuffed, you know? Then keeping the indentation for the water in the bowl was interesting. I got there in the end and I'm happy with the results, but it took a lot of focus and squeezing and stuffing to get it in the right shape. I added a jingly cat ball to the middle of the bowl of the toilet to keep the baby's interest.
Since I was making this for a newborn baby, I decided to make felt eyes. I used my trusty Sizzix Paddle Punches to make circles for the eyes and then I embroidered the white gleam and sewed these on. 
I think between the flusher, the eyes, and the friendly open mouth, it really makes this guy have a dapper appearance. Can a toilet seem dapper? lol I made this guy over the course of 3 days at the end of February and had him ready for my sister's baby shower mid March.
The baby shower was the big reveal and my sister loved it. I was very happy that she enjoyed it, lol, this is one that could have gone south easily, you know?
 

Now that it's done and the baby is out, I hope that he enjoys it as he grows. I hope this becomes a beloved baby toy that he has to explain to others when he's older hahaha. All in all, this was a very successful project and I would definitely make it again should the need arise. This was my first finished object of 2023 and it set the precedent for sure. 


Monday, September 23, 2019

FO: Tiny Superman

Sometimes an idea for the perfect project just pops into my head. Anyone else have those moments? Like there was no planning or anticipation involved, it just was suddenly in my head and had to be made. That is how this guy came about. It's Superman! But much tinier. I made this as a fun gift for a friend who I thought would appreciate it. Who wouldn't like to receive a tiny Superman in the mail?
I used the Knit Kid and Purl Girl pattern, which is free from Anna Hrachovec. I've used this pattern a number of times before and it always is so handy for making people, super or not. You can just change out the colors for the legs and body depending on what you want the person to wear.
This is my first time making the cape pieces from the pattern. I probably should've just attached it at the bind off, but I did an invisible seam and it caused the cape to stick out really far.
To help combat this, I tacked the cape down to the body. You can just barely see the stitch in the above photo. If this was a toy a little kid would be playing with, I would've done something stronger, but this is really just to look cool for a friend so I knew it would be fine like this.
The Superman emblem was the most complicated part to get looking right. I first embroidered the yellow yarn as a base for the shield, then I outlined it with red, then I had to sort of mentally envision an S and only stitch every other line before going back the other direction to fill in the spaces. I'm really pleased with how it came out in the end, but it took several tries and pulling it out to redo.
So on my way to the post office with this guy, I hooked him to my sun visor and took a few photos, lol. Here is Superman flying in to save the day!
And there he goes again! I attached a removable mini lanyard to his back so he can be hung from things, but it is removable so the new owner can decide how he will hang around. I had fun taking pictures of him for the short time he was in my possession though.

Any other Superman fans out there? This was a quick and fun gift to make and I had a lot of fun taking pictures, lol.

Friday, May 11, 2018

(Please Vote For Me!) My Entries in the Mochimochi Land Annual Photo Contest

Before I get into the details (in case you're only here for a quick read) - Please click here and vote for my video entry for this contest! I'm one of the 3 finalists and your vote would be greatly appreciated :) Read on if you have a moment to learn more about what this all is, lol.

Each year, Anna of Mochimochi Land hosts a photo and video contest. The idea is to use items you have made using her patterns and make some type of clever photo scene or video. I entered for the first time last year, and almost immediately after that deadline I thought of other ideas for the contest. I decided to use those ideas for this year's contest :) This meant I technically had a whole year to make it happen so I shouldn't be doing things at the last minute like last time (hahaha, yeah that's funny). Being me though, I waited until the final week to pull things together. I knitted my pieces throughout the year, but I didn't actually take pictures and whatnot until a week before the original deadline of March 31st. I was thrilled when the deadline was extended for another month. I used to take pictures as a side gig, but I never dabbled in video. Last year's video suffered for this - I still am super tempted to remake my video now that I know a bit more what I'm doing because I do believe in the idea and that it could've been cute if it was executed better. Anyway, this year's video was a long time coming  - it's cheesy and ridiculous and I'm pretty proud of it. I present to you: Stringer Things. (you can watch it here, or you can click here to watch it and to vote!).
This was quite the process to make! I definitely learned a lot of what I would do differently next time, but for my first real (and somewhat successful) animation I think it turned out rather well. Maybe my story was a bit too ambitious for a short video, but if you've seen the show Stranger Things I think it's still funny. I made all of the items you see in the video. I made Mike and Eleven especially for this, but the rest are items I've made over the years. Even the backdrop and ground are actually sweaters I've knitted :) No matter what happens in the contest, I did have a lot of fun making this (and I think my family did too - thanks, Kelly, for doing my audio!)

So anyway, there are 3 finalists in the video contest and the prizes are pretty sweet, so I would greatly appreciate if you could CLICK HERE TO VOTE. Please do watch the others and vote for your favorite. The others did a great job.

My photo entry received an honorable mention again this year. I will confess that I feel like I dropped the ball with this idea. My original plan was to recreate a Degas ballerina painting with mini knitted dancers. I needed a handful of ladies to make this work, but I only managed to make 2 :/ Womp womp. So while my Degas Project may still happen one day, I decided to use the two I had to make a different scene. I call this picture Ballet at the French Court:
Again I used a hand knit sweater for the background (interestingly though I did not knit this one! I bought the pattern sample from Emma Welford for her Polonaise Cardigan so I got the style I love but didn't have to make it myself! lol). I thought the bow and lack of buttons at the front was perfect to act as a stage curtain. The mini Notre Dame is a paper postcard I bought in France years ago and finally built. Anyway, it was fun even if it wasn't what I originally intended. I'm glad I got an honorable mention though :)

So that's another of my big deadlines met this year. Again I would greatly appreciate if you would CLICK HERE TO VOTE, lol have I said that enough yet? The voting is open until May 20th, so please do so promptly. Thank you so much if you do vote, and I will be sure to mention the outcome here when it is announced!

Monday, February 5, 2018

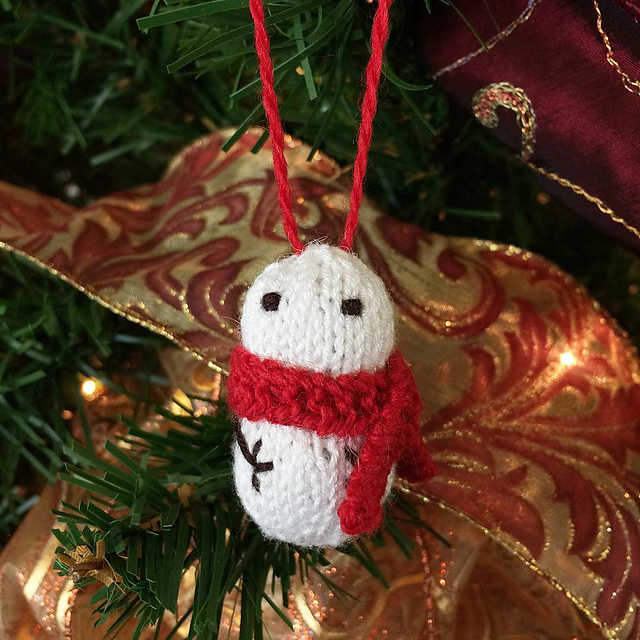
Christmas FO: Mini Snowmen Ornaments

This project kind of grew like the Grinch's heart - now that has got to be the cheesiest line I've ever written on this blog, lol. I bought this pattern last year thinking I would make Christmas ornaments for my family and friends. Ha ha ha, let's all take a moment for that deep laugh to subside. I always have great intentions for group gifts like this, but then I quickly become overwhelmed by just how many I would need to make to include everyone. So they were never made. This year I decided I would make one for my sister, since that was the original inspiration anyway, so I started making just one, which took about an hour. Well I couldn't make her a cute ornament and not my nephew, and since it was quick to knit I just made another right after in one evening. Thus the first two were created:
See the reason I wanted to make one for Kelly is this awesome charm topper thing I snagged at a thrift store years ago. It was some kind of family name thing that the previous owner never put together (where each name dangles from the one above in a line), and I had uses for 2 of the names. Kelly was my only family member present, so I grabbed it and put it away for just such a project. Now that it's made I really wish I could find these things for everyone, but that is just not feasible. Maybe I'll actually get good at lettering and make something next time. We'll see. Anyway, Kelly and Luke loved their snowmen, as evidenced here:
Luke kept wanting to hang it from everything, lol. His had a green scarf because that's his favorite color right now, which he thought was pretty cool.

Well, giving these sparked a chain reaction of family members wanting one. My mom saw theirs and her reaction was awesome about how cute they were, so when I had a little time one night I decided to make her one next:
My mom's favorite color is red, so it just had to be a red scarf.

Next I really wanted to make some for my Aunt and Uncle as a thank you, and I needed to get them in the mail so they would arrive in time, so I spent a few hours making these:
For these I got creative and switched up the color of the hanging loop. Fancy! lol.

I never know what to give my sister Shannon's husband (sorry, Justin!). He likes cars and such like - not exactly my forte, ya know? So this year he got Amazon money, but I wanted to give him a little handmade touch so I made him a snowman as well. And, you know, I can't send an ornament to the guy and not the girl - it's just not the way - so I made Shannon one as well.
After making these two, I deliberately gave Shannon the red scarf because it was a bit sassier looking, lol. And yes, I realize these look identical to the one for my Aunt, but I swear they are not (I even checked to make sure the photos were of different sets). Tricky little snowmen...

Finally on Christmas Eve, I really wanted to have something to give my grandmother and she LOVES miniature things so I knew this would be perfect. At that point, I had this pattern down to a science, so I knew I could get it made along with the other finishing touches I had to do that night.
I gave it to her at our big family breakfast on Christmas morning, and it promptly went into her miniatures cabinet. He looks pretty chill with that squirrel.

For anyone else needing to make a quick gift next year, this is the Mochimochi Snowmen by Anna Hrachovec and I can't recommend it enough. If you don't mind things being small and therefore slightly fiddly, this is a fantastic pattern. It's super fast and very easy as far as tiny knitted people go (I've made a several different patterns this size at this point and this was definitely the easiest - no arms and legs!). Also this pattern is only $2 on Ravelry - can't beat that. I also have quite a stash of fingering weight in various colors at this point, so the snow men were Golden Sun Bamboo yarn (from China on ebay) in white  and bleck for the embroidery, while the scarves were all from Knit Picks Palette in Macaw, Serrano, Cyan, and Limeade Heather. But really as long as you have white yarn for the body, you can use absolutely anything for the scarves and they all turn out cute.

So while I did not realize my dream of making one for everyone, I am happy with my little crop of 8 this year. Now that I know how easy this is to make, I'm sure that I will make more in the next few years for those who did not get one this time around. All in good time, folks!

Friday, December 1, 2017

FO: Mini Mike & Eleven

So this project was a sudden revelation a month ago. I was struck with the perfect video entry for the Mochimochiland photo contest one morning, and I would only need to make 2 mini knits to accomplish it :) Sounds good, right? So while I haven't heard anything about the photo contest this year (I'm coming to the realization that it is not happening this year - of course, because I'm actually prepared for it, lol), I wanted to show off my little creations on their own now.
I wanted to make a video based off Stranger Things. I'm not a big tv watcher, but my husband talked me into it and I really enjoyed this show. Now that the show is so popular I figured it would be the perfect subject for the contest since most people would get the references. All I needed were my two main characters: Mike and Eleven.
Can you see the resemblance? I knitted these before the second season came out, so these are based on their looks from season 1. Eleven seemed the most obvious to make first, so I started with her.
I started off with the Mini Ballerina pattern (oddly enough considering my other minis project this year, lol) and made a few modifications to make the characters. For Eleven these were my mods:
  • white yarn for feet
  • row 14 and 15 of head - changed to light brown for shaved hair
  • make separate stockinette stitch rectangle in blue yarn: 14 sts, 5 rows long - steam block as a half circle
  • arms: knit 2 rows skin color, 14 rows blue, then 2 rows skin color. Pull through "jacket" and body
  • tutu: bind off knit-wise, steam block and attach knit side up
It wasn't really a lot to change, but it was super fiddly since this is so few stitches in such small yarn. I think Eleven took me 2 hours to make. I'm pretty pleased with the likeness though :) Check the back view:
Being that she is Eleven, I had to make her a waffle too. The waffle will play a role in my eventual video (if there is a contest next year, that is), so I decided to go ahead and make one. I just cast on 6 stitches and increased for 3 rows, then bound off. Voilà! Waffle.
Mike was a little harder just from having to pick yarn for his shirt. It seems he's always wearing stripes in the show, but it's very difficult to represent thin stripes in 80s colors on such a small item. I looked through my multicolored sock yarns and liked this one best because it had lots of colors in a small area. This yarn is Yarn Bee Walk Away Sock in the Mamba colorway. I bought this at Hobby Lobby when I first started knitting and it has sat in my stash ever since, lol. I'm glad I finally used some of it (even if it is a miniscule amount). I think it worked great for Mike's shirt. I made the same jacket and arm mods for Mike and just changed the colors for his shoes and jeans, etc.
I'm super glad I had so many colors on hand to make this project happen. That's the thing about these mini knits - they are small but they take a lot of different colors to really give them character. For both of these peeps I used Knit Picks Palette in Oyster Heather (skin), Coriander heather (Eleven's hair and Mike's jacket), and Blue Note Heather (Mike's jeans and Eleven's jacket); Golden Sun Bamboo (from China on ebay) in Brown (hair and shoes), Nude Pink (Eleven's dress), White (shoes), and Butter Yellow (waffle); plus the Mamba for Mike's shirt. That's 8 different skeins of yarn! And all of these skeins are still technically full since I used less than 1 gram of each. Craziness. But when the mood strikes, I'm still glad I happen to have acquired so many colors of sock yarn.

SO there you have it - my Stranger Things homage :) I am really bummed that there is no photo contest this year, but I guess at least I am prepared if (hopefully when) there is a contest next year. And maybe I can get better at video software in the meantime. Yay for planning, lol.


Thursday, October 12, 2017

FO: Irma

Have you ever had a project that you've intended to make for a long time but just never got around to it? While packing to evacuate for Hurricane Irma, I planned several projects to kill the time I might have during and after the storm hit. The lions and birds came first, but I knew I may have more time on my hands then just those toys would fill. So I deliberately packed coordinating colors of yarn (that I was able to use for all the projects) and grab my Super-Scary Mochi Mochi book as well. I never want to be caught without a project, and what better opportunity to make the pattern that made me buy the book? So after making my other little critters, and after quite a bit of debris clean up, I cast on my dream monster. I call it Irma :)
This is the Hurly-Burly pattern from Super-Scary Mochi Mochi by Anna Hrachovec. The whole book is filled with cute/scary monsters (mostly cute) like werewolves, little witches, rats, etc. I like a lot of the patterns, but the Hurly-Burly pattern is what made me buy the book. Want to see why?
Wait for it...
Almost there...
Just tuck those legs all the way in...
And you have a different monster :) Isn't it great?! The monster eats itself, lol. I just love it. I'm a bit partial to the orange and yellow side - aren't her pigtails cute?
I love how both sides have stripes but on the purple side they are half the size. It's a cute touch. The stripes look particularly neat on the back:
Like a bull's eye, right? I also love the arms and legs - they are so cartoony and cute.
The only change I made from the pattern was to put the eyes a few rounds lower then the example, and I really like the result.
And the yellow back - see how the stripes are wider? This was a very straight forward pattern as long as you don't mind keeping up with the stripes. I decided to go with the colors she uses in the example mostly because I couldn't figure out any other colors at the moment I was packing and I already knew I'd be bringing these. The yellow is Red Heart With Love in Daffodil, the orange is a mystery thrift store acrylic, the dark purple is I Love This Yarn in Grape, and the light purple is a mystery acrylic I've had since high school and no longer know what it is, lol.
I love the individual touches of each side with their hair - see his little stubble hair?
And her pigtails?
And the feets.
And for the girl.
I'm super thrilled with how this turned out, and having this made up has given me great ideas for this year's MochiMochiland Photo Contest :) At the moment, this is sitting on a shelf in my sewing room and it makes me smile to look at it. And what better name than to call it after the storm that made it possible?