Showing posts with label new look 6150. Show all posts

Friday, August 19, 2016

FO: Lacey Wrap Front Top

This is one of those projects that make you wonder if sewing actually is fun, lol. All was well ... until it wasn't... and this project sat unloved on my ironing board for a solid 2 weeks yet I wouldn't allow myself to sew anything else. *sigh* I've had a little distance from it now, so I'm not as upset with it as I was, and I even think it's very pretty considering I thought I was going to have to throw it away at one point, haha. So here's a slightly more fancy project than my norm to break up the monotony of toddler print t-shirts: A stretch lace wrap front top.
As soon as I made my first Dawn to Dusk Top using New Look 6150, I sort of had a vision of this shirt. I wanted to make it up in an ivory stretch lace. I had thrifted a beautiful 100% silk chiffon blush pink knee length skirt earlier this year, and I just didn't have anything quite fancy enough to wear with it. I knew that silk chiffon and lace would be a lovely combo, and since this pattern uses a knit I could have an outfit that was both fancy and comfy. Behold!
I couldn't get a whole body shot, and I was in no mood to futz with it, so trust me when I say the skirt is knee length, lol. I already had a very nice ivory rayon jersey in my stash that I bought from a friend ($5 for 3 yards!). The fabric is buttery soft but just too sheer to wear alone in all decency. You could see everything through this stuff. So it sat for years until I made this up. I hunted for a stretch lace to use on top of it hoping that the pattern of the lace would help with the opacity, and I finally settled on this stretch lace from Fabric.com (affiliate link). It was the right color and not too expensive, so I snapped up 2 yards with a coupon back in June. Combined the two fabrics are still a bit sheer, but the pattern in the lace does distract from that fact so I felt fine proceeding.
You can see on the back that it's still a bit sheer, but not overly so. You can also see my unintentional pattern patching on the lace - score! Anyway, this projects marks a few firsts for me: this is my first time working with lace (other than trims, but they are a whole different animal), as well as being my first successful attempt at underlining anything. Early into trying to sew clothes, I tried to underline a shirt dress with disastrous effects. It did not matter what I tried (I even hand basted it flat with silk thread) the pieces would shift as I sewed them and they wouldn't line up, leaving me with puckers inside. How did people do this so effectively with no puckers? I decided I was ready to try it again since I have loads more experience under my belt AND I would be making this in a knit so I knew I could just fudge it if the fabric slipped (I could just stretch the other piece to fit). I did not have to fudge anything though! Which makes me wonder what I did wrong the first time around, but at least it worked now. After spending about 2 hours cutting out everything, I stitched the lace and lining together around the edges with a straight stitch.
From there I sewed the body together with no issues. I even managed to figure out a rather tricky instruction that I did wrong the first time I made this pattern. The bodice looked great, and when I tried it on it was a little snug but I realized that I still had all those straight stitched edges so the skirt wouldn't give like it should. I pulled out all those basting stitches and it was better, but it was not as loose as the first shirt. It's a snug fit, but not uncomfortable or unsightly, so it's ok. I just figure it's from having more layers of fabric. 
Look at that lovely shoulder draping! I stopped sewing the shirt that night after getting the body fully assembled figuring I would quickly insert the sleeves the next night and be done. When trying on the shirt though, I noticed that the shoulders were too wide - they hung off my actual shoulder by a few inches. This is a problem I have with the other top too, but I never realized the reason the shoulders fell off all the time was because the shoulder was drafted for a football player (stupid big 4 grading...). I just figured the problem on my first version was caused by me not doing that tricky instruction right that I mentioned before. Apparently it was a combination of that and the shoulder drafting. So, I started messing with the sleeve. I sewed the sleeve about 1.5" inward on the shoulder, but that looked really odd. "No worry," I told myself, "it's because there's all that extra fabric I don't need. I'll just cut it off and THEN sew in the sleeve." You can guess where this is going, right? I tried it on after this and it was even worse. The sleeve was pulling the fabric over to itself, which was completely eliminating the drape that the front needed. In fact it was causing diagonal drag lines toward the seam. This is when I realized I'd royally screwed up. I was going to have to put that cut out piece back in, which would cause a ridiculous looking seam around the entire arm hole. I was so frustrated at this point after all that work and unpicking (for the record unpicking a lightning bolt stitch in ivory thread from ivory rayon jersey is no picnic in itself, but add in stretch lace and you have a serious nightmare) and I just couldn't even look at this shirt anymore. I set it on my ironing board and didn't touch it for 2 weeks straight.
Sorry for the awful phone pictures, but I couldn't get my regular camera to show the extra sleeve seam. This what each shoulder looks like now, which is really not that bad considering all the trouble I had with it and how lost I was. I actually only cut a piece off of one side before I realized my mistake, but I had to make the other side match. Once I got the piece sewn back in, I basically pinched a pleat on the other sleeve opening to try and match the other side. It's not exact, but who's going to stare at both my shoulders to compare? So not I've ended up with a "design detail", lol. Oh, and as fate would have it the shoulders fit fine now :/ And I was really surprised when I put on the shirt - you don't even notice the extra seams. All that stress for nothing ...
All that unpicking caused a couple of holes - only 2 which is amazing considering the fabric types and the tension on the lightning bolt stitch. Happily they were at the seams and my thread was an exact match, so I was able to just stitch back and forth a few times to secure the fabric and I haven't had any problems. That little lump in the circle above is where I did this - looks pretty good, eh?
So after all that, I now have a very pretty lace shirt that I really like. And it does look really good with my chiffon skirt :) Now, since you've endured this whole word-filled post, you get rewarded with this super sexy photo of me trying to look demure and swishy in lace. You are welcome.
So next time I run into issues, I'll try to take my own advice and not get so upset about it :) Don't sweat it, folks! It's just fabric :) Considering this was my first time with lace and my first time underlining, I'm pretty thrilled with my new shirt.

Summary: 
Fabric: 1.5 yards ivory rayon jersey (similar here) - $1.50, 1.5 yards Ivory Stretch Lace - $8.50
Pattern: New Look 6150
Notions: knit stay tape - $0.10, thread - $1.50
Time: 10 hours
Total Cost: $ 11.60

Monday, August 1, 2016

Progress, Not Perfection

I have a simple sewing project that will be coming up this week on the blog, but I wanted to interrupt the finished stuff to report on a few in progress items :) I'm in the middle of a new sewing project that has been thrown in the naughty corner for the last week...
This picture was before I ruined it, lol, so don't let its looks deceive you. It's New Look 6150 made up in an ivory stretch lace and underlined with ivory rayon jersey. All was well until I tried to attach the sleeves. Even though I made this shirt once before, the sleeves on that one drive me crazy and I didn't know why. Now I know: the line backer shoulders they grade the larger sizes up to have. Ugh. I didn't realize this until I tried it on sleeveless and saw how far the shoulder drooped off my actual shoulder, so I've been trying random fixes and at the moment I have no idea what to do. It may just end up with crazy dropped shoulders and an added seam to fix how I tried to fix it at this point. I just couldn't look at it anymore last Sunday, and now it's sat on my ironing board for an entire week with no work at all. So what do you do when you've lost your sew-jo and just can't bare looking at your current disaster? Switch to knitting!
Right when the shirt debacle happened, I decided to join in a knit along. Susan B. Anderson just put out a new pattern called the Smooth Operator Socks that is designed specifically for striped yarns so you don't disrupt the striping at the heel. This is an issue I ran into with my Arne & Carlos socks earlier this year, so I was really interested to see what her answer was, and the pattern is currently on sale at a discount for the Knit Along she's hosting on her Ravelry group, Itty Bitty Knits. It's an amazingly simple pattern, but it's beautifully thought out and I ended up with a perfectly fitting sock that still has a striping heel! She gives a great breakdown on how to match up your socks as well as how to match the heels and get a great fit. I don't have all that much self striping yarn in my stash, and I didn't want to use my beloved Le Petit Prince Opal sock yarn until I knew the pattern fit and worked well for me, so I pulled out this Patons Kroy Sock yarn in the Meadow Stripes colorway (which I actually purchased after Susan herself made a pair with the same yarn earlier this year). Since this sock is entirely stockinette stitch, I was able to knit up this sock in just 4 days! Isn't that crazy? I finished it up last night and I'm excited for the second one. Anyway, if you're at all interested in the pattern now is the time to get it at a discount plus you can join the Ravelry group Knit Along to potentially win some prizes :) What's not to love about that?
 Sadly I did set my Alecia Beth cardigan aside for these socks, but I have made significant progress on it in the last month before the socks came around. I'm almost to the waist and I love how the rows of cables start to disappear on the back - see that diagonal at the lower back? So neat.
And here's how it looks on the front. Sorry for the awful pictures - my current phone's camera is horrid and doesn't like color or detail. The yarn here is a nice rich navy color in real life. I'm actually really enjoying knitting this sweater and it seems to go faster than my first fingering weight sweater did. I guess I've just made more things with fingering weight in general and I don't mind it so much anymore. So, I'm slowly plugging away on this as well.

I also have a small smattering of projects that haven't seen light in months (my Fuzzy Mitten KAL project is about 50% done, my Antarktis is also about 50%, and another shawl I started months ago is still just a few inches in overall size, lol), but I'm trying not to be too hard on myself about them. I know I will eventually get back to them, but with the limited crafting time I have right now I try to just go with what I really want to work on to keep that feeling of it being fun. Sewing and knitting are my escapes from the drudgery that is clearing out my house and getting ready for an estate sale (ugh, heavens) which feels like it will never end. I'm glad I have something soothing to help me wind down after hours of unpleasant real life junk each night.

So that's what I'm working on now. What are you working on?

Monday, May 2, 2016

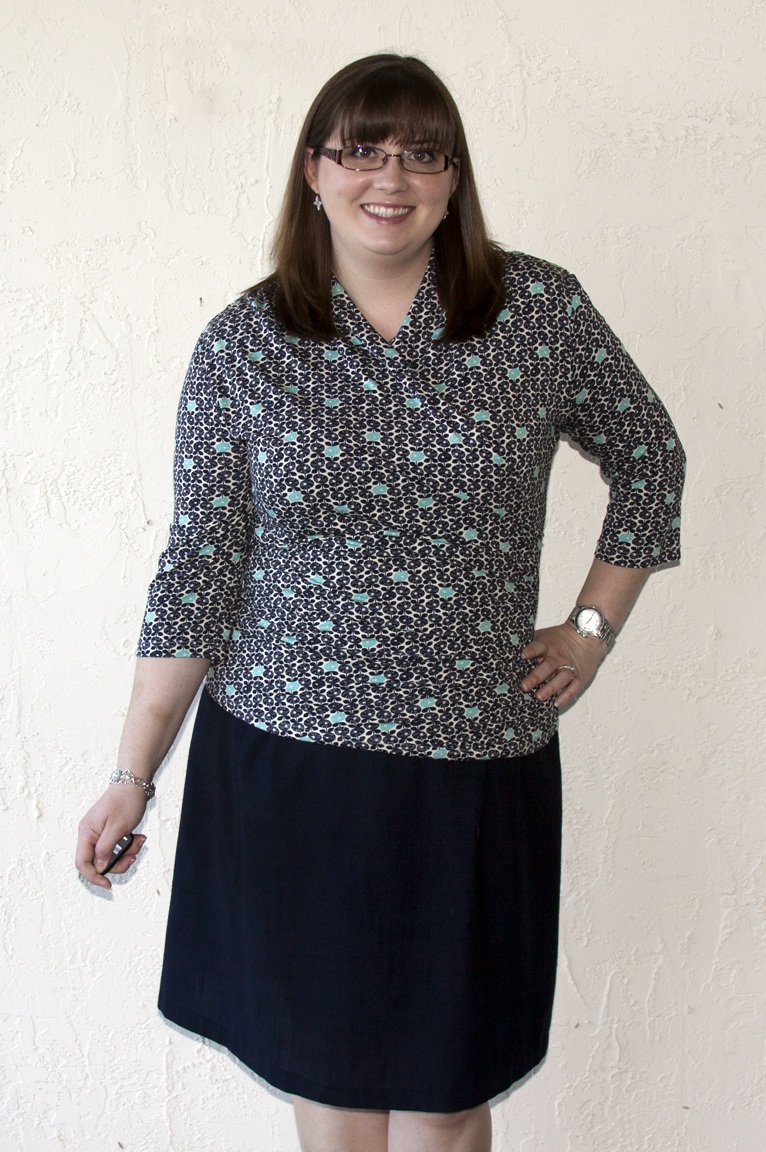
FO: Dawn To Dusk Knit Top

You guys ... I sewed something! And it was successful! It feels like a small miracle to type that, but it's true. My life has been so crazy over the past few months with being half moved and working on getting my house ready to sell on top of my usual schedule and household duties. It feels like I never get anything much done, and I never feel justified using my time to sew since I have to plan when I will and head to my sewing room away from home. There's just so many other things that need to be done that sewing feels frivolous. But you know what - you have to still take care of you and do the things you love to help with stress. Thankfully I always have knitting, but I've seriously only wanted to sew for months now since it's not an easy possibility like it used to be. I decided to finally carve out some time on a Saturday night and just get sewing.
Naturally, the first thing I sewed up after my long break is something that I was supposed to make up last month. Craftsy contacted me a few months ago and asked if I would like to review one of their sewing kits. Like I would really say no, right? I've actually been a buyer for several of their kits since they sell for such deep discounts in some of their sales that it's cheaper to buy the kit than to buy the pattern and fabric separately. But to get one for free? Even better! They were nice enough to even consider my style and picked a kit they thought I would like. Once I approved, they sent it out and I was super excited when it showed up.
The kit is called the Dawn to Dusk Knit Top, currently available for $20.80. The kit includes New Look 6150 and just shy of 2 yards of a medium weight viscose knit from Confetti Fabrics. You guys, I was on the fence since this is a rayon knit technically speaking (which I usually shy away from because it's too clingy to be flattering on me), but this fabric is fantastic! Normally when I think of a rayon knit, I think of the super thin stuff that clings to all your lumps and bumps, but this is thicker and is heavy enough to drape nicely but not cling. It's more like an interlock knit in thickness, but it's super soft from the rayon. This fabric really made me rethink my swearing off rayon knits in general. I know I received it for free, but for real ... this stuff is awesome.
Isn't the flower print cute?!
I was unsure what size to make on a New Look pattern, so I decided to measure across the bust on a wrap top I already have that fits well and compare to the finished measurements. I went with the largest size, 16, and it was just the right fit for me. The pattern was simple enough if you've sewn with knits before. The only head scratching part is the gathering at the sides and which direction to sew first since one side gets gathered and the other does not, but the instructions tell you very clearly. I used a lightning bolt stitch on my sewing machine to sew everything up. I also went with a twin needle hem since it's my favorite.
The top is technically a wrap top, but the wrap is secured in the side seam. Wraps are another thing I usually stay away from because I hate having to constantly adjust them to avoid indecent exposure. The pattern photo looked pretty high (borderline puritan high, really), so I figured I would try it out as it was. I'll confess - the wrap is still pretty high especially if you're comparing to a ready to wear wrap top, but guys this shirt is so comfortable! I wore it to work and did not have to worry about it being low one time. It relaxes a bit throughout the day and became a little lower than the photos show, but still plenty of coverage and no bra flashes.
Construction-wise, I made a straight size 16. The only changes I made were 1) I added clear elastic to the shoulders (the pattern calls for twill tape) and 2) I shortened the sleeves by 2.5" so they hit me at a better spot. I almost cut the back piece on the fold instead of as 2 pieces, but I noticed the center back curves in and wanted to try this out. This shaping was like a built in sway back adjustment and it worked great. Also, the print is so busy that you really can't see the back seam anyway.
All in all this was a lovely project :) The fabric sewed great, the pattern fit straight off, and I'm comfortable in the finished product - I call that a win. I will certainly be making more of this pattern - I have a plan for a cream version with stretch lace on the front, and my mom has requested one too. And if I find more fabric like this I will certainly snap it up fast! So if you want a nice win of a project like this, I definitely recommend Craftsy's kits. It takes the guess work out of the patterns involved and gives you appropriate fabric in the right amount. Plus you can already see what your project will look like finished up thanks to the modeled photos. This kit is still available (click here), and I know I will certainly shop Craftsy's kits again in the future.

Thank you Craftsy for such a fun top and opening me up to new sewing possibilities!

Summary: 
Fabric: 1.9 yards of Blooming Dots Viscose Knit by Confetti Fabrics - Free from Craftsy
Pattern: New Look 6150 - Free from Craftsy
Notions: clear elastic - $0.25, thread - $3.00
Time: 7 hours
Total Cost: $3.25
.
*I received this kit for free from Craftsy, but my opinions are 100% my own. Craftsy links are affiliate links.