I learned that Dollar Tree sold amigurumi kits and I set off on the mission to try them out and see if they are any good. Curious if they are good for beginners or kids? Head over to my You Tube Channel or click the box below to see how my projects turned out.
Showing posts with label kit. Show all posts
Friday, August 9, 2024
Wednesday, May 30, 2018
FO: Yaletown Dress
This is the Yaletown Dress by Sewaholic patterns. I saw it around the sewing web when it was first released and it seemed kind of hit or miss even then with who liked it and who didn't. Some people had it turn out great for them and others were not very happy. I filed all that info away and a while later (quite a while, actually) I came across a kit during a Craftsy sale that included the Yaletown physical pattern and 4 yards of poly crepe to sew it with for $28.78. This wasn't dirt cheap, but it was certainly a good value for what I got and I was interested in the pattern anyway, so I bought it. And then it sat in my stash for a few years, lol. I put this dress on my official Make 9 in 2018 list, so I decided this would be the year I finally made it up. I was trying to decide if I wanted to make it up in this fabric or another poly crepe as a muslin, and in the end I decided to just use this fabric and go for broke. Technically that makes this my most expensive muslin to date, lol.
I decided to go ahead and make some of my usual pattern adjustments to this before cutting out the fabric. I lengthened the bodice by 1.5" for my long torso, and since I fell outside the waist on the size chart I added 2.5" to the front bodice pieces. That seems like nothing now, but I was so stressed about the adjustments at the time. Once I was cut out and committed, I just started sewing it together. I managed to get it completely made except for the sleeves - tried it on - and felt like a dumpy mess :/ It was way too big, way too blousey, and very unflattering. Like really. I was so bummed. I was still determined to finish this, so I added the sleeves before I set it aside to muster up the courage to undo the entire waist (which was a self enclosed elastic waist - so that's 3 seams to undo) and side seams. I just couldn't move on and sew something else while this waited, so after almost a month of it haunting me I finally cut it all apart. I took out all the width I added at the side seams (so 2.5") and sewed that back together, then redid the waist. It doesn't sound like much to type it, but just the unpicking took an hour. I had to shorten the bodice by 5/8" because I accidentally picked a hole in the fabric, but I think that was for the best. This made things much more acceptable looking overall - I just had to deal with the drape next.
The pattern tells you to put a single button at the cross point in the neckline for security, but I didn't love that you would see a button there. I decided to sew on some snaps instead, but figuring out where to put them was a lot of trial and error. I can see now that the neckline goes lower than I wanted it to anyway, so it doesn't really like to sit right on me after pulling it up to where I wanted it to be. I didn't trust just that one snap to hold everything, and the drape was hanging funny anyway, so I added another snap under my boob (I'm touching both snaps in the above photo). After wearing this out in public, I definitely need to change to the button - I had 2 wardrobe malfunctions in church with the top snap coming undone *whoops*. So this will change sometime. But it made things at least wearable and the drape didn't stick out so much that it looked like I was storing fruit in there.
The fabric is a very nice quality poly crepe with lots of drape. I was a little worried (as I am with all polyester fabrics) that it would be too warm for Florida, but this is so drapey that it wasn't a problem and I was not hot at all. In fact I almost have a little issue with it feeling too light in the skirt - it feels like nothing on my body which makes me nervous. I like to feel a solid cloth covering my butt at all times, lol. I think I'll have to finally make a slip just so I don't feel like I'm going to expose myself all the time in my lighter weight dresses.
The pattern also includes a waist tie - which I lengthened by about 10 inches after reading other reviews saying it was short. To be honest I almost didn't make the tie. I completely forgot about it, did all my other fixes to the dress, and then while putting the pattern away I saw the fabric still pinned with it. I'm pretty sure I said, "Aw man..." in a whine in my sewing room. So I sat down and made the tie. I even forgot about the tie again when taking these pictures - I took all the pictures I would need for this post, then saw the tie sitting in my sewing room after I had already changed and put the camera away. I was not happy, lol, but I put the dress back on an retook the photos - thus why you see the belt in some pictures and not in others. With this fabric I don't think the tie is a necessity for the design anyway, but I do feel a bit more secure with it tied at my waist. It kind of keeps everything in place since my elastic is not super firm. After taking these pictures, I was putting the dress away I noticed that I forgot to sew the hole in the tie I left to turn it right side out, lol. That poor, unloved tie.
Here are the snaps up close. It was really a challenge to figure out where to put them. I sewed on the one at the neckline once, tired it on, then realized I needed to make it a 1/4" lower. So I picked it off and tried again. It still doesn't sit perfectly, but it's passable, so I left it.
Now if you're wondering why I felt this was unflattering, these side photos will show you. It's not bad from the front and back, but the sides aren't doing me any favors with all the blousey-ness. You can see how the snaps close up the gap at the drape though. Before I redid it, that whole area under my boob stuck out like a hammock. Because of the interfacing in the facing, the drape wants to pull away from the body. It also adds weight to pull it downward - thus looking like your own personal handfree shopping bag at your waist. When I tightened things up it definitely helped, but that snap below the boobs really was the fix.
Not as bad from this side, but still not great. I always try to accentuate my waist to avoid feeling like a big lego brick, and I tend to avoid gathered skirts to not make my hips look larger, but I thought that this thin fabric and the elastic waist would help with that. I was really happy with my Mayberry Dress, so I figured this would be the same. I think I shouldn't have added that extra length and it might have made it a little more to my taste.
I do love that this has pockets though :) Everything should have pockets! I also like the sleeves. Normally I steer away from anything called a "flutter sleeve", but this is more subtle and just a little roomy - the perfect combo. Also it's really not bad without the tie - the channel for the elastic is narrow so I don't feel like it's unsightly or anything. So I will probably wear it both ways.
So that's my dress that almost wasn't, lol. This one really fought me, but I'm glad I stuck with it and now have something to show for my time. I have already worn it and I think it will be a nice summer dress - nice enough for church, yet overall a more casual look, plus breezy enough for the excruciating heat that is fast approaching. I don't know that I will make this pattern again, but it was a good learning experience and a test in my determination :) Also I've finally made something on my make 9 list during the year I first committed to it! Woo hoo!
Summary:
Fabric: 3 yards poly crepe - from Craftsy Kit
Pattern: Yaletown Dress by Sewaholic Patterns - $28.78 total from Craftsy Kit
Notions: Pellon SF101 interfacing - $0.50, navy thread - $2.00, 1 yard of 1/3" elastic - free,
Time: 12 hours
Total Cost: $ 31.28
Monday, May 2, 2016
FO: Dawn To Dusk Knit Top
You guys ... I sewed something! And it was successful! It feels like a small miracle to type that, but it's true. My life has been so crazy over the past few months with being half moved and working on getting my house ready to sell on top of my usual schedule and household duties. It feels like I never get anything much done, and I never feel justified using my time to sew since I have to plan when I will and head to my sewing room away from home. There's just so many other things that need to be done that sewing feels frivolous. But you know what - you have to still take care of you and do the things you love to help with stress. Thankfully I always have knitting, but I've seriously only wanted to sew for months now since it's not an easy possibility like it used to be. I decided to finally carve out some time on a Saturday night and just get sewing.
Naturally, the first thing I sewed up after my long break is something that I was supposed to make up last month. Craftsy contacted me a few months ago and asked if I would like to review one of their sewing kits. Like I would really say no, right? I've actually been a buyer for several of their kits since they sell for such deep discounts in some of their sales that it's cheaper to buy the kit than to buy the pattern and fabric separately. But to get one for free? Even better! They were nice enough to even consider my style and picked a kit they thought I would like. Once I approved, they sent it out and I was super excited when it showed up.
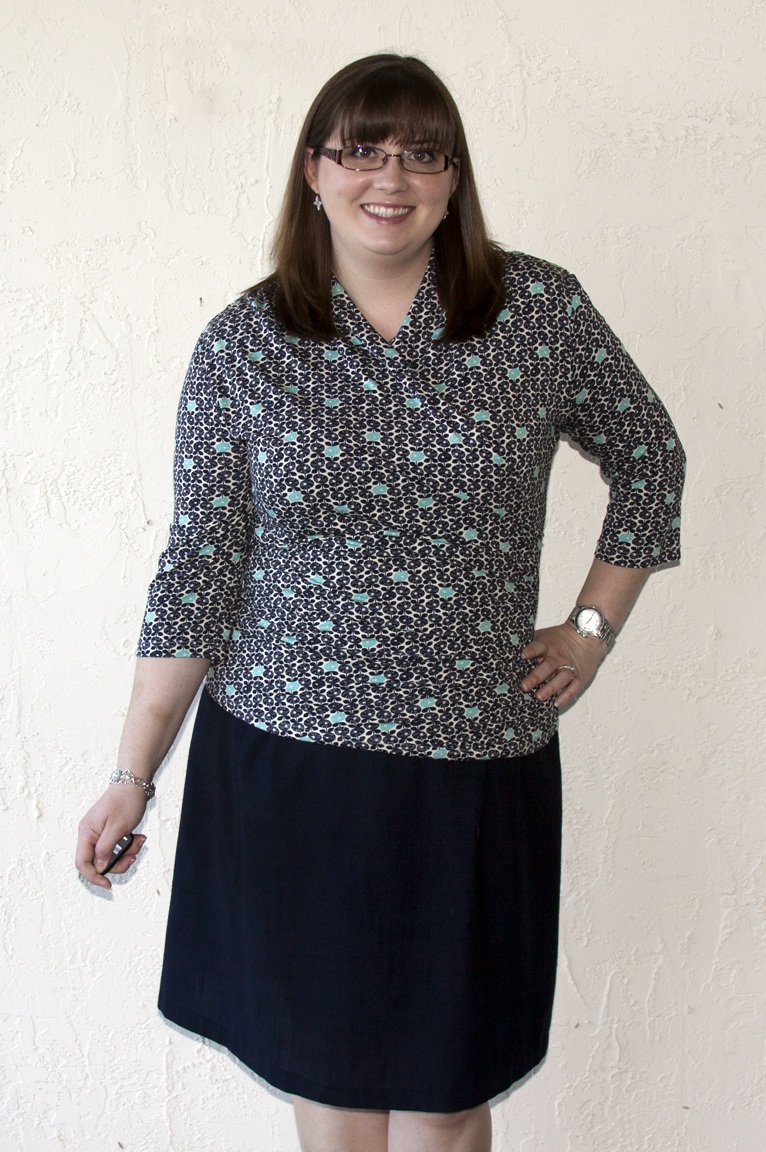
The kit is called the Dawn to Dusk Knit Top, currently available for $20.80. The kit includes New Look 6150 and just shy of 2 yards of a medium weight viscose knit from Confetti Fabrics. You guys, I was on the fence since this is a rayon knit technically speaking (which I usually shy away from because it's too clingy to be flattering on me), but this fabric is fantastic! Normally when I think of a rayon knit, I think of the super thin stuff that clings to all your lumps and bumps, but this is thicker and is heavy enough to drape nicely but not cling. It's more like an interlock knit in thickness, but it's super soft from the rayon. This fabric really made me rethink my swearing off rayon knits in general. I know I received it for free, but for real ... this stuff is awesome.
I was unsure what size to make on a New Look pattern, so I decided to measure across the bust on a wrap top I already have that fits well and compare to the finished measurements. I went with the largest size, 16, and it was just the right fit for me. The pattern was simple enough if you've sewn with knits before. The only head scratching part is the gathering at the sides and which direction to sew first since one side gets gathered and the other does not, but the instructions tell you very clearly. I used a lightning bolt stitch on my sewing machine to sew everything up. I also went with a twin needle hem since it's my favorite.
The top is technically a wrap top, but the wrap is secured in the side seam. Wraps are another thing I usually stay away from because I hate having to constantly adjust them to avoid indecent exposure. The pattern photo looked pretty high (borderline puritan high, really), so I figured I would try it out as it was. I'll confess - the wrap is still pretty high especially if you're comparing to a ready to wear wrap top, but guys this shirt is so comfortable! I wore it to work and did not have to worry about it being low one time. It relaxes a bit throughout the day and became a little lower than the photos show, but still plenty of coverage and no bra flashes.
Thank you Craftsy for such a fun top and opening me up to new sewing possibilities!
Summary:
Fabric: 1.9 yards of Blooming Dots Viscose Knit by Confetti Fabrics - Free from Craftsy
Pattern: New Look 6150 - Free from Craftsy
Notions: clear elastic - $0.25, thread - $3.00
Time: 7 hours
Total Cost: $3.25
.
*I received this kit for free from Craftsy, but my opinions are 100% my own. Craftsy links are affiliate links.
Naturally, the first thing I sewed up after my long break is something that I was supposed to make up last month. Craftsy contacted me a few months ago and asked if I would like to review one of their sewing kits. Like I would really say no, right? I've actually been a buyer for several of their kits since they sell for such deep discounts in some of their sales that it's cheaper to buy the kit than to buy the pattern and fabric separately. But to get one for free? Even better! They were nice enough to even consider my style and picked a kit they thought I would like. Once I approved, they sent it out and I was super excited when it showed up.
The kit is called the Dawn to Dusk Knit Top, currently available for $20.80. The kit includes New Look 6150 and just shy of 2 yards of a medium weight viscose knit from Confetti Fabrics. You guys, I was on the fence since this is a rayon knit technically speaking (which I usually shy away from because it's too clingy to be flattering on me), but this fabric is fantastic! Normally when I think of a rayon knit, I think of the super thin stuff that clings to all your lumps and bumps, but this is thicker and is heavy enough to drape nicely but not cling. It's more like an interlock knit in thickness, but it's super soft from the rayon. This fabric really made me rethink my swearing off rayon knits in general. I know I received it for free, but for real ... this stuff is awesome.
![]() |
| Isn't the flower print cute?! |
The top is technically a wrap top, but the wrap is secured in the side seam. Wraps are another thing I usually stay away from because I hate having to constantly adjust them to avoid indecent exposure. The pattern photo looked pretty high (borderline puritan high, really), so I figured I would try it out as it was. I'll confess - the wrap is still pretty high especially if you're comparing to a ready to wear wrap top, but guys this shirt is so comfortable! I wore it to work and did not have to worry about it being low one time. It relaxes a bit throughout the day and became a little lower than the photos show, but still plenty of coverage and no bra flashes.
Construction-wise, I made a straight size 16. The only changes I made were 1) I added clear elastic to the shoulders (the pattern calls for twill tape) and 2) I shortened the sleeves by 2.5" so they hit me at a better spot. I almost cut the back piece on the fold instead of as 2 pieces, but I noticed the center back curves in and wanted to try this out. This shaping was like a built in sway back adjustment and it worked great. Also, the print is so busy that you really can't see the back seam anyway.
All in all this was a lovely project :) The fabric sewed great, the pattern fit straight off, and I'm comfortable in the finished product - I call that a win. I will certainly be making more of this pattern - I have a plan for a cream version with stretch lace on the front, and my mom has requested one too. And if I find more fabric like this I will certainly snap it up fast! So if you want a nice win of a project like this, I definitely recommend Craftsy's kits. It takes the guess work out of the patterns involved and gives you appropriate fabric in the right amount. Plus you can already see what your project will look like finished up thanks to the modeled photos. This kit is still available (click here), and I know I will certainly shop Craftsy's kits again in the future.Thank you Craftsy for such a fun top and opening me up to new sewing possibilities!
Summary:
Fabric: 1.9 yards of Blooming Dots Viscose Knit by Confetti Fabrics - Free from Craftsy
Pattern: New Look 6150 - Free from Craftsy
Notions: clear elastic - $0.25, thread - $3.00
Time: 7 hours
Total Cost: $3.25
.
*I received this kit for free from Craftsy, but my opinions are 100% my own. Craftsy links are affiliate links.
Labels:
craftsy,
kit,
new look 6150,
review,
sewing,
sewing with knits,
wrap top
Wednesday, April 9, 2014
WIP Wednesday: Easter Animals Edition
I almost don't believe it myself, but I have finished all of my wips from last week! Prepare for a pretty epic FO Friday, lol. Luckily, there are always tons of cute things to make so I didn't go without a project ... or 3.
First up is the Silly Duck from Fuzzy Mitten. There is a sort of unofficial knit-along for this pattern this month, so I decided to jump in on it. It's a super cute design and the pattern is half price, so why not? I decided to use a mystery yarn that came in the big bag of yarn I was given. It took me forever to figure out what it was but I liked it so much that I endured the search, lol. Turns out it's Red Heart Value Textured Yarn and I absolutely love it. Of course, it's discontinued and you can't even find it on ebay anymore. Oh well. I'll enjoy the skein I have. This yarn is great for knitted animals - it's just fuzzy enough without making it to where you can't see the stitches. I'm also using some old Caron Sayelle in baby yellow for the feet - another thrift store yarn that I am newly in love with. It may sound strange, but the yarn is actually a little stretchy, so it makes the stitches hold together for a tighter fabric = perfect for animals! And I have this yarn in a bunch of colors - hooray! lol I'm really excited to finish up the duck. I'm about half way through at this point :)This next project is a new/oldie. I was at a local thrift store on Friday night after work (I was actually there to buy knit fabric) when I saw this weird box in the craft section. It was all taped up and you couldn't see anything from the outside, but it had a little label on it that said Bucilla Yellow Brick Road Coverlet Kit. I asked the cashier if I could open it up before I bought it just to check it out and she let me cut into all the tape and I found all this stuff inside. For some reason, I loved the blanket and wanted to make it, lol. I know it's kind of silly and definitely 70s looking, but I think it's cute. The weirdest part is that the kit had everything - all the yarn and hooks to make it - except the pattern! I was so bummed! I didn't buy it that night, but I decided to see if I could find it on ebay that night. I found where someone else had put the same kit up for sale and they had taken pictures of all the pages of the instruction! Score! lol So having the pattern I went back and bought the kit the next day - and it was only $3. Everyone I show the blanket picture to thinks I'm crazy, lol, but I don't care, I'm making it. Incidentally, the center section is Tunisian crochet (thus the long "afghan hook" in the kit), so this will be a great opportunity to give Tunisian a try :)
And I have been dying to make my own Well-Dressed Bunny ever since I found the pattern a few weeks ago. I blame Watership Down for this desire :) Plus it's coming up on Easter, so what better time to make up a bunny? I put off making it because I really wanted a honey/brown color for the body and I didn't have it in my stash. Thank heavens for an April Fool's Day sale on Joann.com :) I got 2 different yarns in hopes that one would be the right color, and this Patons Canadiana in Flax is exactly what I wanted. I can't wait to make him up! Maybe I'll really get on the ball and make the Bunny Puppet too. Here's hoping!
So that's my crazy list of things I'm up to now :) Head over to Tami's Amis' Blog to see what lovely things other are making.
Friday, March 29, 2013
Crochet Update: Meet Chiquito Rene the Monster!
Since I had a little time after I finished Marisa's headband when my husband had a back procedure done, and also since all my other crafting supplies are at my new house, I decided to make up my FreshStitches Monster Kit :) Let's be honest, I've been dying to make him up. This is a pattern I've wanted for a while and I'm sure you can see why:
I have dubbed this little guy Chiquito Rene :) One of the guys I work with is named Rene and when I brought it to work to show off, my other coworker Sandy said he looked just like Rene (she said the ears and the surprised expression gave it away) and the name just stuck lol. Also, the people in question are Spanish, so of course this became Chiquito (little) Rene. The pattern is Roosevelt the Monster from FreshStitches if you want to make your own :)
Here he is from the back. The only thing I don't love is that you can see the color changes on the back. On the legs they end up facing the inside so you don't notice them when he's all put together. I need to learn a way to hide the color changes next time.
As far as the kit goes, I really loved it. I actually ended up with more yarn than I needed (I crochet very tightly - I can't really help it) and the yarn is 100% wool. I've never made an amigurumi with anything but acrylic before and I am really surprised by the difference. This guy is much more springy than my other animals and the only difference is the wool so that must be why. So now I know that wool makes a great little stuffed animal too.
I highly recommend the kits from FreshStitches. This is my first time getting one and I am extremely happy with it. The kit includes high quality yarn and definitely all that you need for your project. These kits would be great gifts for someone who wants to try out amigurumi - you can even get a real beginner kit that includes a hook and stitch markers if you want. So keep them in mind for the crafter in your life :)
Friday, March 22, 2013
My Mail-Time Surprise!
I had a lovely surprise in the mail for me today :)
It's a kit from FreshStitches! As you know, I use her patterns all the time for the cute little animals I make. Did you know she also offers kits?! Each kit includes the pattern, all the yarn you need, and safety eyes - just add stuffing and you're good to go :) I have never tried the kits before, just the patterns, and this kit is Roosevelt the Monster made in limited edition colors of purple and yellow. The monster kits were made especially for the Pittsburgh Knit & Crochet Festival last weekend and Stacey put the left overs on the website for sale, so I snagged one :)I also got a cute little button with Nelson the FreshStitches Owl on it :) So cute! And I even got a coupon for my next pattern purchase.
I can't wait until I have the time to make this guy up - and you know I'll post the results :)
Labels:
amigurumi,
crochet,
freshstitches,
kit,
stacey trock
Subscribe to:
Posts (Atom)