Showing posts with label free pattern. Show all posts

Monday, May 20, 2024

FO: This Vera Top Used To Be a Dress!

This project had an unconventional start. I was walking through Old Navy (which is an incredibly rare occurrence one its own) and was loving the fact that they had so many items in my favorite color green. I grabbed a few items, but they had one that I would never wear: A spaghetti strap knit dress.


The fabric was a lovely and soft viscose jersey and I felt it thinking I wish it was not this dress. I went home and was ordering a different dress from their website (because they didn't have my size in the store) and I had the idea - Duh! I can sew things. And this dress has more than enough fabric to remake into a top I would love. 

I made a whole video where I outline the whole process of using this dress as yardage - things to consider, how to know if you have enough for the pattern you want to make, etc. Click through to watch the video and see how to do this for yourself!

This is still a blog though, so now back to the regular post about this FO :)

I was able to cut the front and back pieces on the fold at the center front and back of the dress, so these areas all look exactly as any other shirt would. I went with my new love - The Vera Knit Top, which is a free pattern from Forget-Me-Not Patterns. This pattern is everything a free pattern should be - a wonderful gift to test out the style of that company's patterns and get a great garment in the process.
The first time I made this pattern, I was very happy with how it turned out, but having never sewn a V neckline before it wasn't 100% perfect. I am so proud of the V on this version. It turned out exactly with the seam on the middle line of the V. Excellent. 
Really the only difference between this version and one sewn from yardage is that I have a seam going down the center of the sleeves. With these large sleeves and limited fabric, I had to use the original side seams. I just made sure to line up that seam with the center of the pattern piece and it is perfectly aligned with the shoulder seam, so it looks very deliberate. If I didn't tell people this was formerly the skirt of a dress, they would never know. The seam line just looks like a design detail.
I am so incredibly happy with how this top turned out. I have worn it several times already and it goes with a surprising amount of my skirts, which is a great bonus considering I was so smitten with the color that I didn't really think about how well it would incorporate into my wardrobe, lol. Now no knit dress is safe! They all look like fabric to me :)

Summary:

Fabric: Size 4X Old Navy Dress - $15

Pattern: Vera Top by Forget me Not Patterns - Free

Notions: Thread - Free

Time: 3 Hours

Total Cost: $15

Tuesday, April 9, 2024

Sew Frugal: Miranda Gathered (?) Tee

My first Sew Frugal project turned out to be a bit of a disappointment, but I wanted to still post about it here for others that look into this pattern. I didn't really find much online about this pattern before I used it, so I know a review can be helpful :) 
If you want the full shebang - head over to my YouTube channel for the full shebang. This is a written review of the full info there.
I discovered the Miranda Gathered Detail Tee pattern by Tiana's Closet and I loved the example photo. I love that it's a basic t-shirt with a little something extra in the gathers at the yoke, so I decided to give it a try. I grabbed a blue cotton interlock from my stash that I had thrifted so I knew it wouldn't be the end of the world if it didn't turn out, and it's a good thing I did. I think you can notice a few differences in my version already - most notably being that mine has almost no gathering to speak of whatsoever. The entire reason I wanted to make this pattern was for the gathers, so I was pretty bummed to have it turn out like this. The directions tell you to sew a gathering stitch across the yoke like on the front, but the seam allowance is so small I couldn't do my usual 2 lines of gathering stitches, so just one row made for less even gathers. In the end, the gathering stitches did nothing at all anyway, so I compared the two pattern pieces and the yoke piece is wider than the body, but only by about 2 inches. Also, I really like the sweetheart shape to the yoke on the example photo, but as you can see on my photo above - that was almost non-existent. I'm not sure how this happened either except that it must not be drafted in like the photo shows. The instructions on this are sparse to say the least and they just tell you to top stitch the seam allowance down for the yoke, but the more I look at the pattern photo, the more convince I am that she used a top stitches band on top of that area.  
The back is 3 pieces that get assembled first, which feels slightly unnecessary if I'm honest. You do get a nice fit at the lower back if you have a sway back like me, but personally it's not a big enough deal for me on a t-shirt to justify the extra work there. The pattern photo also shows a band on the yoke seam, which I do not have. I like that it sits flatter though, so I would probably do this part the same way.
The sleeves were just standard and simple. No issues there to report. If you have never sewn a t-shirt before, these instructions will not help much, but I've sewn a fair few in my time so it was no problem. This is also an extremely small hem because I found the shirt a bit short as it was drafted, so next time I would definitely make it an inch longer there.
In the end, I'm left with a ... perfectly adequate plain blue t-shirt. I do want to do a little work to this pattern and see if I can get something similar to the example, but with how it is drafted it just did not happen. It's really a shame, but I feel like this is a case of "you get what you pay for". If this had been a paid for pattern, I would have been very upset with the outcome I achieved. Since it was free, I'm willing to put in a little work, but it just didn't end up being what I felt was a good Sew Frugal entry. After I let this pattern sit and think about what it's done for a while, I will try again. 

Summary:

Fabric: 1.25 yards of blue interlock - $1.00

Pattern: Miranda Gathered Detail Tee by Tiana's Closet - Free

Notions: Thread - Free

Time: 3 hours

Total Cost: $ 1.00

Friday, October 20, 2023

FO: Minion Rattle

 My youngest sister has decided she wants to learn to crochet. She has seen all the chunky stuffed animals made with fuzzy yarn on instagram and pinterest and wants to make her own. Now that she lives near me again, I'm working on teaching her. We are starting simple with the bird from the Craftsy Woodland Animals Class, but I needed something to work on myself so that I could demonstrate the stitches for her. We started the first weekend in September, but given that we both have kids and she just bought a house, we didn't have time again until 3 weeks later, lol. I reserved this project to only be worked on while I was teaching her, so he took 3 weeks even though it actually only took a couple of hours. Anyway, let's meet the minion!
I used the Minions pattern by Jenni Ferwerda, which is free on Ravelry. The pattern has 3 different shaped minions, so I used the twinkie shaped one - so this is Kevin. There was really no rhyme or reason to me picking this guy, it just happened that way. My sister's husband is obsessed with minions and they just had a baby back in June, so I decided that my project would be a rattle for her baby. He can't really enjoy the characters much yet, but I figured adding a rattle and making it something that had lots of chewable appendages would be the best way to go. So he got a minion, lol.
I grabbed acrylic yarn from my stash to make this. These are I Love This Yarn in Yellow and Gray Mist, and the rest are Vanna's Choice in Colonial Blue, Black, and White. All in all this was a good example to use for teaching purposes but still keep it simple and interesting for myself. You make the twinkie body shape, then do the legs, then the eyes and mouth, then the arms. The only change I made was putting a rattle in the middle of the body. The pattern is very straight forward. The only part that could use a bit more explanation is the suspenders - the pattern just says to embroider suspenders, no mention of what stitch to use or anything like that. I used a chain stitch because I knew it would be the simplest, but if I wasn't familiar with embroidery I would not have known what to do for that feature.
I went with baby safe eyes because obviously. This was meant to be chewed on from the very beginning, so I couldn't justify shank eyes. For my eyes, I just used the same black yarn and chain stitched a circle then added a white French knot with embroidery floss. I find that the French knot is key to not having your item have "creepy eyes" as my sister was worried they would be. You have to give them that little glint or they seem like dead eyes. I spent a decent amount of time on the eyes and glasses alone just to make sure everything was even so it didn't throw off the look and I'm pleased with how he turned out. I also forgot to add the strap to his goggles, so I chain stitched that last.
My nephew is still a bit young to quite know what to do with this offering, but he likes the color contrast and the rattling sound because he just stares at it and sometimes wiggles excitedly, lol. He was a bit too wiggly to get a not blurry photo, actually.
And he has already christened his minion with a chewing session! The ultimate baby seal of approval. I know once this little guy gets a handle on grabbing things, he will be all over this toy.

This was a very fun little project that was not too complicated to teach and talk while I worked on it. That's a good project in my book :)


Thursday, March 9, 2017

FO: Slouchy Moss Beanie

And now we have the final hat from Marisa's triumvirate :) This one was the wild card. She had picked a different pattern - Bothel by Tracey Todhunter - but when I went to make it I discovered that it was just a plain double crochet stitch hat. The pictures look very different, so I'm not really sure what's up there, but I just wasn't happy with the pattern. So when both the other hats were finished we had another little consultation and she picked this one.
This is the Slouch Moss Beanie by Phanessa Fong, another free pattern on Ravelry. It's a slouchy beanie knit in a moss stitch at a very loose gauge, giving it a nice texture. It also made it super stretchy, which is pretty fun and more comfy I think.
This is also made in Cascade 220 Superwash yarn, this time in the smoke gray colorway, I really like this color - a nice blue but not in your face. This yarn really worked fantastic for this style of hat - man I love 220 superwash :)
I really love this texture. I've never been a fan of knitting moss or seed stitch because I'm an English style knitter, so it's pretty tedious to change your yarn from front to back after every single stitch. Thankfully this was a small project, and while I did get a bit tired of all that moving toward the end I can't deny that it is a lovely outcome :)
Both of us agreed that this hat needed a little somethin extra, so I showed marisa the other colors of 220 superwash I have in my stash so she could pick a pom pom. In the end she settled on white. I made a 3.5" pom pom and holy cow does that take a lot of yarn! It took 11 grams just for this pom pom. Crazy. But it is a cute result.

And here's the hat's new owner, lol. Are you tired of seeing that same hill yet? This is a nice color for winter - it goes with the landscape but still stands out with its touch of more color.
So there you have it - my 3 hats that I made while I had the flu. In the end I'm really grateful I had these projects already lined up and ready to make. I don't know I could've handled a lot of decision making with my head in a fog, and the knitting really kept me from being completely miserable. So thanks, Marisa, for wanting so many hats, lol :)

Monday, January 16, 2017

Christmas FO: Justin's Chilly Podsters

This final Christmas gift of 2016 (that I'm blogging about - there are more to come in the future) was actually finished in 2017 - whoops! This one also has something of a back story, so read on!
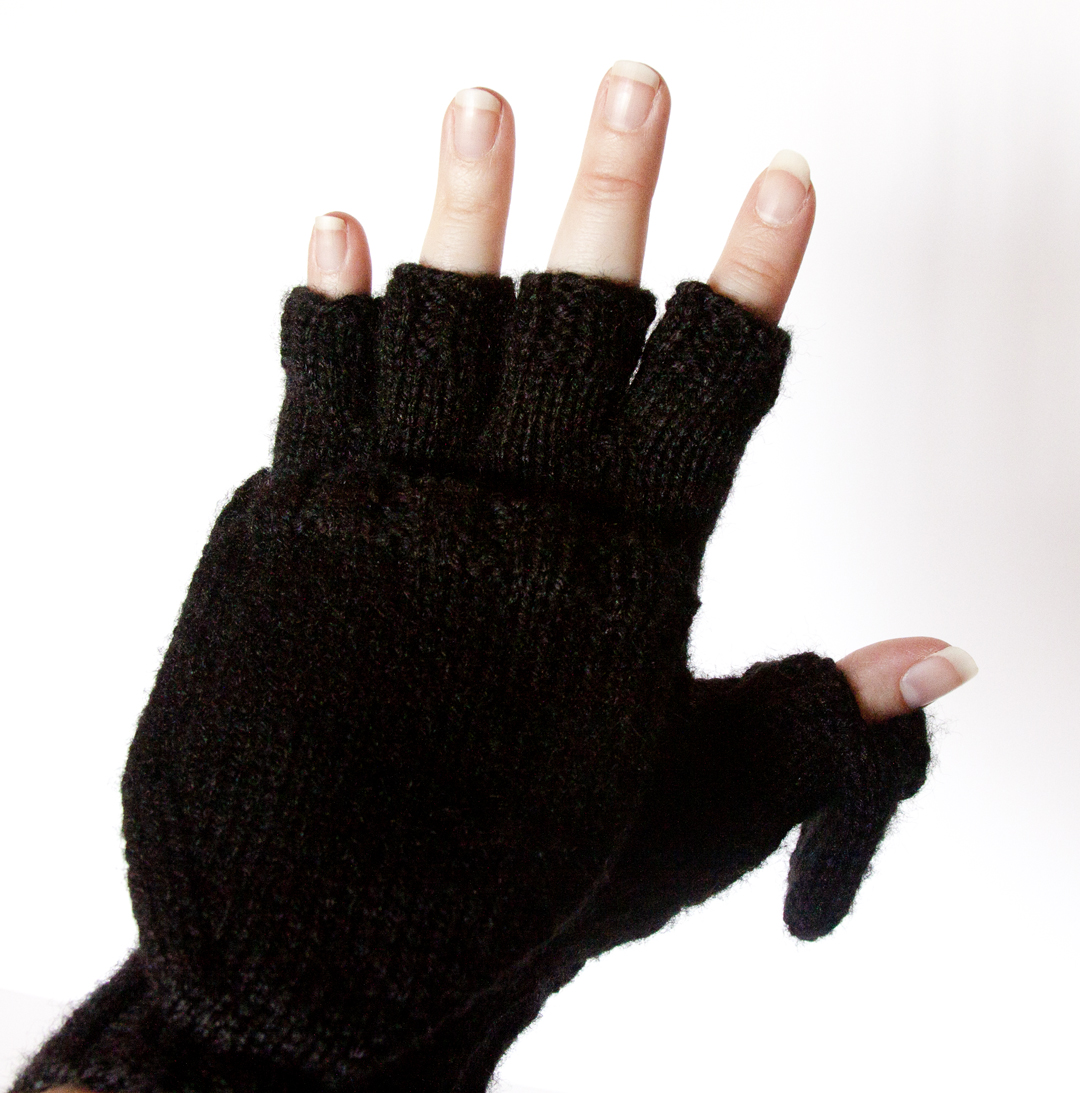
Years ago (like literally multiple years) my husband really wanted a pair of gloves with cut off fingers but also with a move-able flap. He was working as a police officer at the time and was always having to take off his gloves in the cold to write paperwork, so I started looking for patterns. I discovered the free Chilly Podsters just in time for it to get warm that year, so I just kept the pattern in my queue and forgot about it. Fast forward to Christmas of 2015. Everything was falling apart between my husband and I, but we still were exchanging gifts. We didn't end up celebrating together until over a week later, but I just hadn't felt motivated to make anything for him if I'm perfectly honest. I was so frantic making things for all our other family members that I put his aside and just wrapped up a copy of this pattern with the yarn I was going to use and gave him that with the promise to make them soon. Shortly after that we split up, so I certainly wasn't going to spend my time making him anything. It's been a whirlwind few years, which I may explain one day, but things are looking a bit better lately and we have been "hanging out" (lol that sounds so lame, but I can't think of what else to call it). So when I started brainstorming for what to give him for Christmas, I thought it might be poignant to finally make him these gloves.
Little did I know how involved of a project these would be, so I only had one glove finished to give him for Christmas, and I finished the second one on New Year's Day. Ah well. At least he has them now, right? About 4 years later, lol.
So onto the pattern! Like I said, this is the Chilly Podsters pattern, which is free on Ravelry (follow the link). IT's really neat how you make these. You knit the ribbing first, then separate and make each finger, then go back and make the mitten top. I made this in a black acrylic yarn because 1) my husband loves everything in black and 2) he can wash them and I won't worry they are ruined. I picked this yarn up at a thrift store a while back, so I'm not sure what it actually is, but it worked great for this project. It's a hardy yarn, so not a lot of pilling going on, yet not so rough they itch or anything. Overall I found them very comfy.
I totally love the thumb! The gloves are really mindful of what people need nowadays, I think. Not only can you remove the cover on your fingers, but also on your thumb. This is part of what took longer in making them, but it was definitely worth the extra effort in my opinion. Now he can use his phone without removing the mittens.
They are a bit big on my hand, lol, but they fit my husband just right. It was a bit hard to gauge the size, so I kept having my dad try on the glove as I worked each section to make sure they still felt ok. Turns out they have similar sized hands, so it worked out.
Once I finished the gloves, Justin asked if I could add a button to secure the mitten top open with. I thought about doing it before hand, but I figured he wouldn't use that feature so I left it off. Whoops! It was really quick to add. The buttons are just 2 from my stash and I just made a single strand of yarn loop for them - since it's acrylic I don't have to worry about just one strand breaking with use. Hooray! I think the buttons are a nice finishing touch, so I'm glad he had me add them.
I will say I liked these gloves enough to want to make some for myself, so perhaps you'll see this pattern up here again. Maybe not til next year, but it will happen sometime. Aren't free patterns the greatest? I'm so glad this one is out there, and I definitely recommend it if you like the style.

So those are the Chilly Podsters and that marks the last Christmas gift post for the year! Hooray! You made it! lol

Friday, November 4, 2016

FO: Birthday Pokéballs for Luke

So... being the cool aunt that I am, I make my nephew gifts for his birthday each year. Usually I crochet them, but sometimes they involve sewing. Past gifts have been themed with shows and characters he likes (or his parents like). This year, he's turning 4, and he is mildly obsessed with Pokémon. He goes on Pokémon hunts with his parents and he loves to catch them. So we had the idea that I could make him some crocheted Pokémon. This was a little while ago - I had planned on a few characters and looked up patterns or started devising my plan of attack for patterns I would have to improvise. All good intentions here. Then life happened. I found myself 2 days before his birthday with nothing to give him, and the next day was Halloween so I certainly wouldn't have time to make anything then. I settled on making him a handful of Pokéballs. It's not as technically exciting as the characters I planned to make, but they were probably the part he would've used most out of a set anyway. So I went with it and just made as many balls as time would allow on Sunday night.
I started off with this free pattern from Nichole's Nerdy Knots and I made them a little bit bigger. Her pattern has you increase to 30 sts around, plain sc 2 rows red, 2 rows black, then 2 rows white, and decrease from there. When I increased to that 30 sts I decided they were just too small (I wanted closer to baseball size), so I kept increasing until I like the diameter I was getting. I ended up increasing to 48, plain sc 3 rows red, 2 rows black, 3 rows white, then decreased down. Easy peasy. That's the nice thing about such a simple pattern - it's so easy to customize. I kept the "button" piece the same and I like the proportions. I ended up with just slightly bigger than baseball sized balls. I also feel pretty clever for attaching the button piece on top of the color jogs on the ball, so this baby looks perfectly seamless :)
Can I just say how much I've missed the quick and satisfying feeling of making crocheted amigurumi? I've only crocheted 1 animal this year and that was a mystery spread over several weeks, so I haven't had this feeling of instant gratification in quite a long time. I had all 3 of these balls don in about 2.5 hours. It now makes total sense why I made so many animals a few years ago - I liked the feeling of finishing a project often :) I made sure to stuff them a bit more firmly then I normally would because I know these will be tossed and squeezed and thrown, all of which cause the stuffing to condense and not puff up as much over time. They aren't hard enough to hurt anyone, but they will stay puffed for quite a while.

I gave Luke his present on Halloween (the day before his birthday) because I thought he could use them for his costume. He was Pikachu! And my sister and her husband were going as Ash and Misty. This way they would be able to carry around the balls if they wanted when they trick or treat tonight.
I made sure to use all washable yarns for these since I anticipate them being chucked into some interesting environments. The red and white yarns are both I Love This Yarn from Hobby Lobby in fire red and antique white and the black is Premier Everyday Soft Worsted.
And now to force you to look at my cute nephew :) This was the big moment, lol.
 And then I had to get a few posed, happy shots. At least it seems that he enjoys them :)

And now Luke is ready to catch 'em all! Happy 4th Birthday, Luke!

Saturday, February 13, 2016

Christmas FO: The Pierced Eyebrow of the Republican Party

Oh my gosh you guys - I lied! I'm sorry, lol. I forgot one of the gifts that I made this year. I swear this is the last one though, so don't worry. Though I can completely see why I forgot about this gift...
My husband made a passing comment back in December that he would like to try wearing bow ties. I already had other things planned for his gift, but I thought that a few handmade bow ties wouldn't be too much trouble. I had him look through my stash with me and pick a few fabrics that he would like to wear. I made no promises as to when the ties would materialize, I just knew what to make them out of and what his taste would be. I ended up making them that same weekend. I searched pinterest for a pattern and came across See Kate Sew's free bow tie pattern. You just print it out and tape all 2 pages together, cut out your ties, interface one side, sew around the edge, flip it right side out, sew the hole shut and press. Super easy. 
Confession: I learned how to tie a bow tie just to take these photos, lol. I now understand why stores usually only have them in slick fabrics - these were not easy to tie! All of these fabrics were thrifted :) The stripes (my favorite) is a cotton seersucker, the check is a poly rayon of some kind, and the blue tiny checks is a thick 70s polyester. That thick polyester one was near impossible to tie. Maybe it will just take some practice. For the David Sedaris fans among you, the title of the post comes from one of his stories about when he decided to wear bow ties. It was so spot on that I always think of that phrase when I see a bow tie, lol.

Those are all the photos I have of these, and I know I won't be getting any modeled shots. Sadly my husband and I are separating. It's a pretty crappy time, and I'm not looking for sympathy by posting about it here, I've just been meaning to say something about it for a while and didn't know how to begin. My life has become incredibly crazy, filled with unfortunate tasks like sorting through old junk and divvying things, cleaning and repairing things around the house to prepare it for sale, gathering things for a yard sale, trying to sell things online, etc. Lots to do. I will say that I am fine with it all - it's my decision and I know it is justified so I will leave it there for now. That does make it easier to summon the motivation to do all these annoying tasks though. I will still be posting projects, but definitely with less frequency as I sort everything out. I guess now you can see why I forgot about making these bow ties though.

So that's OFFICIALLY the last Christmas gift I made this past year and normal projects will commence soon. If you find yourself needing a bow tie pattern, I would absolutely recommend this one. It was easy and free - can't really beat that! It also comes several sizes, so it's sure to fit the bill. Thanks for hanging in there with me and giving me a little happy place to come to. I try to keep my blog upbeat to drown out the drama of real life, and it makes it so much better to know that there are real people out there who read my posts. Thanks for reading :) It means more than you can know.

Tuesday, January 19, 2016

Christmas FO: Foxy Basket

My mom is another person on my list that I always deliberate a long time over what I will make her. Being that she's my mom, of course she "loves" everything I make her, lol, but this year she actually mentioned an item to me and I remembered. My mom was watching Knitting Daily TV one day at random and told me how they showed a really cute crocheted fox basket. I hunted down the episode and the pattern and made her one of her own :)
This is the Foxy Stash Basket which is a free pattern put up by Lily Sugar'n Cream yarn. The pattern calls for using their cotton yarn and holding it in double. Not only did I not have the fox appropriate colors of their yarn, but I didn't feel like holding things in double. I used the pattern as written, but I made it up in Vanna's Choice yarn from my stash in Terracotta and Beige with black scraps for the nose. The color worked section I did in tapestry crochet, and the rest was just done normal. I was pretty proud of my lack of ends to weave it - I stranded behind and then trapped the strand in the the next row of stitches.
You can see a little jog at the back with the colors, but not bad. It came out a cute little size too :) It's about 8 or 9 inches tall with the ears.
I used 15 mm shank eyes because I like how they look better. They stick out in the inside, but they won't be a problem. The ears are crocheted separately and then sewn on - they don't really like to stand up because of that, but you can mess with it to get them in a cute position.
I did a few on the fly changes to the pattern just based on my experience crocheting. First off, I added a back loop only row as the first row that didn't decrease - this creates a nice outer ridge along the bottom so the bag kind of knows how to sit so it makes it stand up nicer. I also changed the color work section a bit. The original pattern had quite the slant going on with the nose, so I tried to correct that a bit. I did to an extent and I'm happier with my finished basket than the example photo so that's good :) Other than that, I made it up just as the pattern suggested.
Happily, my mom loved her basket :) She thought it was super cute. My nephew also thinks it's pretty great - he likes to put all his toys inside it and carry it around. So that's always a good sign :)
So there's another successful Christmas gift :) Yay for cute storage items!


Sunday, January 10, 2016

Christmas FO: A Trio of Hats

Once I completed Shannon's scarf, I started getting serious about a gift for her husband. I asked all my sisters what their men might like, and most of them said a hat. In the case of Shannon's husband, she said he would want a beanie that was blue or gray. I had several skeins of Lion Brand Hometown USA in Dallas Gray in my stash that I knew would work great - it was the requested color and would knit up quickly- double score! 
I searched Ravelry for man-ish looking beanie patterns that were made for super chunky yarn and weren't too boring but also not too complicated. I settled on The Perfect Tuque by Homespooled which is a free download. The pattern was incredibly simple - k1 p1 one row, knit the next - but added a really neat texture that I thought would jazz things up a bit more. I knitted this hat for Shannon's husband in about 3 hours or so and I really liked the result. It was warm, looked like a guy would wear it, and it was fast to make. So when I started making decisions about my other brothers-in-law, the choice was simple...
My sister Marisa specifically said that her husband would like a gray beanie that was fairly simple. How much closer could I get?! I decided to use the rest of my Dallas Gray yarn and make a copy of the first hat. At that point I was much faster at whipping this pattern out, so this one only took me about 2 hours. Woo hoo!
A few weeks later I found myself with another brother-in-law on my list that I had no gift for. He tends to go on trips up north with my sister-in-law a few times a year, so I thought he might also like one of these hats. I decided to go with the Oakland Black colorway (also in my stash for years) since I see him wear more black than anything. I still haven't seen him to give him his gift (shh! don't tell him please, lol).

So there were 3 more gifts off my list to make :)