You guys - I made my first ever striped shirt! And it's a refashion!
Here is what the shirt originally was purchased as:
It was a Bobbie Brooks rayon/poly size small maxi dress. It was a fine enough (if poorly made) dress to begin with, but I am no size small and I liked the fabric. For $1.00, I figured it would be a good opportunity to try out stripe matching.
I've been really into a looser fit on striped shirts lately. I have 2 thrifted shirts that I love the fit of - this one was my example. I started off with the Plantain pattern since it's loose at the waist, and I compared the pattern to the cut of this shirt. I ended up adding in a 1" wedge to the side seam at the bust line. I also did my usual change of raising the neckline. Then I started cutting. The fabric is a light weight sweater knit that stretches well horizontally, but had zero vertical stretch. This meant it loved to roll at the edge, plus it wanted to unravel. I took my time cutting everything out so I could match the stripes.

I started off by adjusting the body pattern to be closer to my inspiration shirt. I simply folded that shirt perfectly in half, then laid the plantain front pattern piece over top to see what the difference was. I ended up adding a 1" wedge to the top of the underarm on the body, then did the same thing to the back pattern piece. This way I get a slightly looser fit at the bust and the rest of the pattern is already flowy enough to match the inspiration shirt.
Here's the stripe matching on my side seams. One side is perfect while the other is just ever so slightly off. I don't think anyone will ever notice, but I wish I had been a bit more careful. Oh well, it's way better than ready to wear clothes (especially considering this dress had zero stripes matched anywhere) and it will not keep me from enjoying it.
Here's my matched sleeve seam. I used the method of stripe matching that Sarai put out with the Dahlia Dress where you match it at the notches on the sleeves. This worked out great at that point, but it is a little off on all the other stripes :/ Oh well, you can't have everything and it's at least slightly off in the same way on each side so it looks symmetrical. It matches pretty well at the bust line, but you can see how it starts to veer apart. I think next time I will try to match it up a little higher so others can visually appreciate it, lol.
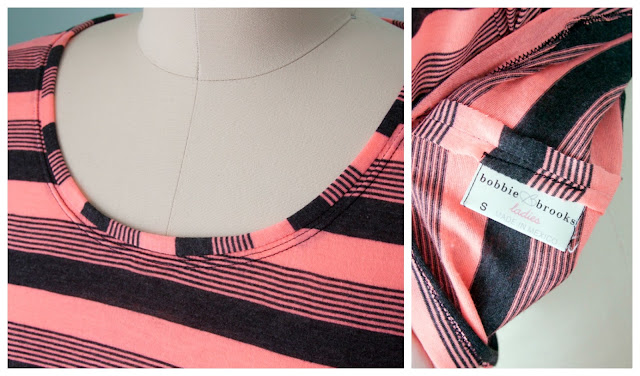
I decided to play with the stripe directions and cut the neckband on the cross grain. I was a little worried about i tat first since this fabric has absolutely no stretch in the cross direction, but the original dress had it so I thought it must work ok. Only after cutting out and piecing the neckband together did I notice the original was on the bias :/ It worked out ok though, and I lined up the seam I had to piece on the stripe edge so you would never know it was pieced together - score! The neckband certainly has less give than my other shirts, but I kind of like it that way - I don't have to worry about it sagging when I sit down. My other big change I made to the pattern was to raise the neckline to the Renfrew height and use that neckband pattern piece (thus the Plan-frew title). I love the height of this neckline!

My favorite part of this shirt is that perpendicular striped neckband - it's just so cool looking! I don't think I've ever had a ready to wear shirt that made this design choice, so it feels fancy I guess.
I'm really happy with this little experiment, and I feel a little more confident in my pattern matching now while still learning things I need to change next time.
Summary:
Fabric: thrifted Bobbie Brooks rayon/poly maxi dress - $1.00
Pattern: Deer + Doe
Plantain with Sewaholic
Renfrew neckline plus fit hacks
Notions: black knit stay tape - $0.15, thread - stash
Hours: 3
Total Cost: $1.15


You're so nice :) Thanks for your lovely compliments. I think I enjoy refashioning more for the mental exercise than the finished product. It's like a sewing puzzle, ha ha. Though it is nice when they turn out well too.
ReplyDelete