Showing posts with label plantain. Show all posts

Friday, October 4, 2024

FO: Sewing Slump Plantain

I put out a video about this shirt, but it's been so long since I did a usual blog post that I thought I would post this as well :) 
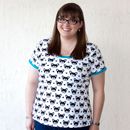
I find when I'm having a hard time sewing things, I need to grab a simple project that I've made before so I can forget about fitting issues and just sew. The Plantain Top is the perfect pattern for this purpose. I've made this shirt many times over the years, and it's perfect if you're not feeling super confident about your tummy.
I used a 1 yard cut of Art Gallery jersey called Love Story Flower Stamp Adore that I grabbed at The Sewng Studio this past July for a steal. I love the color and this fabric is wnoderfully soft. Very comfortable.
I did raise the neckline of this pattern years ago by combining the Plantain with the Renfrew neckline - easy peasy. Now it's a comfortable height so I don't have to worry about showing more than I want to.

All in all, this was the perfect project to get me out of my sewing slump :) If you haven't seen the full making process, head over here to see it on You Tube :)


Summary:

Fabric: 1 yard of Art Gallery Love Story Flower Stamp Adore Jersey - $7.94

Pattern: Deer & Doe Plantain Tee - Free

Notions: Knit Stay Tape - $0.25, thread - $0.50

Time: 3 hours

Total Cost: $ 8.69


Friday, February 9, 2018

Christmas FO: Mint Sequin Shirt

One of the final gifts I made this year was this shirt for my mom. I could never decide what to make for her, so I hemmed and hawed for a while before realizing I should not reinvent the wheel. I've made my mom the Plantain Tee before and she wears it quite often and says it's super comfortable, so I presented her with making another one. I pulled out several pieces of stash fabric for her to choose from (we were just over 1 week from Christmas at this point, lol, so stash was a necessity) and she chose this lovely combo I plan to make up for myself exactly the same (luckily there should be just enough fabric to squeak out another - muahaha!). 
So this is the Plantain by Deer + Doe, which I've made more times than I can name off hand. They recently released an update to the pattern, which included larger sizing and a few other tweaks, but this is the original pattern with my own alterations already added in - I use this pattern as a nice basic block to make other shirts fit better all the time since I've got it right where I like it. Technically this is the Plantain shirt with the Renfrew neckline since the original is just a touch too low and wide for my taste. My mom said the one thing she would like different is to drop the arm scye just a touch as her first version can feel a bit tight there throughout the day - so easy. I just folded the corner down at the arm pit area when cutting. I also had to make a few changes due to the fabric. This front fabric is a rayon jersey that is covered with sequins, making it not as stretchy as it would otherwise be, so I added 5/8" to each side seam before cutting on the front and back pieces. This simple change made all the difference and it fits great now if I do say so myself :)
 Since it really wouldn't be comfortable to cover your entire body in sequins all day long, I used the sequin fabric only on the front piece (thus having more to make myself one) and I cut the back, sleeves, and neck band from a cream colored cotton interlock (a very lucky find at a thrift store). Now that my mom has worn this a few times, I've learned that I should've done something to the sleeve or the side seam below the arm to protect from the sequins. She says it's not a big thing, and it would happen with an sequin shirt, but throughout the day your arms can get a bit rubbed from the sequins - totally understandable and I can't believe I didn't think of that before because I have a few rtw shirts that do the same thing. When I made this for myself I will either make the sleeves longer (which will cause the seam line on the sleeve to pill quite a lot :/) or maybe piece a strip of the cream colored fabric onto the side of the bodice under the arm scye, angling out to nothing at the hem. I'll have to play with it, but I'll definitely do something along those lines. My moms sleeve has pilled from the friction already, but sadly it's kind of unavoidable.
I really love this interlock fabric. This stuff was a major score and I got several colors at the time just thinking it would be fine for muslins, but I've used this stuff a ton and wear it all the time. I'll be so sad when it's gone, lol. I love it because it's beefy enough to hide lumps and bumps as well as not being sheer at all, but it's also drapey enough to look nice in a design like this one. Also it's comfy and washes great. It's basically magical fabric. 
And here's a closer look at that lovely sequin fabric :) I snagged the last bit of this at The Sewing Studio sale a few years ago - it was a garment factory remnant and the entire thing is covered in very cool sequins. The sequins seem like normal circles at first glance, but they are actually a strip of 4 circles all together in a bar shape. They are stacked on top of one another to make the floral design and then stitched down with clear thread. Even the cream colored areas are sequins - so cool. I was a bit concerned about sewing through this stuff at first, but my fears quickly subsided. It's funny - I always read blogs about how people have to pick all the sequins out of the seam allowance before sewing them, yet the two times I've sewn with sequin fabric it was absolutely fine and I had to do no such thing. Maybe it's because mine were knit fabrics? I don't know, but these lay perfectly fine at the side seams and have given no trouble on the insides either. I even hemmed it as normal with woolly nylon in the bobbin and a twin needle. No special equipment or techniques needed - yay!
And since we were taking pictures, we had to add a few fun shots, lol. Can you tell we're related? Wait, how about in the next photo?
Yep, I definitely came from her, lol. These pictures also show how nicely this drapes away from the body below the bust - definitely our family favorite fit.
And she had to do the blogger pose, lol. This shirt is another fav and Kelly has already asked me for one.  I'm just glad I was able to make another special piece for my awesome mama. Isn't she cute? I hope she gets to wear it for a good long time. Also you will probably be seeing another iteration of this shirt sometime in the future when I make it for myself :)

Summary:
Fabric: front piece from cream rayon spandex knit with floral mint sequins all over, 1 yard cream cotton interlock (thrifted)
Pattern: Deer + Doe Plantain with Sewaholic Renfrew neckline
Notions: knit stay tape, thread
Time: 3 hours

Saturday, January 14, 2017

Christmas FO: Shannon's Stripey Plan-Frew

One of my only sewn items this Christmas was a refashion. I decided to give making a shirt for Shannon another try after I kept the one I made for her birthday, lol. The plan was to actually make the same shirt, just with more "Shannon" fabric. She's a big fan of neutrals, so when I looked through my stash, I knew this one would be perfect.
I purchased this skirt at a thrift store a few months ago specifically to refashion - it was a dumpy and boring knit skirt with an elastic waist originally, but the fabric is a lovely, drapey rayon jersey. I'll confess - I originally bought this to use for myself because the fabric was so buttery soft. But since I already stole one gift from Shannon, I knew I needed to make the sacrifice this time, ha ha. The skirt was originally a size 2XL and about ankle length, so I had plenty of fabric to work with. I was even able to salvage the elastic at the waist since it was just threaded in a channel, so now I have a nice piece of 1" wide elastic for a future project - woo hoo! Anyway, when I went to my stash, I knew this would be a great basic item for Shannon.
I went with my Plantain/Renfrew combo pattern since Shannon likes her shirts fitted at the bust and then flowy around the tummy. I was able to fit all of my pattern pieces on my fabric except I didn't quite have enough width for my second sleeve, so I will confess that I did a little creative piecing at the back of one sleeve. I don't think anyone would even notice in this basic fabric, but there it is, lol. 
And the back view - don't you love this tiny stripe on the heathered gray? Normally I shy away from stripes (and so do my siblings), but this one is so small I figured it would be ok. I mean, I would wear it, so there you go. I know it's hard to see the sleeves on the dress form, but can you see a seam back there? I can't either :)
I did have a little snaffoo with this project that I don't normally have (of course, because I was making it for someone else and I was on a deadline). I stitched the neckband like normal, and then top stitched with a twin needle all around just outside the seam. I was able to keep the neckband piece straight with the stripes which I think looks really cool, so I thought it was done and I was really happy. When I went to stitch the hem, I noticed that the neck band top stitching was already coming undone in the back - when I looked closer I saw the wool nylon on the bobbin thread had pulled out from under the top stitches with stretching the shirt. Not good! I tried to just fix that spot, but to no avail. I had cut the bobbin thread too short. I finally just ripped the whole thing out and sewed it again making sure to give a good overlap to the stitches this time and it worked fine. It's just so weird I've never had this happen before, but now it makes perfect sense.

And that is Shannon's shirt :) I'm sorry to say I have no modeled shots of this shirt, but considering there is quite a bit of snow where she is I'm willing to forego this time. I will confess that it took a lot of restraint not to embellish this shirt. It's a perfectly fine shirt, don't get me wrong, but it is undoubtedly the most boring thing I've ever sewn, lol. I contemplated putting a floral knit mini pocket on it or something, but then that would've been to my taste and not Shannon's. My mom and sister agreed that leaving it plain was the way to go. I hope she likes it!


Monday, October 24, 2016

FO: A Tale of Two Bosties

This is a shirt with an interesting story, lol. It all started when I was looking on Joann's website at the new fabric designs and came across this Boston Terrier printed cotton interlock from their Doodles line. My sister, Shannon, has a Boston Terrier named Willie and totally loves him. I suddenly decided she needed a Bostie shirt for her birthday (which was in 6 days at that point). I drove to Joann's right then and had to do some hunting to find this print, but find it I did and I walked out with enough to make a shirt.

I asked my sister what she likes in a shirt fit-wise and decided to make her a Deer + Doe Plantain but with the raised neckline of the Sewaholic Renfrew. I didn't like the idea of using such a large print for the neck band so I dug through my stash of knits and decided to use this bright aqua blue rib knit I got at a thrift store and I love how it turned out :)
When I finished the shirt, I was really in love with it and on a serious roll. I had the notion that I could make a matching shirt for my nephew with the larger leftover pieces. That night I saw my sister and literally took the t-shirt off my nephew's back to trace a pattern from, which I did that night. He's much bigger than I anticipated, so I was only able to use the Bostie fabric on the front panel and even that I had to piece with a bottom band to get it long enough. Luckily I had plenty of the rib knit, so I just used that for all the other pieces.
So here's where it gets interesting, lol. My sister came to visit from Oklahoma a week after I made the shirt, and I quickly suspected that she would not be as amused with the Bostie fabric as I was - not in a bad way or anything, she just has a more contemporary and (dare I say) adult style then myself, haha. I had a cute Lauren Conrad blazer I picked up at a thrift store recently and thought at the time that it looked like something Shannon would wear, so I brought the Bostie shirts and gave a big schpeal that she did not need to feel obligated to keep the Bostie shirt if she thought she would never wear it and that I had an alternative offering if she so chose. I was right - I liked the shirt way more than she did (like I had actually thought of going out and getting more of the fabric to make myself one) but she did like the blazer. So now I have my own Bostie shirt and Shannon has a blazer and all is well, lol. I still insisted on doing a photo shoot with the original recipients along with her dog though before they left.
The fit came out really well so at least I know what size to make if/when I decide to make a shirt more to her taste in the future, lol. Luke didn't want to wear his shirt at first, but once we convinced him to put it on he refused to take it off so clearly he's a fan. It is now his "Willie shirt" since that's the only Bostie he knows. Willie clearly approves as well.
Haha - gross.
So now for the particulars. I made the short sleeve length and just added bands that were the same length as the bottom of the sleeve piece (personally I hate sleeves that hold tight when worn). So it turned out as a sort of cuter version of a ringer tee.
I'm really pleased with the fit on this shirt - it's snug enough to give me a shape but not digging in anywhere.
I think the fabric is so much fun! Even though I'm a corgi lover, how can you deny the cute-ness of these Bosties? Amiright?!
I did manage to get a few pictures of Luke in his shirt the night I gave it to him. These are all his own poses - my personal favorite is the "pregnant lady pose" in the center, lol. Who knows how he came up with that one. His shirt actually came out a little big, which is surprising and a bit of a relief because I was worried it wouldn't be long enough for him compared to the shirt I made the pattern from. The blue ribbing seems to have caused the shirt to grow a bit, but it's kind of a good thing because it means he will be able to wear it longer.
For the adult version, I decided to be fancy with switching my thread colors on the top stitching. Ooh, so fancy! I used my favorite twin needle finish wherever possible and always had woolly nylon thread in the bobbin. Around the neckband I used white thread while at the sleeve bands I used a matching aqua blue color so it doesn't distract. I'm pretty proud of how the sleeves turned out for such an improvised thing. I didn't want actual hem bands, so these are done like the neckband - I stitched the pieces right sides together, pressed the bands under at a width I liked the look of, then top stitched the hem in place. It looks a little interesting on the inside, but it's still neat and clean - there's just 2 seam allowances there now.
So that's it :) The shirt that wasn't actually intended for me but is now mine. It's like I made myself a gift! lol Those are always the best kinds anyway. I look forward to wearing it around on casual days to come. And my nephew thinks it's pretty cool that we have matching shirts too :) #coolestauntforthewin

Summary:
Fabric: 1.5 yards of Doodles Boston Terrier Cotton Interlock Knit - $9.00, aqua blue rib knit - $0.25 (thrifted)
Patterns: Plantain by Deer + Doe with Renfrew neckline
Notions: knit interfacing - $0.10, thread - $0.50, woolly nylon thread - $0.25
Time: 5 hours (for both shirts)
Total Cost: $10.10

Saturday, August 6, 2016

FO: Swirly Birds Planfrew

This is one of those projects that was totally inspired by fabric! When I saw this print from the latest collection of the Doodles line at Joann's, I had to have some. It comes in 3 colorways, and when I went to the store back in June the only color they had on hand was this green. With such a bus fabric, I knew I wanted it to be a fairly simple t-shirt, so I bought 1.5 yards and went home to plan.
The resulting shirt is a true Planfrew - part Plantain, part Renfrew. My last few simple shirts have been combinations of these two patterns, but this one is definitely the biggest marriage of the two. I took my previously altered Plantain pattern with the Renfrew neckline (as well as a 1" wedge removed from the center front for my hollow chest) and used that for the bust and above. Since this fabric is an interlock knit, it's a bit too thick to pull off the drape around the tummy area of the Plantain, so I used the Renfrew pattern for the waist and hip, but I made it the length of the Plantain so I could do a twin needle hem (not the ham band of the Renfrew). Still with me? lol. Since I used the Plantain above the bust, I used the Plantain sleeve as well, but hemmed it shorter. The result is almost my perfect t-shirt.
Here's that slightly shortened sleeve. All I did was fold the hem up a bit more and twin needle stitched at 6/8ths of an inch. It's something I wanted to try lately since I've noticed that a lot of nicer ready to wear t-shirts have a greater distance between the bottom edge and the twin needle stitching.
I'm particularly happy with how the back of this shirt looks. It's a nice relaxed fit, but it's still a bit shapely. I've been trying to figure out the perfect shoulder distance for me, and this is certainly the closest I've come. I also made a deeper hem at the bottom on this just like at the sleeves. I folded under about 1.25" all the way around and then stitched at 6/8ths and trimmed the excess. It may still be a touch long, but I think that I can easily wear it with jeans in this length (should I ever actually wear jeans - it's so blazing hot right now!)
For some reason I had a harder time than usual with this neckband - I just couldn't get the stitching smooth around the curve of the neckline. So this neckline took two tries, but I'm really happy with the results :) I used Woolly Nylon thread in the bobbin for all my twin needle stitching on this shirt and I really am surprised at how it keeps the stitches from looking like a raised tunnel. This is really the perfect neckline height for me though! It's the Renfrew neckline height and neck band, but I attached it using the method from the Plantain pattern. I told you - it's a total marriage of the two patterns!
Yay birds! Isn't the color on this shirt great?! It's borderline Christmasy, and I will certainly play that up come December, lol. While the neckband piece is from the Renfrew, I did make the finished band itself much narrower just as my personal preference - I find it much easier to stitch the neckline if I have a bit more fabric to hold onto and then I just cut off the excess close to the stitching line.
As usual this fabric is wonderfully soft. I've worked with Doodles interlock before on my Forest Friends Sorrel and I certainly plan to again (in fact I already have another piece waiting to be sewn up!). The fabric is really soft since it's designed for toddlers, but it washes really well. It's also got a bit more heft to help hide lumps and bumps, but it's still not so thick as to be too hot for Florida. Perfect!
So there you have it - my Swirly Birds top :) I've already worn this out and about and I can absolutely attest to it's awesome comfort level. Yay for quick, simple, and fun projects!

Summary:
Fabric: 1.5 yards of Doodles Cotton Interlock Green Birds fabric - $10.36
Pattern: Renfrew by Sewaholic Patterns and Plantain by Deer + Doe Patterns
Notions: knit stay tape - $0.10, thread - $1.00, wooly nylon thread - $0.20
Time: 2.5 hours
Total Cost: $11.66

Wednesday, December 16, 2015

FO: A Plantain For My Mom

Since I've been successfully sewing so many t-shirts this year, I thought it was high time I branch out and make something for someone else. My mom's birthday and Mother's Day fall within a week of each other most years, and this year I offered to make her a shirt for her gift. She was all for it and originally we planned to use some leftover red fabric she liked. When I went to cut it out though, the pieces we had were not big enough and they were oddly shaped, so the red shirt was put on hold. Fast forward to months later when I came across some royal blue fabric in a thrift store that is no joke the same type of fabric she wanted in red. I bought all the shop had and when I got the color approval, I was off. A blue shirt it would be! My mom liked the fit on my floral plantain, so I made hers exactly the same. We both like the result :)
This was my first time working with an ITY knit, and a rather thick one at that. The different fabric caused a few differences in the example version and the one I gave my mom. This fabric has some serious stretch and recovery, that combined with it being thicker seems to have made the fit a bit more snug. She still likes it though, so we're good :)
See where I get my modelling skills from? :)
I didn't want to give just a plain blue shirt - that felt so boring! I dug through the trims I had acquired and sent my mom a few pictures of options after the shirt itself was finished. In the end she chose this pretty ribbon flower trim that was the EXACT same color blue. Seriously, this stuff looks like it was dyed with the fabric. I'm glad she chose these because I think it really makes the shirt look store bought and deliberate. The fit is good on the front and the back. She even the likes the length (a common problem for us both).

Obligatory mannequin shots. I'm really happy with how this shirt turned out overall. The fabric is a bit clingy for my personal taste, but my mom wears shirts from this type of fabric a lot. Construction wise, everything was done the same as my previous Plantains. I stabilized the shoulders with knit stay tape, and hemmed the sleeves and bottom edge with a twin needle.
The trim is actually roses made of swirled ribbon that are stitched onto a base of netting. I didn't want the netting to show through, so I tucked it under the flowers and I hand stitched the trim on all the way around the neckline. I stitched in a sort of S shaped line to go around the edge of each flower to make sure it stayed in place well with washing. I put the flowers just over the twin needle stitching and I love how clean it makes the whole piece look. I will admit I was worried my hand stitches wouldn't last, but my mom has worn this a number of times over the past few months and I assume she's washed it sometime in there but the flowers remain. Crisis averted! lol
So there you have it - the first item of clothing I've ever sewn for someone other than myself. I love how this top turned out, and my mom wears it fairly frequently, which always gives me a little glow of pride :) Hopefully she does really like it and isn't just wearing it for my sake, lol. You never can tell with moms. She seems comfy in it though, so I'm going to take it as a gifting win. Even though I didn't give it to her until September, it still counts as a birthday present, ha ha. Thanks for being such a great mom, Mom! And Happy Birthday!

Summary:
Fabric: 1.5 yards mystery heavy polyester ponte type ITY knit - $1.00
Pattern: Plantain by Deer + Doe - Free
Notions: royal blue floral rosette trim - $2.00 for the whole roll (Hobby Lobby), thread - $0.50
Hours: 3 including hand sewing
Total Cost: $3.50

Wednesday, December 9, 2015

FO: Stripey Plan-Frew Refashion

You guys - I made my first ever striped shirt! And it's a refashion!
Here is what the shirt originally was purchased as:
It was a Bobbie Brooks rayon/poly size small maxi dress. It was a fine enough (if poorly made) dress to begin with, but I am no size small and I liked the fabric. For $1.00, I figured it would be a good opportunity to try out stripe matching.
I've been really into a looser fit on striped shirts lately. I have 2 thrifted shirts that I love the fit of - this one was my example. I started off with the Plantain pattern since it's loose at the waist, and I compared the pattern to the cut of this shirt. I ended up adding in a 1" wedge to the side seam at the bust line. I also did my usual change of raising the neckline. Then I started cutting. The fabric is a light weight sweater knit that stretches well horizontally, but had zero vertical stretch. This meant it loved to roll at the edge, plus it wanted to unravel. I took my time cutting everything out so I could match the stripes.
I started off by adjusting the body pattern to be closer to my inspiration shirt. I simply folded that shirt perfectly in half, then laid the plantain front pattern piece over top to see what the difference was. I ended up adding a 1" wedge to the top of the underarm on the body, then did the same thing to the back pattern piece. This way I get a slightly looser fit at the bust and the rest of the pattern is already flowy enough to match the inspiration shirt.
Here's the stripe matching on my side seams. One side is perfect while the other is just ever so slightly off. I don't think anyone will ever notice, but I wish I had been a bit more careful. Oh well, it's way better than ready to wear clothes (especially considering this dress had zero stripes matched anywhere) and it will not keep me from enjoying it.
Here's my matched sleeve seam. I used the method of stripe matching that Sarai put out with the Dahlia Dress where you match it at the notches on the sleeves. This worked out great at that point, but it is a little off on all the other stripes :/ Oh well, you can't have everything and it's at least slightly off in the same way on each side so it looks symmetrical. It matches pretty well at the bust line, but you can see how it starts to veer apart. I think next time I will try to match it up a little higher so others can visually appreciate it, lol.
I decided to play with the stripe directions and cut the neckband on the cross grain. I was a little worried about i tat first since this fabric has absolutely no stretch in the cross direction, but the original dress had it so I thought it must work ok. Only after cutting out and piecing the neckband together did I notice the original was on the bias :/ It worked out ok though, and I lined up the seam I had to piece on the stripe edge so you would never know it was pieced together - score! The neckband certainly has less give than my other shirts, but I kind of like it that way - I don't have to worry about it sagging when I sit down. My other big change I made to the pattern was to raise the neckline to the Renfrew height and use that neckband pattern piece (thus the Plan-frew title). I love the height of this neckline!
My favorite part of this shirt is that perpendicular striped neckband - it's just so cool looking! I don't think I've ever had a ready to wear shirt that made this design choice, so it feels fancy I guess. 
I'm really happy with this little experiment, and I feel a little more confident in my pattern matching now while still learning things I need to change next time. 

Summary:
Fabric: thrifted Bobbie Brooks rayon/poly maxi dress - $1.00
Pattern: Deer + Doe Plantain with Sewaholic Renfrew neckline plus fit hacks
Notions: black knit stay tape - $0.15, thread - stash
Hours: 3
Total Cost: $1.15

Thursday, December 3, 2015

FO: Pinwheel Plan-Frew

I had the itch to sew a new shirt to go with my Brown Melissa Skirt a few weeks ago - my wardrobe tends to favor cooler colors, so kind of hit or miss on wearing with brown. Why not make something, right? I've had this cute Pinwheel jersey in my stash since July and really wanted to make something with it. I ended up with my Thanksgiving outfit:)
I've officially named this the Pinwheel Plan-Frew. I love the fit of the Deer + Doe Plantain, but the neckline is a bit low for me, so after making several versions by laying the Sewaholic Renfrew pattern over top to raise the neckline, I finally grew a brain and traced it all together as a new pattern; thus, the Plan-Frew. I also have noticed a bit of gaping at the neck when I sit down (i.e. hunch my shoulders) on previous versions, so I also took a 1" wedge from the center front as a hollow chest adjustment. I'm happy to report this doesn't gape at all!
I had 1.5 yards of this jersey (from Joann's Doodles line - yes, it's for toddlers) and I really wanted to jazz things up in some way on this shirt so I decided to make the 3/4 sleeve version with elbow patches. The blue on the elbows is a scrap of thrifted cotton interlock that went well enough with the other colors involved so I went for it. I can't believe it's been over a year since I made the 3/4 sleeve version of this pattern! I love it so much - the patches are so fun! I used a nice narrow zig zag stitch on their very outer edge so the stitches disappear more than they did on previous versions. I love how they turned out.
Since the neckband had the pinwheels on it as well, I made extra sure to keep the pattern even when I cut as well as when I folded it over. I top stitched the neckband with a twin needle as usual.
I took quite a lot of care when cutting this out so I could match the lines of pinwheels from front to back as well as on the sleeves. I'm incredibly pleased with how well the sides seams matched up! They aren't matched to be invisible, but I think since the lines are consistent it helps hide the seams.
Obligatory mannequin shots. The top looks more drapey here than it is on my body. While this is a jersey, it's a very heavy jersey and it has a crazy amount of 4 way stretch, all of while made it fit a bit tighter than some of my other versions. I think the fit is flattering though.
Details, of course. I'm pretty proud of my neckband and elbow patch stitching - much more precise than any previous version of this shirt, that's for sure. I can definitely tell my skills have improved over this last year.
Did I mention I love the elbow patches? lol I kept flashing them at everyone who said anything about my shirt all evening on Thanksgiving. I know that I will get lots of wear out of this top since it's fun, goes with mt colors I like, and is really comfy. I couldn't be happier!

Summary:
Fabric: 1.5 yards of Doodles Teal Pinwheel Knit - $8.25, scraps of teal ribbed knit (thrifted) - stash
Pattern: Deer + Doe Plantain with Sewaholic Renfrew neckline
Notions: knit stay tape - $0.15, thread - stash
Hours: 3
Total Cost: $8.40