I went on a plane trip recently and decided it was the perfect time to take you along for the whole process - from planning to travelling to completed project. I talk about how to plan what tools and projects to bring on a plane trip, then show you bits from my trip (including a yarn store visit!), then we check back in to see how the project turned out and how it all went. If you struggle with how to smoothly take your knitting on a plane, this is the video for you! Head over to You Tube or click the video below to watch. Enjoy!
Showing posts with label how to. Show all posts
Friday, October 25, 2024
Saturday, May 11, 2024
Button Band Backing Tutorial At Last!
It's finally here! I made a full step-by-step tutorial on how I back my button bands. This is something I've wanted to do for quite a while, but the thought of doing all the photos to put it up on the blog was just incredibly daunting. Enter YouTube! It was quite the job to edit this video, but I think it turned out very well. So if you want to see how I stabilize my button bands on cardigans, head over here or click through and watch the video below!
Friday, August 17, 2018
Serger Thread Catcher Tutorial
When getting my serger set up and getting all the accessories I would need to use it properly, one of the first things I looked into was a thread catcher. My mom's 90s model Janome serger came with a plastic bucket that all your cut off edges fall into so you can dump it in the trash, but my new/old Babylock did not have this feature. Turns out that most modern machines don't have a thread catcher either, including my mom's new $1500 Babylock Imagine - craziness! Why would you want to pick all your waste up off the floor all the time? So I set out to find a solution to this madness.
When you search online for serger thread catchers, the main one that shows up is a long plastic tray you set the serger on that has a small opening and a fabric bag hangs from that opening. All the reviews said it was difficult to get the bag hung right on the small hole, plus since the serger sits on this plastic tray instead of your table, many people complained that their machine would rattle off their tables as they worked. Also this thing is about $20. I decided that I could make something myself instead of spending the money on something plastic I might not like, so I started searching for tutorials. By the time I went to pick up my serger from the repair shop I had decided on making the style that has a quilted place mat that a bag hung from (the most common solution I found on Pinterest with lots of tutorials). My repairman suggested an easier and better solution - making a bag that has ribbon straps to hook around the feet of the machine. This way when you need to dump the bag, you just unhook it from the feet and dump it into the trash - no need to pick up your whole machine to remove the placemat and then dump before putting it back (too much hassle!). I loved the idea, so I went home and looked for a similar tutorial online only to come up empty handed. Really? No one had posted about this before? So I decided to make one of these up to my own specifications and take pictures so that others could make a bucket of their own :) Welcome to my thread catcher tutorial.
I started off with this (super basic) schematic. The area from my knife to the edge of the machine is a little over 6" wide, so I decided to make the bag fill that space. I wanted my bag to be 6" across and 3" deep, so I just drew up a box and added 1/2" seam allowances to all the pieces.
Fabric choice considerations:
The outer fabric can really be any type as long as you like the look since you will be using this for a long time :) I picked a cute rose gold metallic printed floral quilting cotton from Hobby Lobby that I had in my stash because it went well with my sewing room. The lining fabric is the only one that I would recommend a specific type: anything slick. Technically you could use anything for the lining fabric and what I usually see in thread catchers is cotton muslin and the like, but I find that 1) the threads will stick to the cotton and not fall all the way into the bag and 2) the threads stick in the bag when you are trying to dump them out. This is just annoying to me, so I made sure to pick a slick lining fabric that would not have these issues. My lining is just a cheap white acetate left over from a garment project, but it can be anything - just think slick!
To Make This You Will Need:
- Main fabric (I used quilting cotton)
- Medium Weight Fusible Interfacing (I used Pellon SF101)
- Slick Lining Fabric
- Thin Ribbon or Elastic
Cut the fabric, interfacing, and lining pieces all the same. You need 2 squares that measure 7" x 7" of all 3 fabric as well as 3 rectangles that measure 4" x 7" of all 3 fabrics. Iron your fusible pieces to the main fabric pieces before you begin. All of my pictures will show that I serged my entire bag, but you could do the same thing with a sewing machine. Since the seams will all be closed in the bag, there is no need to do any extra finishing.
1. With the lining pieces, sew one rectangle piece to one square piece, then sew the second square piece to the opposite side of the rectangle piece, making one large rectangle. Press seam allowances in toward rectangle piece - it should look like the above photo.2. With 2 remaining rectangles of lining material, pin one to each side of the long rectangle you just made. At the seams in the large piece you've already sewn, pin the corner of the rectangle - this will make the piece look like a box. Sew around these rectangles, picking up your presser foot and pivoting at each corner.
3. Repeat steps 1 and 2 with the main fabric, always sewing with right sides together.
4. Press all seams of your bag - I just folded the fabric along each seam and pressed flat. This will give your bag a nice square shape and it get much harder to get a nice press after this step so go ahead and do it now.
Once the pieces are pressed, your bag should stand nice and square like the photo above.
5. With right sides together, insert the lining box into the main fabric box.
6. Pin each corner of the lining and main fabric together. If using ribbon: Go to your serger and wrap a piece of ribbon around the foot, pulling the ribbon to where the bag will sit when it is finished. Add 1" to the length of your ribbon and cut. If using elastic: Cut 2 pieces of elastic that are 5" long. For ribbon or elastic, continue the same way: Fold each ribbon/elastic in half and slide between the lining and main fabric. Pin each just in from the corner seams on the back square (mine were about 5/8" in from the seam).
7. Sew around the top edge of your bag leaving about a 2" opening, making sure to back stitch at the beginning and end if using a sewing machine. Your elastic/ribbon will be trapped between the two fabrics like the above photo.
8. Flip you bag right-side out through the hole. It should look like the above photo.
9. Push the lining into the main fabric bag. Press the lining along the edge of the bag so that the lining is just slightly below the main fabric. Fold the edges of the opening you left to the inside, making sure it is level with the rest of the edge and press well.
Your bag is looking like a real bag now!
10. On a sewing machine, top stitch your opening all the way around. I kept mine as close to the edge as I could to make sure the space I left from flipping the bag right-side out was sufficiently closed with this step, but it's up to you how far in you top stitch as long as it's within the 1/2" seam allowance.
After a nice press to the top stitched edge, your bag is finished!I love that the lining is not only slick but light - I can easily see in there at any time. This may seem silly since it's just going to be filled with trash, but imagine the pain if you used a dark fabric and something you don't want to throw out falls in. Just one of the little perks of making something yourself - you can accommodate all your quirky desires, lol.
Now you just hook the ribbon/elastic pieces over your machine feet and pull the machine to the edge of your table and it's ready to use! Now my feet are firmly planted on the table - mine are suction cups, so it is very secure and not going to slide around - and I can easily pull the elastic off to dump my bag :) It's so fuss free!
This whole project (even with taking pictures for this tutorial) only took about 20 minutes and I love this little thing - it's even handy when I'm cleaning off my desk from snipped threads since now I can just put them in here until I dump it again. So convenient. Now I have to make one for my mom's machine too :)
So if you, too, find yourself in need of one of these guys, I hope this tutorial helps! And please send me a picture - I'd love to see what you make with it!
Saturday, December 12, 2015
Cloth Pads - A Success Story and Tutorial
This is a post that I've hemmed and hawed about putting out there for quite some time (a few years in fact). It's not that I'm ashamed or anything remotely close to that, it's that this is one of those things that could be awkward to know about a person you're friends with but not best friends with ... if that makes sense. So people who know me in real life, be warned: if you don't want to know personal details of a feminine nature, stop reading now!
So, what's all this fuss about? Well, it's about periods. Yes, menstruation and all its paraphernalia. This all started off in very unlikely way for me. Years ago, I was very into couponing and freebies, and one of my favorite blogs to follow for deals was Hip2Save. One day (about 3 years ago now), Collin posted about a freebie from Party In My Pants (yes, you read that right). Party In My Pants is a small company that make and sell cloth pads. At the time, the thought of women using cloth pads and washing them had never even crossed my mind and I was a bit blown away to be honest. Because of our "throw it away and get rid of any evidence" culture toward any bodily function, the thought was kind of gross - which is the reaction I get from 95% of the people I mention this to. I had to admit though, I was pretty curious about this concept. Would it actually work?
Here's where my personal TMI comes in. I've always had issues with the apparatus of that time of the month. I can't use tampons for legit medical reasons, and even though I used the "expensive pads", I was always very uncomfortable after a day or two of using disposable pads. I live in Florida, so the already humid region is even more so, causing things to stick and rub and just not feel very good at all. Even more TMI - I have a very heavy flow. Much more than average, apparently. I never knew this until a few years ago. I have to use overnight pads all the time or I have embarrassing problems. So, this freebie offer hit me at just the right time when I was wondering if there could be any thing better than just suffering through a week each month. I've used the same set of about 6 Party In My Pants pads each month for almost 3 years now, and I've been extremely happy with them. What a difference! I really wish that I could say I turned to this option because I was some kind of eco warrior or something, but I am only a believer due 100% to comfort and thrift. It was a strange concept to get used to at first - washing out blood soaked pads and reusing them - but in the end it's really no different than washing cloth diapers, or a rag you used to wipe down the toilet, or even a shirt a kid threw up on. Yes it's a gross mess, but that's what the washing machine is for! I throw my pre-soaked pads in the washer, and out they come clean and ready for use again. The cloth pads are also ridiculously cheaper than the throw away variety, especially if you use the ones I used to (Always Infinity or whatever their latest and greatest is now).
Up until now, I've only had about 7 or 8 pads. Two years ago I decided to try making my own, and I had one that was successful then, plus I won a free one on Party In My Pants' Facebook page (they have giveaways every time they introduce a new fabric collection - I highly recommend friending them for this reason). This was a fine amount since it was really all I could afford - I have a few different sizes and levels in my collection and all these cost me somewhere around $50 to $60. Not bad for 3 years of periods, amiright? The pads I have are all cotton and have a water-proof nylon backing, and they are only just starting to show signs of wearing out. They aren't leaking yet, but the water-proof layer is looking a bit more soaked in if that makes sense. I'd rather preemptively refresh my collection before leaking becomes an issue, but to be honest I just don't have $50 laying around to buy a few pads with - even though I love supporting such a great small company and I feel their products are certainly worth the price. At the end of the day, I have the ability to sew ... so why not make my own?
I've looked into the various fabric options periodically over the past few years, and I've acquired materials little by little. Most of my info has come from cloth diaper suppliers (like Wazoodle and Diaper Sewing Supplies) and various eco-bloggers (this is a great post) who make pads of their own. The first time I tried making pads 2 years ago, I used ProCool fabric for the waterproof outside (the blue to the left above) and Zorb (the lofty white on the far right above) for the core (both from Wazoodle). The one resulting usable pad was ok, but the outer fabric was nothing like I thought it would be. It's similar to a thick oilcloth, and very slick outside so it likes to shift around. I have a bunch left, but I'm just gonna save it until I need to make diapers one day I guess. The zorb works really well and holds a lot of liquid, so I still use that. I've read about people using terry cloth or flannel inside, but I just don't like the idea of sitting on a towel (too bulky) and flannel sounds like it would be too light weight and not hold enough. The zorb fits the bill for me - thin but very absorbent. I was just still on the hunt for outer fabric closer to my beloved Party In My Pants pads. Only a month ago, I heard about PUL (polyurethane laminate) and its use as a waterproof outside. When I learned Joann's sells PUL, I grabbed a 1/2 yard to try it out during one of their big sales along with a moisture wicking lining (which just sounded like it couldn't hurt, you know?). I finally buckled down, pulled out some scraps of cotton, and made my own pads :)
I had so much fun choosing from my scraps for these pads :) I went with scraps from my Take A Seat Dress, Skewed Flowers Dress, and Margot Pjs. It's projects like this that help me justify keeping every reasonable sized scrap I end up with, lol. All of the fabrics I chose for tops are good quality quilting cotton or cotton flannel = highly absorbent. Since grain is not so important in a pad, I just laid them out so they looked straight, and cut them all in one go. I made the pattern myself by tracing my favorite PIMP pad and adding 3/8" seam allowances. This free pattern is really similar just with square ends, but you could easily round them to make the same pattern as me.
I also used this scrap from a long-ago bag making project - because I couldn't resist the idea of geishas since it's so ridiculous, lol.
For my pads, I cut the full pattern piece in PUL (for the backing), Stay Dri Wicking Fabric (for the lining), and the cotton print (for the top). I also cut a smaller "core" piece in the Zorb.
To keep holes in the waterproof layer to a minimum, I attach the core and liner to the cotton top piece first by marking out a semi-circle next to the wings. I deliberately cut the Zorb core so that I will just barely be caught in this stitching line so the moisture stays in the middle of the pad, not flowing out into the wings as much.
I laid out each pad assembly line style and stitched along this semi-circle. It doesn't have to be exact (clearly, mine is not perfect, lol), this is really just to attach the 3 top pieces together. After this, I cut the seam allowance down on the zorb piece, and clip into the points at the ends of the stitching line on the zorb as well to minimize bulk at the seams.
Next, I laid the PUL piece with the shiny side out on top of the cotton top. You're going to flip the pad right side out after stitching and you want the fabricy side of the PUL to be on the outside (I had to do a bit of hunting to find this out).
Because the shiny side is facing out as you sew, it will want to stick to the presser foot. I got to use my teflon foot for the first time and it worked wonderfully :) No sticking at all! If you don't have a teflon foot or a roller foot, you can use tissue paper - just sew through the piece with the tissue paper on top, then peel it off when you're done.
I stitched around the perimeter with a 3/8" seam allowance, leaving an opening to turn the pad right side out (it works best if the opening is between the wing and the curved top and about 2" long). I trimmed down the seam allowance, flipped it right side out, using a point turner to push the seams out smooth, then pressed it to make the next step easier. Next I just fold the open end under to match the already closed edge, and topstitched about 1/4" from the outer edge.
Next I just gave them a good press to set the stitches, added snaps to the wings and called them done :) I was able to make all 4 of these in about an hour from cutting to finishing, and I would have paid $56.00 plus shipping if I'd purchased them from PIMP. I don't really know how to figure the cost exactly for each of these, but I'd guess they cost about $2.00 each to make with everything I used :) Not too bad of a savings if I say so myself.
So there you have it - my cloth pad confession :) These were so ridiculously fun to make, plus they were quick which is always really satisfying. Obviously my top-stitching isn't perfect by any means, but seriously no one will see them but me so I really don't care, you know what I mean? My favorite part is undoubtedly attaching the snaps. It's such a simple process that looks super professional, plus you get to use a hammer in the sewing room. I love it!
If you decide to try making pads yourself with the same materials, it's recommended you wash the finished pads before you use them. I didn't know this so I just used one immediately and I could see a bit of seepage around the stitching holes on the bottom of the PUL fabric. It wasn't enough that anything leaked out, but washing apparently will fluff the fabric back up around the holes from the stitches and stop this problem. I will also mention from my previous experience using the zorb core - the zorb is susceptible to "compression leaks", meaning if it's really full and you sit on it, it can basically squeeze the liquid out the sides. Trust me, I know this. So just be aware and don't let them get completely saturated (they are not so comfortable that way anyhow). Other than one time with a little side seepage, I've had no problems with the zorb. I'm hoping that the moisture wicking layer will suck the liquid down into the zorb faster and leave the top drier - we shall see.
After my first night of success, I went a little crazy and used up all my PUL and moisture wicking fabric. I experimented with flannel layers for the core on a few so I could use them for lighter days, as well as with a few shorter pads. I made all different sizes, but I wound up with 13 pads out of the 1/2 yard pieces of those fabrics (plus all my scrap cotton and the zorb). For the pads I made, I would have paid $166 from PIMP. Not a bad savings for 2 night's work, eh?
Anyway, I'm ridiculously pleased with myself about this project :) I have plenty more materials and tons of scraps - this is also giving me a great opportunity to use some crazy fat quarter prints that I loved but have no idea what to do with. Even though no one will see them but me, why not have them look pretty, right? Hopefully I haven't freaked anyone out too much with this post, lol. Do any of you use cloth pads? Have you made your own? I'd love to know your experience!
Summary:
Fabric: 1/2 yard of white PUL fabric from Joann's - $6.50, 1/2 yard of Stay Dri Wicking Fabric from Joann's - $4.50, various cotton and flannel prints - scraps from stash = free, 1/2 yard of Zorb absorbent fabric - $4.00 (I think - I bought it years ago)
Pattern: Self drafted from PIMP pad, but this pattern is similar - free
Notions: snaps - $5.00, thread - stash
Hours: 2 nights, so about 6 hours total
Total Cost for 13 pads: $20.00
So, what's all this fuss about? Well, it's about periods. Yes, menstruation and all its paraphernalia. This all started off in very unlikely way for me. Years ago, I was very into couponing and freebies, and one of my favorite blogs to follow for deals was Hip2Save. One day (about 3 years ago now), Collin posted about a freebie from Party In My Pants (yes, you read that right). Party In My Pants is a small company that make and sell cloth pads. At the time, the thought of women using cloth pads and washing them had never even crossed my mind and I was a bit blown away to be honest. Because of our "throw it away and get rid of any evidence" culture toward any bodily function, the thought was kind of gross - which is the reaction I get from 95% of the people I mention this to. I had to admit though, I was pretty curious about this concept. Would it actually work?
Here's where my personal TMI comes in. I've always had issues with the apparatus of that time of the month. I can't use tampons for legit medical reasons, and even though I used the "expensive pads", I was always very uncomfortable after a day or two of using disposable pads. I live in Florida, so the already humid region is even more so, causing things to stick and rub and just not feel very good at all. Even more TMI - I have a very heavy flow. Much more than average, apparently. I never knew this until a few years ago. I have to use overnight pads all the time or I have embarrassing problems. So, this freebie offer hit me at just the right time when I was wondering if there could be any thing better than just suffering through a week each month. I've used the same set of about 6 Party In My Pants pads each month for almost 3 years now, and I've been extremely happy with them. What a difference! I really wish that I could say I turned to this option because I was some kind of eco warrior or something, but I am only a believer due 100% to comfort and thrift. It was a strange concept to get used to at first - washing out blood soaked pads and reusing them - but in the end it's really no different than washing cloth diapers, or a rag you used to wipe down the toilet, or even a shirt a kid threw up on. Yes it's a gross mess, but that's what the washing machine is for! I throw my pre-soaked pads in the washer, and out they come clean and ready for use again. The cloth pads are also ridiculously cheaper than the throw away variety, especially if you use the ones I used to (Always Infinity or whatever their latest and greatest is now).
Up until now, I've only had about 7 or 8 pads. Two years ago I decided to try making my own, and I had one that was successful then, plus I won a free one on Party In My Pants' Facebook page (they have giveaways every time they introduce a new fabric collection - I highly recommend friending them for this reason). This was a fine amount since it was really all I could afford - I have a few different sizes and levels in my collection and all these cost me somewhere around $50 to $60. Not bad for 3 years of periods, amiright? The pads I have are all cotton and have a water-proof nylon backing, and they are only just starting to show signs of wearing out. They aren't leaking yet, but the water-proof layer is looking a bit more soaked in if that makes sense. I'd rather preemptively refresh my collection before leaking becomes an issue, but to be honest I just don't have $50 laying around to buy a few pads with - even though I love supporting such a great small company and I feel their products are certainly worth the price. At the end of the day, I have the ability to sew ... so why not make my own?
| My stash of pad-making-materials. |
I had so much fun choosing from my scraps for these pads :) I went with scraps from my Take A Seat Dress, Skewed Flowers Dress, and Margot Pjs. It's projects like this that help me justify keeping every reasonable sized scrap I end up with, lol. All of the fabrics I chose for tops are good quality quilting cotton or cotton flannel = highly absorbent. Since grain is not so important in a pad, I just laid them out so they looked straight, and cut them all in one go. I made the pattern myself by tracing my favorite PIMP pad and adding 3/8" seam allowances. This free pattern is really similar just with square ends, but you could easily round them to make the same pattern as me.
For my pads, I cut the full pattern piece in PUL (for the backing), Stay Dri Wicking Fabric (for the lining), and the cotton print (for the top). I also cut a smaller "core" piece in the Zorb.
To keep holes in the waterproof layer to a minimum, I attach the core and liner to the cotton top piece first by marking out a semi-circle next to the wings. I deliberately cut the Zorb core so that I will just barely be caught in this stitching line so the moisture stays in the middle of the pad, not flowing out into the wings as much.
I laid out each pad assembly line style and stitched along this semi-circle. It doesn't have to be exact (clearly, mine is not perfect, lol), this is really just to attach the 3 top pieces together. After this, I cut the seam allowance down on the zorb piece, and clip into the points at the ends of the stitching line on the zorb as well to minimize bulk at the seams.
Next, I laid the PUL piece with the shiny side out on top of the cotton top. You're going to flip the pad right side out after stitching and you want the fabricy side of the PUL to be on the outside (I had to do a bit of hunting to find this out).
Because the shiny side is facing out as you sew, it will want to stick to the presser foot. I got to use my teflon foot for the first time and it worked wonderfully :) No sticking at all! If you don't have a teflon foot or a roller foot, you can use tissue paper - just sew through the piece with the tissue paper on top, then peel it off when you're done.
I stitched around the perimeter with a 3/8" seam allowance, leaving an opening to turn the pad right side out (it works best if the opening is between the wing and the curved top and about 2" long). I trimmed down the seam allowance, flipped it right side out, using a point turner to push the seams out smooth, then pressed it to make the next step easier. Next I just fold the open end under to match the already closed edge, and topstitched about 1/4" from the outer edge.
Next I just gave them a good press to set the stitches, added snaps to the wings and called them done :) I was able to make all 4 of these in about an hour from cutting to finishing, and I would have paid $56.00 plus shipping if I'd purchased them from PIMP. I don't really know how to figure the cost exactly for each of these, but I'd guess they cost about $2.00 each to make with everything I used :) Not too bad of a savings if I say so myself.
So there you have it - my cloth pad confession :) These were so ridiculously fun to make, plus they were quick which is always really satisfying. Obviously my top-stitching isn't perfect by any means, but seriously no one will see them but me so I really don't care, you know what I mean? My favorite part is undoubtedly attaching the snaps. It's such a simple process that looks super professional, plus you get to use a hammer in the sewing room. I love it!
If you decide to try making pads yourself with the same materials, it's recommended you wash the finished pads before you use them. I didn't know this so I just used one immediately and I could see a bit of seepage around the stitching holes on the bottom of the PUL fabric. It wasn't enough that anything leaked out, but washing apparently will fluff the fabric back up around the holes from the stitches and stop this problem. I will also mention from my previous experience using the zorb core - the zorb is susceptible to "compression leaks", meaning if it's really full and you sit on it, it can basically squeeze the liquid out the sides. Trust me, I know this. So just be aware and don't let them get completely saturated (they are not so comfortable that way anyhow). Other than one time with a little side seepage, I've had no problems with the zorb. I'm hoping that the moisture wicking layer will suck the liquid down into the zorb faster and leave the top drier - we shall see.
After my first night of success, I went a little crazy and used up all my PUL and moisture wicking fabric. I experimented with flannel layers for the core on a few so I could use them for lighter days, as well as with a few shorter pads. I made all different sizes, but I wound up with 13 pads out of the 1/2 yard pieces of those fabrics (plus all my scrap cotton and the zorb). For the pads I made, I would have paid $166 from PIMP. Not a bad savings for 2 night's work, eh?
Anyway, I'm ridiculously pleased with myself about this project :) I have plenty more materials and tons of scraps - this is also giving me a great opportunity to use some crazy fat quarter prints that I loved but have no idea what to do with. Even though no one will see them but me, why not have them look pretty, right? Hopefully I haven't freaked anyone out too much with this post, lol. Do any of you use cloth pads? Have you made your own? I'd love to know your experience!
Summary:
Fabric: 1/2 yard of white PUL fabric from Joann's - $6.50, 1/2 yard of Stay Dri Wicking Fabric from Joann's - $4.50, various cotton and flannel prints - scraps from stash = free, 1/2 yard of Zorb absorbent fabric - $4.00 (I think - I bought it years ago)
Pattern: Self drafted from PIMP pad, but this pattern is similar - free
Notions: snaps - $5.00, thread - stash
Hours: 2 nights, so about 6 hours total
Total Cost for 13 pads: $20.00
Labels:
cloth pads,
eco friendly,
how to,
reusable,
sewing,
tutorial
Sunday, April 26, 2015
Why I Love Audiobooks (and How You Can Join Me)
As I'm sure you know if you've read my blog for any amount of time, I'm an avid reader. I absolutely love reading, and always have. I enjoy learning new things as well as just being swept away from my current problems in real life. As I've gotten older though, I find it harder and harder to devote the time to reading that I would like. There are just too many things to do in the day from working full time to keeping up with my house to working on my hobbies like knitting and sewing - there never seems to be enough time to accomplish the things that must be done, let alone the fun extras that I would like to do. So, how do I still read so many books? Audiobooks. Scoff if you will, oh disbelievers, but audiobooks have seriously changed my life. I only started with them because I received one for free back in my couponing days (The Great Gatsby by F. Scott Fitzgerald courtesy of Downpour.com), and I enjoyed it so much that I went on to find more. That was in April of 2013, and I have never looked back.
So, what's so great about audiobooks? I will confess that I used to be among the crowd that claimed listening to audiobooks wasn't "reading". I assumed people only listened to fluff stories that didn't matter much anyway if you missed something - man, was I wrong. I've always been able to listen to things very attentively (I'm the kind of person who will know the actual lyrics to a song after hearing it once, which I never knew was a big deal until I got much older), so I think I actually retain more when I listen to the book than when I read it in a physical book. I'm able to focus on what is being read to me while I do all kinds or mundane tasks. I listen to books while I do the dishes, fold laundry, clean up my sewing room, drive to work, etc. I feel like I've cracked the multitasking secret :) Not only do I do the things I would have to do anyway, I learn something at the same time. It's really an awesome feeling. I know for a fact that I've improved little by little in all the ways that books are known to improve you - I have a better vocabulary, I can understand more complex ideologies, I can contribute more to conversations, I can even recommend books and studies that might help someone else in a situation I've experienced myself. I am able to listen even while I'm doing other things I enjoy, like sewing and knitting. I already had a granny-like reputation with my friends and family, but adding the audiobooks into the knitting equation definitely solidified that persona even more, ha ha. I enjoy it though. They can hate all they want, but I will be smarter than them so whatever :pSo where do I get my audiobooks?
The shocking thing about audiobooks when you first get into using them is definitely how expensive they are. I've seen some recordings of books go for as much as $40 - $50! Clearly that is not an affordable alternative to regular books, especially for a thrift store junkie like me who gets books for 25¢ each. How do I get around this? The public library. I will confess that I hadn't entered my local library in over 10 years - I used to just buy books myself as I got older. I renewed my card though and was struck with awe at how much the library system has changed since my teenage years. The library has the usual books on cd and whatnot in their actual branches around town (which I have also been known to borrow and upload to my itunes library so I can listen to them on my phone), but now they have an online library! My library has ebooks and audiobooks that are available to checkout through a lovely site called Overdrive.com. I just set up an account on overdrive, then searched for my local library. Once you find your local library, you just put in your same card number and password that you would use on the regular library site (they tell you all that when you sign up for a card), and you are able to check out their files. Overdrive lets you access the books for a set period of time (usually 2 weeks), then when your due date comes you just no longer have access to the files.
Overdrive is my favorite way to listen to books. You can download the app on your computer, tablet or phone and use their program to download the files and listen. I use my phone so I can literally take it with me everywhere. I walk around my house, phone in hand, doing chores and "reading" all the time. I even hold it up to my ear while I brush my teeth if I'm in a particularly heavy part of the book. The only limitations you have with overdrive is that you have to wait your turn for a book just like all physical library books - only one person can check them out at a time - but you can "place a hold" on any book and join the queue to get that book next (in order of when you requested it). You can also make "wishlists" of your library's books on overdrive and then you choose to view only the books on your wishlist that are available for checkout (I do this all the time). The other big limitation is that you only have access to books that your library has purchased, so the selection will not be as extensive as online audiobook clubs (I will list those shortly). Even this can be avoided :) I just found out this week that some libraries will allow access to their files even if you don't live in their area! this link lists libraries from around the country who sell memberships for a yearly fee. I just got a membership to the Fairfax County Virginia Library this week - I nearly wet myself when I looked through their selection while I was deciding if the fee was worth it and saw that they have 12,919 audiobooks! That's just insane. Most every book I searched for before making my decision, they had it, particularly the classics. Frankly I think that access to almost 13,000 audiobooks is well worth $27 for the whole year, especially when you consider how much audiobook clubs cost. Anyway, Overdrive is amazing and I highly recommend checking into it.
My next go-to for audiobooks is Librivox.org. Librivox is a public site that offers free audiobooks of any book in the "public domain" - a book goes into the public domain so many years after its publication (at the moment, any book published before 1923 qualifies). The only catch - these are not professional recordings. All of these books are read by volunteers. Some are very good volunteers, but some are really not, lol. Also most books are not read entirely by the same person - each file is a chapter, and you can volunteer to read as many as you want. On the plus side, Librivox does have a free iphone app, so you can listen to them on the go. I've listened to several books this way and while they certainly aren't the quality of the professional recordings, they are free, so don't look a gift horse in the mouth :) (As a total side note, you can also volunteer to read for librivox - pretty cool!)
The next few options are all subscription services you have to pay a monthly fee for - the most obvious being Audible.com. Audible is now owned by Amazon, and they follow the usual format of audiobook subscription services: you pay a monthly fee and that fee gives you 1 credit each month. Each credit can be used for 1 book, and if you want any more than that you get a special "member discount" on their other titles during your membership. The nice thing with Audible is that they will give you a free trial - usually this is just 1 month, so 1 free book. I do see other deals though - Living Social currently has an offer to get 2 free months if you sign up through their link (it's still completely free), so you would get 2 books that way. This is what I did. Also Groupon has a deal going now that you can get a 3 month subscription for $2.95 per month, so you would be getting 3 books for $2.95 each - definitely a good deal. My membership saved me recently when I ran out of time on reading Atlas Shrugged through my library - it was 63 hours long, so it took me longer than the 2 week checkout period to listen to, and I couldn't renew it because someone else already had a hold on the book. It was a tragedy - I was 48 hours into the book and I'd have to wait another 2 weeks to finish it - no freakin' way. Audible had the book for $5.95 with the member discount (normally it's $40 on other sites), so the money was well worth it to me to finish the book without waiting. So, I'd recommend the free trial - it's worth it for the freebies and the discount :)
Downpour.com was my first ever introduction to audiobooks, though I will confess that I only did it because it was free :p Very occasionally they do freebies (I've seen 4 different books they gave free since April of 2013). I found out about the freebie from Hip2Save.com, and she posts whenever they have another one available. Other than the freebies, Downpour is just like Audible: their membership is $12.99 per month and that gives you 1 credit, plus you get the member discount on their other titles. Downpour is very good about putting certain books on sale at a deep discount, so I recommend signing up for their emails - I'm tempted pretty often when they go for $3.95 each :) Downpour has a free app for your phone, but you can also just download the file and listen to it on any type of music player.
The last site I have experience with is Audiobooks.com. I actually received a few books for free this year for being a World Book Night giver (which was seriously so nice of them), and to use them I had to get them from audiobooks.com. This service is just like Audible: their subscription is $14.99 per month and you get 1 credit per month. The only difference I can find is that you can purchase additional credits throughout the month instead of the "member discount" on other books. I cannot find out how much the extra credits cost though. This site also has a free app for your phone and that's how I use their service.
So, will you give audiobooks a try?
I am such a huge advocate of audiobooks - I recently got my sister into the ranks, despite her initial reservations. She used Overdrive and downloaded a book for her drive to Oklahoma, and she already has remarked at how accomplished she feels :) I love that I am able to read so much more than I used to due to time restraints. I also love that I am able to read classics with ease now when in physical form I always had trouble getting into the writing style. Classics have become my fall back genre now, and all but 1 of my 5 star books from last year were classics. There are good reasons these stories have stood the test of time. I also am fascinated by non-fiction, particularly in brain science, which can sometimes be a drudgery thick with facts and studies, but they are easy to get involved in when they are being read to me. I've also gotten over a book being so large they intimidate me, and while that means their audiobooks are long as well, it feels like less time than if I am reading a physical book. Just last night I started listening to Little Women while cooking dinner :)
I really hope this little rundown has been useful to someone out there. I had to do a lot of research to find all these services and how they work, so hopefully this will help you navigate the audiobook world more easily. Also, if you know of any useful (and let's face it, cheap!) sites that I did not mention, please comment and let me know so I can add them to the list!
Now you have no excuse - get out there are read!
Thursday, February 26, 2015
New Year, New Needle Case (a.k.a. How To Sew Your Own Double Pointed Knitting Needle Case)
It seems I have started a new tradition for myself - it seems that the last Sunday of the year makes me want to make cases for my knitting needles, lol. In 2013, I made this case for my 6" dpn set - this is honestly one of my favorite things I have made, and definitely the best as far as how functional it is. I use that case all the time and it has held up great. This past year, I was given an 8" dpn set for Christmas (this set from Stitchberry) - it's only right to want a pretty new place to put them all :)
I purchased these fabrics last New Year's Day at The Sewing Studio sale. I was on a kick from my recent make and decided I should make cases for my regular straight needles as well. Obviously that didn't happen, but it worked out so that when I decided to make this case I knew exactly what fabrics to grab. Knowing that I wanted to make this case for bigger needles (just not knowing how big at the time), I purchased 1/2 yard cuts of both the outer fabric and lining, but only got a fat quarter for the pockets like last time. The crazy floral print is an awesome Alexander Henry fabric called "Sloane" - I chose this for the outside of my case. It's basically all my favorite things in a fabric, but I knew I probably would never wear it, so this seemed the perfect chance to see it frequently :) The gray is called Quatrefoil Mini by Riley Blake and it will be my "lining" fabric. The teal is a fat quarter of broadcloth that will be my "pockets".
I wanted to write this up as a standard "how to" style tutorial/pattern, so I decided to just use the measurements I figured for my original 6" needle case I made in 2013. You can certainly change the pattern like I did by simply adjusting the length of your pieces - not the width. All widths will stay the same if you are housing a standard set of 15 sizes of double pointed needles - 5 of each size. Literally all you have to do to lengthen the pattern is add you additional inches to the length before you cut - easy peasy :) Everything is sewn with a 1/2" seam allowance unless otherwise noted.
Materials:
6. For second pocket (with numbers 10-15), measure 7.25" above bottom edge of lining fabric and place the pocket right side down so that the bottom of the pocket is sitting straight across at the 7.25" mark. Pin the pocket in place well (again, don't be afraid of using too many - you don't want the pocket to shift), and sew using 1/4" seam allowance from the edge of the pocket bottom.
Press the seam, then flip the pocket right side up at the seam you just made, pressing across the bottom carefully as not to remove your chalk lines.
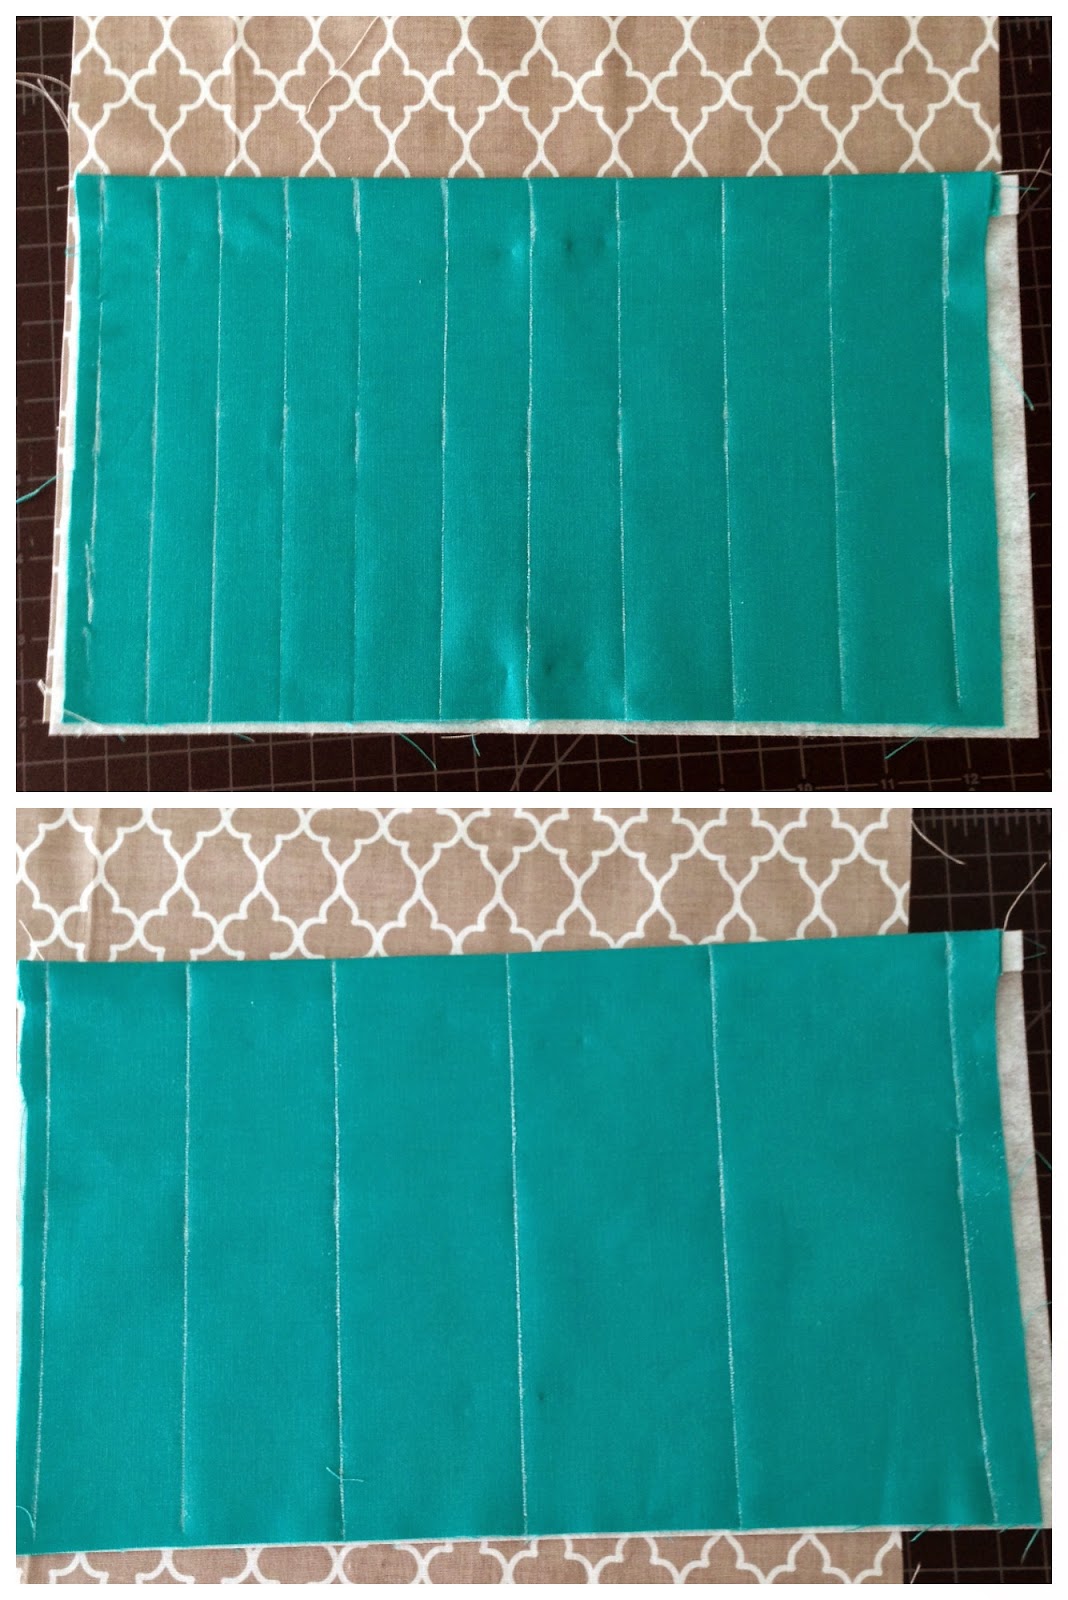
Top stitch 1/4" above the turned bottom edge of your pocket. Make sure the rest of the pocket is lined up with the lining fabric, pinning to keep in place, and stitch down each of the chalk lines making sure to back stitch at the top and bottom. Press the entire pocket to remove any remaining chalk.Your pockets should look like this:
7. Line up your piece of interfacing with the wrong side of the lining on top of it. Place the outer fabric on top of the lining right sides together to create a sandwich. Pin in place, then beginning just off the center of the top flap (the section with no pockets on it) back stitch and sew the perimeter using a 1/4" seam allowance down the long sides and 1/2" seam allowance across the top and bottom. Stop sewing 3" from where you began and backstitch, leaving a hole to turn the pieces right side out.
Cut each corner off near the seam junctions to create a sharper corner once the pieces are flipped.
8. Flip the case right side out through the hole in the top flap. Use a point turner or a chopstick to really push the corners out as much as possible.
Once you are happy with your corners and side seams, press the entire case making sure to keep the side seams straight. Fold under the excess fabric at the 3" hole and press well. Top stitch the entire perimeter of the case as close to the edge as you can.
9. Measure 6.5" from the bottom edge of the case and sew straight across the width of the case. Then measure 6.5" from the bottom edge of the 10-15 pocket and sew a straight seam again. These will help the case to fold nicely into thirds to close it up.
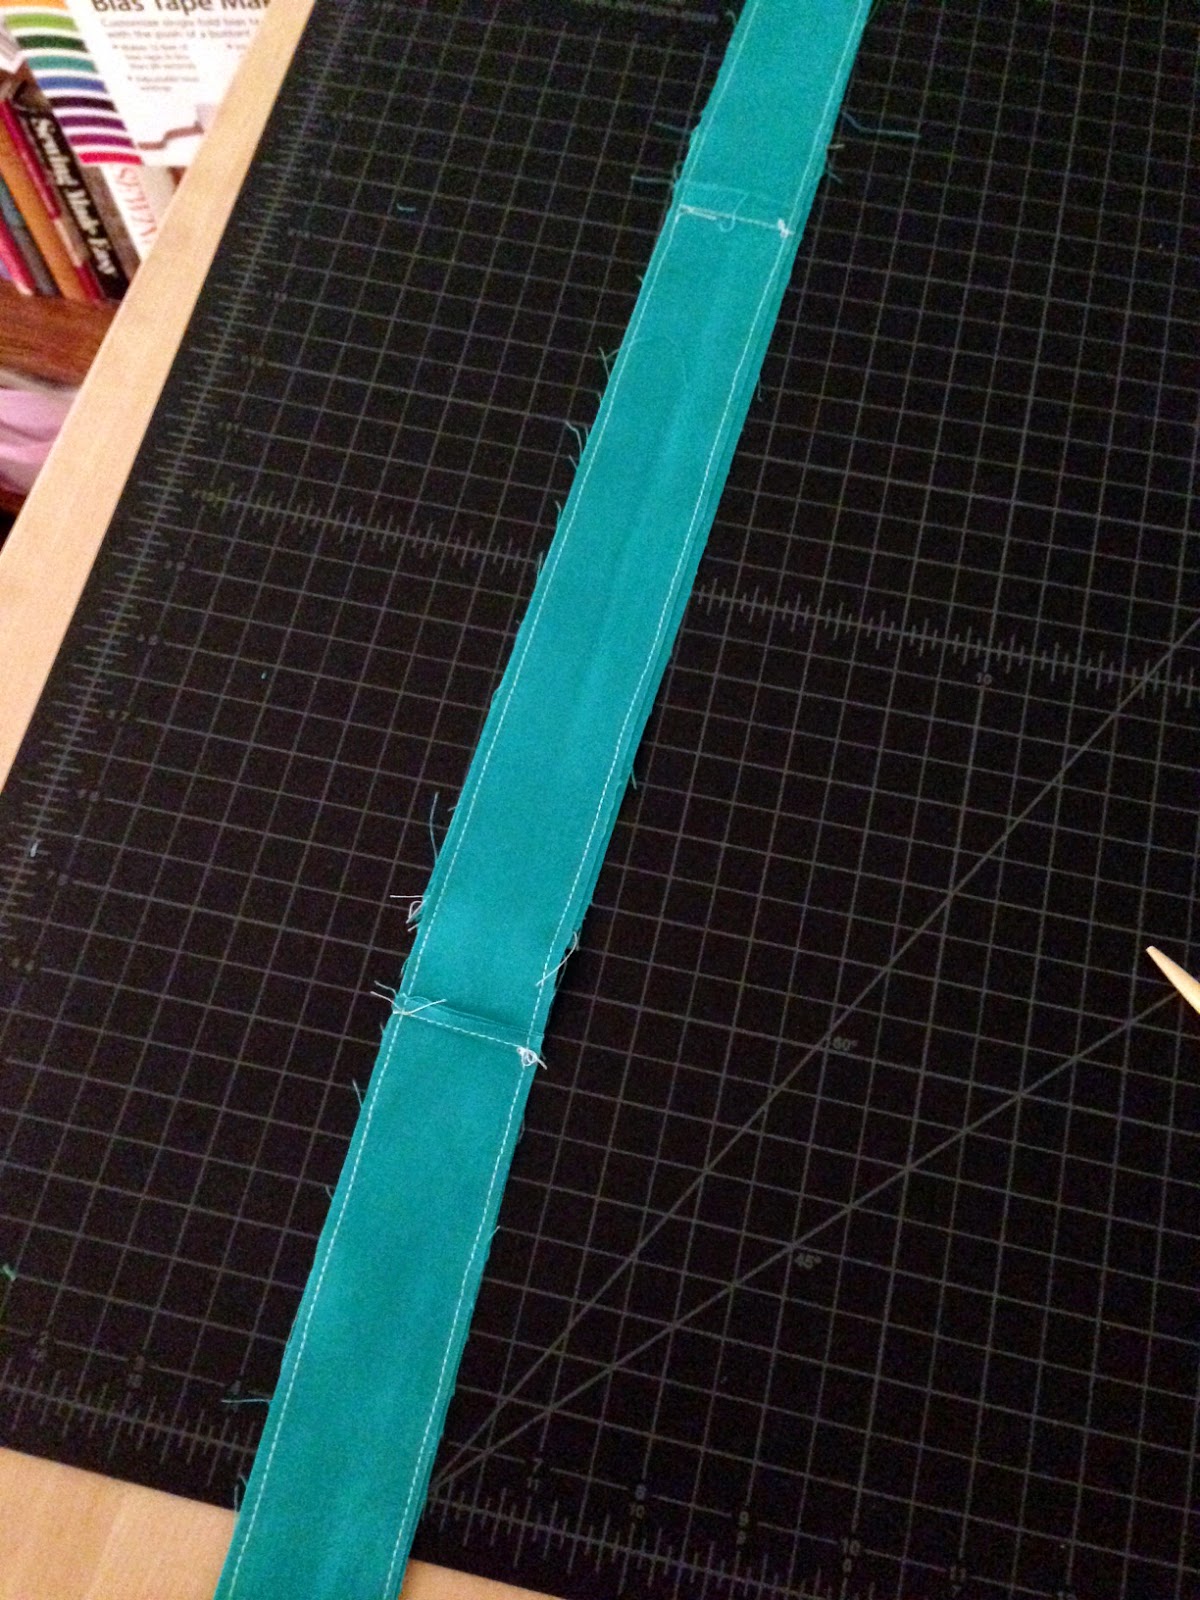
10. For the strap, fold the piece in half lengthwise with right sides together and press. Sew down the length of the piece (using 1/2" SA), then cut down the seam allowance as close as you would like to the seam. Press, then turn the tube right side out, and press being sure to keep the seams straight along the sides. Fold under about 1/4" at the top and bottom of the tube and press. Next, top stitch around the perimeter as close to the edge as you can. Press.
11. Place your strap at the center of your top flap, making sure to line up the edges. Pin the strap in place so it stays perpendicular to the side seam, and stitch a rectangle inside your strap to secure it to the top flap of the case. Try to keep the edges as even with your strap edges as possible, and pivot at the corners by keeping your needle down while lifting your presser foot to turn the fabric to stay with the edge of the fabric. Make sure the rectangle in at least 1" - 1.5" long so it is stable enough to be pulled on.
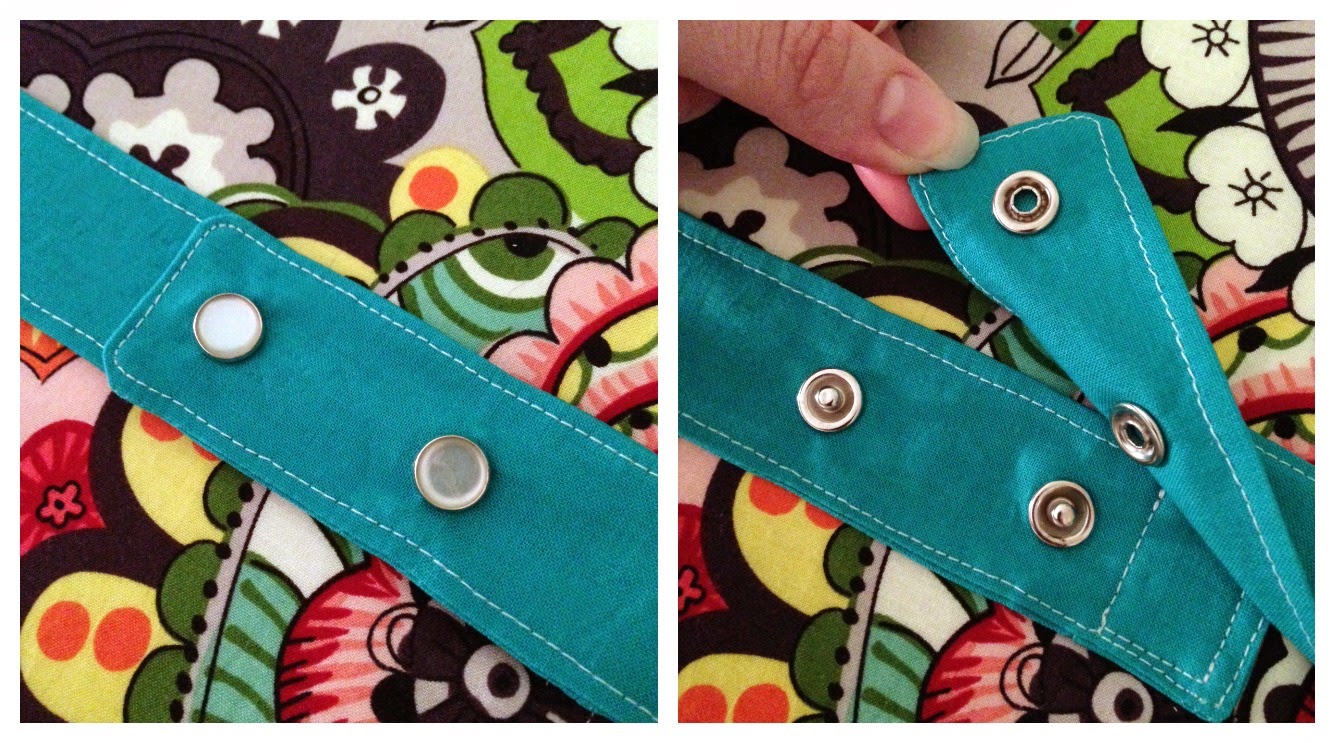
12. Before positioning the snaps, put all your needles in their respective pockets. Fold your case at the "fold seams" and line up the outside edges so you like how it sits. Next, wrap the strap around the case, overlapping it enough to hold the case snugly closed without causing it to buckle. Following the instructions on your packet of snaps, install them in the center of the strap, the first as close to the rectangle attaching the strap to the top flap as you can and the second close to the outer edge of the strap but so that you still have enough of a lip that you can easily grab the strap with your fingers to open the case. This is not an exact science, but a little extra effort will go a long way in the finished look of your case.
13. Sit back and revel in the glory of your new needle case!
Like I said at the beginning, the case in the photos is actually my 8" needle case. You can see my 6" case here. Because this case is larger, I had to do some interesting things to get my pieces cut as long as I needed, such as piecing the lining fabric together at the center and cutting my strap in multiple pieces, sewing them as one long piece, pressing the seam allowances down, and cutting it out in the length I needed in half the width using two pieces instead of just folding it over. I positioned the joins in the strap to sit at the back of the case, and the seam in the lining is completely covered by the second pocket, so there are no unsightly seams where there should not be.
*If you would like to add an additional pocket piece to the top flap (for notions and what have you), just follow the cutting directions for an additional pocket piece, though you will need to buy extra fabric for this. You will also have to decide where you want the pocket to be separated since I have not measured that part out, but it should be easy to do :) Don't be afraid to experiment!
I absolutely love these cases! I am able to carry my needles around everywhere if I want to, or flip it open and go right to the exact size needles that I need. These cases keep everything at easy access, yet still safely contained and organized. Another cool feature is that you can open the whole case, then wrap the strap backwards and snap the strap around something like a clothes hanger or a rod and the case can hang up. You can see an example of this in the link about my original 6" case.
I hope you enjoy your cases as much as I do :) If you have any questions, please feel free to leave me a comment or shoot me an email and I will answer you the best I can!
I purchased these fabrics last New Year's Day at The Sewing Studio sale. I was on a kick from my recent make and decided I should make cases for my regular straight needles as well. Obviously that didn't happen, but it worked out so that when I decided to make this case I knew exactly what fabrics to grab. Knowing that I wanted to make this case for bigger needles (just not knowing how big at the time), I purchased 1/2 yard cuts of both the outer fabric and lining, but only got a fat quarter for the pockets like last time. The crazy floral print is an awesome Alexander Henry fabric called "Sloane" - I chose this for the outside of my case. It's basically all my favorite things in a fabric, but I knew I probably would never wear it, so this seemed the perfect chance to see it frequently :) The gray is called Quatrefoil Mini by Riley Blake and it will be my "lining" fabric. The teal is a fat quarter of broadcloth that will be my "pockets".
I wanted to write this up as a standard "how to" style tutorial/pattern, so I decided to just use the measurements I figured for my original 6" needle case I made in 2013. You can certainly change the pattern like I did by simply adjusting the length of your pieces - not the width. All widths will stay the same if you are housing a standard set of 15 sizes of double pointed needles - 5 of each size. Literally all you have to do to lengthen the pattern is add you additional inches to the length before you cut - easy peasy :) Everything is sewn with a 1/2" seam allowance unless otherwise noted.
Materials:
- 3 coordinating fat quarters of fabric, 1 for the outside, 1 for the inside, and 1 for the pockets and strap.
- Medium weight, Sew-in interfacing (I used Pellon 40)
- Snaps for closures
- Coordinating thread
2. Line up 2 pocket pieces with right sides together placing 1 piece of interfacing beneath them. Sew across one longer side.
Press the seam, then separate the fabric pieces, folding as close to the seam as you can and press again. This seam is the top edge of your pocket. Repeat this step for the second pocket.
3. Lay a ruler across the top of your first pocket piece. Using a chalk marker, mark lines vertically down the front of the pocket at the following increments: 0.5", 1.2", 1.95", 2.8", 3.75", 4.85", 5.95", 7.1", 8.4", 9.75", 11.15". Next, lay the ruler across the second pocket, marking at the following increments: 0.5", 2.15", 3.9", 6", 8.4", 11.15". These measurements are exact to fit sizes 0-15 of needles, so be as precise as you can.
4. Being careful not to rub your chalk lines too much, top stitch a 1/4" seam parallel to the top edge of the pocket. Next, embroider the numbers between each of the chalk lines. The top pocket will have numbers 0-9 and the bottom pocket will have numbers 10-15. I tried to line my numbers up about 1/2" below the top stitched line at the edge of the pocket just for consistency. Be sure to trim all your threads before moving to the next step - you will not have access to the back of this piece again. *If your sewing machine does not embroider, you could certainly embroider the numbers by hand or even draw them on using a fabric marker.*
5. Line up the bottom edges of your first pocket (with numbers 0-9) with the bottom edges of your lining fabric. Pin the pocket in place between the chalk lines (don't be afraid of pins here - you really can't use too many). Starting at the top of the pocket edge, sew down each chalk line being sure to back stitch at the top. Press entire pocket to remove any remaining chalk.6. For second pocket (with numbers 10-15), measure 7.25" above bottom edge of lining fabric and place the pocket right side down so that the bottom of the pocket is sitting straight across at the 7.25" mark. Pin the pocket in place well (again, don't be afraid of using too many - you don't want the pocket to shift), and sew using 1/4" seam allowance from the edge of the pocket bottom.
Press the seam, then flip the pocket right side up at the seam you just made, pressing across the bottom carefully as not to remove your chalk lines.
Top stitch 1/4" above the turned bottom edge of your pocket. Make sure the rest of the pocket is lined up with the lining fabric, pinning to keep in place, and stitch down each of the chalk lines making sure to back stitch at the top and bottom. Press the entire pocket to remove any remaining chalk.Your pockets should look like this:
7. Line up your piece of interfacing with the wrong side of the lining on top of it. Place the outer fabric on top of the lining right sides together to create a sandwich. Pin in place, then beginning just off the center of the top flap (the section with no pockets on it) back stitch and sew the perimeter using a 1/4" seam allowance down the long sides and 1/2" seam allowance across the top and bottom. Stop sewing 3" from where you began and backstitch, leaving a hole to turn the pieces right side out.
Cut each corner off near the seam junctions to create a sharper corner once the pieces are flipped.
8. Flip the case right side out through the hole in the top flap. Use a point turner or a chopstick to really push the corners out as much as possible.
Once you are happy with your corners and side seams, press the entire case making sure to keep the side seams straight. Fold under the excess fabric at the 3" hole and press well. Top stitch the entire perimeter of the case as close to the edge as you can.
9. Measure 6.5" from the bottom edge of the case and sew straight across the width of the case. Then measure 6.5" from the bottom edge of the 10-15 pocket and sew a straight seam again. These will help the case to fold nicely into thirds to close it up.
10. For the strap, fold the piece in half lengthwise with right sides together and press. Sew down the length of the piece (using 1/2" SA), then cut down the seam allowance as close as you would like to the seam. Press, then turn the tube right side out, and press being sure to keep the seams straight along the sides. Fold under about 1/4" at the top and bottom of the tube and press. Next, top stitch around the perimeter as close to the edge as you can. Press.
11. Place your strap at the center of your top flap, making sure to line up the edges. Pin the strap in place so it stays perpendicular to the side seam, and stitch a rectangle inside your strap to secure it to the top flap of the case. Try to keep the edges as even with your strap edges as possible, and pivot at the corners by keeping your needle down while lifting your presser foot to turn the fabric to stay with the edge of the fabric. Make sure the rectangle in at least 1" - 1.5" long so it is stable enough to be pulled on.
12. Before positioning the snaps, put all your needles in their respective pockets. Fold your case at the "fold seams" and line up the outside edges so you like how it sits. Next, wrap the strap around the case, overlapping it enough to hold the case snugly closed without causing it to buckle. Following the instructions on your packet of snaps, install them in the center of the strap, the first as close to the rectangle attaching the strap to the top flap as you can and the second close to the outer edge of the strap but so that you still have enough of a lip that you can easily grab the strap with your fingers to open the case. This is not an exact science, but a little extra effort will go a long way in the finished look of your case.
13. Sit back and revel in the glory of your new needle case!
Like I said at the beginning, the case in the photos is actually my 8" needle case. You can see my 6" case here. Because this case is larger, I had to do some interesting things to get my pieces cut as long as I needed, such as piecing the lining fabric together at the center and cutting my strap in multiple pieces, sewing them as one long piece, pressing the seam allowances down, and cutting it out in the length I needed in half the width using two pieces instead of just folding it over. I positioned the joins in the strap to sit at the back of the case, and the seam in the lining is completely covered by the second pocket, so there are no unsightly seams where there should not be.
*If you would like to add an additional pocket piece to the top flap (for notions and what have you), just follow the cutting directions for an additional pocket piece, though you will need to buy extra fabric for this. You will also have to decide where you want the pocket to be separated since I have not measured that part out, but it should be easy to do :) Don't be afraid to experiment!
I absolutely love these cases! I am able to carry my needles around everywhere if I want to, or flip it open and go right to the exact size needles that I need. These cases keep everything at easy access, yet still safely contained and organized. Another cool feature is that you can open the whole case, then wrap the strap backwards and snap the strap around something like a clothes hanger or a rod and the case can hang up. You can see an example of this in the link about my original 6" case.
I hope you enjoy your cases as much as I do :) If you have any questions, please feel free to leave me a comment or shoot me an email and I will answer you the best I can!
Labels:
diy,
dpns,
how to,
knitting needles,
needle case,
organization,
pattern,
sewing,
tutorial
Subscribe to:
Posts (Atom)