Showing posts with label diy. Show all posts

Friday, January 16, 2026

Video: Let's Make A Knitting Bag!


YEARS ago I made myself a Faux Field Bag from scratch off of just a few measurements. Now I'm breaking down exactly how I make this bag as I show you how to make one yourself with no pattern. Come hang out and get a cute new knitting bag in the process! Click the video below to watch now.


*It's so cute, I just love it!


Friday, May 23, 2025

Video: Let's Build a Duck House!


This is a little departure from my usual sewing and knitting content, but these ducks REALLY needed to start living outside of my garage. So I decided to film how I made this duck house in case others want to make one as well. Click the link below to watch (and there is some very cute duck footage, fyi).


Friday, March 8, 2024

Video: DIY Magnetic Pin Plate


I needed to make a new pin plate, so I thought "Why not make it a video?" This is how I think now, lol. BUT if you are at all interested in making your own quick and easy magnetic pin plate for your sewing room, head on over and check it out. This project is so easy, it feels like cheating. Grab a thrifted plate or saucer plus some magnets and you're mostly there. These make wonderful gifts and each one is as bright and colorful as you can find a plate for. Head over here to watch it yourself and give me a like if you feel so inclined :)
I'm trying to plan out more simple tutorials to make videos on, so if you have any ideas of things you've seen me do over the years, let me know!

Saturday, March 14, 2020

Tutorial: Cute Dollar Tree Hanging Planters!

Friends, it is officially spring in Florida and certainly will be by the 21st of March everywhere else, lol. As such, I've been seeing all the beautiful flowers and herbs available in stores just waiting for me to take them home and love them (just me?). This project actually started because my boyfriend gave me beautiful orchid for Valentine's Day and it was needing to go outside to increase its chance of survival. Orchids have always been a hard plant for me even though I live in the perfect place to grow them. I tend to water them too much, etc, and my over love is not something they can withstand. Given my history with these lovely plants, plus that the people I've seen have the most success with orchids have them hanging and leave them alone in their back yards, I decided to devise a hanging planter. Those wooden crate style ones the garden center sells are obviously good, but given my current budget I needed a more cost effective option. Enter the Dollar Tree! I found all these materials for $1 each, and with a little bit of sewing know-how I made a bunch of adorable hanging planters for less than the cost of 1 of the basket style ones. I thought others might like to make these as well, so this is a tutorial on what I did to make these cheap but cute hanging planters.
Materials:

  • Coco liner
  • Jute cord
  • Large and Sharp Darning Needle
  • Scissors
Yes, that's it. Crazy. You can technically do this with any size coco liner - mine are about 10" in diameter and they are sold for $1 at the Dollar Tree each spring. If you went with a larger coco liner, you may want to get thicker cording, which may get complicated for threading it through. So keep in mind when purchasing your materials. This tutorial will just focus on the smaller size.
Step 1: First, you'll need to cut a semi circular piece out of the side third of your coco liner. It's hard to see the semi circle in the picture because of the angle (sorry), but just know you want it to bow in. It can help to fold it into a cone shape and mark where it overlaps and then cut there. I just eye balled it and it all worked out fine.
Step 2: Roll your now cut down liner into a cone shape with just a bit overlapping along the cut edge.

Step 3: Thread a length of jute cord on your darning needle and secure it at the top of your cone with a knot inside the planter. I like to fold the tip inward so there are no open areas and then stitch it down. Don't tug the cord too roughly or it may snap (ask me how I know) and just get your stitching started. 
Step 4: Using a running stitch, stitch up the opening in whatever spacing you like. I made my stitches fairly large because I liked the simplified look, but you could make more stitches if you wish. Tie it off inside (just like you would knot after sewing on a button or something) to secure.
*This would be a great time to add any embellishment if you so choose. Wouldn't it be cute with extra embroidery?! I was in a rush, but I may do this one future iterations.
Step 5: Next you need the hanger. Take your jute while still on the spool and thread the end on your darning needle. Starting from the inside where you want the hanger to start, thread it out and then back in making a small stitch. Tie a double knot inside the planter to secure and cut off the excess. 
Determine how long you want your planter to hang - I made mine about a 2 foot drop, but it can be any length you want. Pull out the length you want, add a few inches, and cut the jute. Thread your jute on the darning needle again and repeat the knotting process directly across from the knot you made first. Repeat this process again in the area between your first knots so that your hanging weight is evenly distributed and your hanger will hang level.
Step 6: Time to make it a hanging look at the top. Hold up your hanging cords so the planter looks level and pinch about 2 inches down from the top, holding the cords all as one. Tie a separate length of jute at this point, making a double square knot that has one short end and one long end.
Now for a little basic macrame! Tuck the shorter cut end of the jute you just tied onto the other cords down and hold it with the other cords. Using the longer end you just tied on, start making half knots and slide them up to the original knot. Imagine you're at summer camp in middle school making spiral friendship bracelets. That is exactly what you are doing here. Keep making half knots and sliding them up to the previous knot until you run out of cord. Pull your last knot a little tighter than the rest and cut off the excess. If you're worried about it unraveling, you can thread the end up into the knots. I just left mine raw. It's a $2 planter, I'm not that worried about it, lol. But you end up with a cute little spiral securing your hanging loop and I just love it.
This is my initial orchid hanger. I just poured the bark that was in the original pot into the hanger around the roots of the orchid and wedged the support posts holding up the flowers into the coco liner as much as I could without piercing through. I also grabbed the large hanging hooks at the Dollar Tree - this one has a butterfly, but I got some plain hooks as well.
After my initial orchid hanger turned out so well, I decided to make a few more for some new annuals and herbs to hang in my pergola! This picture has French Lavender and white Petunias, but I also made one with a Red Velvet Echevaria, so I have 6 of these in total.
Add to the small planters some of the larger hanging baskets I had on hand, and my pergola is looking super cute and I just want to hang out in there now :)
Not a super impressive photo, lol, and I majorly need to to some neatening up and raking on the ground, but I've hung lights in there as well and I have a couch on the other end that you can't see, so it's just a fun hang out spot that now has the added touch of some cool hanging planters. And it only cost me a few bucks and an afternoon to make them all!
I hope you enjoy this tutorial, and if you make any of these planters yourself I would love to see them! Let's cute up our yards to make us more excited to be outside this spring!


Friday, July 15, 2016

Sewing Room Tools: DIY Magnetic Pin Plate

Friends, I have a confession - I'm not super patient with tools when I'm sewing. I want my tools to work (and easily) how and when I need them to, and when they do I am able to be super productive. One thing that I always feel deficient in is pin collection while I'm sewing. A friend of mine gave me this awesome (but incredibly old) wrist pin cushion a few years ago, and I used it all the time for months - I could easily just stick the pins on my wrist as I pulled them out of my fabric while sewing, and then they were all ready to be used without having to arrange them any certain way. I say "used" (past tense) because being an old item (from at least the 70s, possibly 60s or earlier), eventually this happened:
I would stick the foam back into the little plastic housing, but it kept coming back out, then one day I saw the insides looked like this and I knew it was no use:
Yeah... not much left there to pin into anyway. Around the time of this small tragedy, I came across this post by Mint Green Sewing Machine and I decided to try something new (and way cuter, let's be real). I'd never thought of such a great purpose for the cute plates you find in thrift stores. I would always be tempted by pretty plates, but knew I would never use them, so this post gave me yet another thing to hunt for, lol. I picked a pretty plate, bought some magnets, and got to work.
When I decided to make it, I couldn't find my furniture felt pads, but I had just made a Princess Anna Cape and had scrap pieces of pink felt readily available and my larger circle Sizzix Paddle Punch was the perfect size to cover the magnets I bought so I just used that instead.
I wanted a strong bond (no falling apart like my wrist pin cushion!) so I used E6000 to glue the magnets to the plate, then I used a little more of it to glue the fleece to the magnets. I followed all the instructions and even let it sit overnight before I messed with it.
Et voilà! A magnetic pin plate that's way prettier than the expensive than the ones made by Clover and the like.I made this plate 2 years ago (wow! seriously, it was July of 2014) and I still use this every time I sew anything. I liked my plate so much that I made more for my mom, sister, and aunt for Christmas that year (they all also sew) and I know that my mom at least mentions how much she loves hers. I may even make myself more (one for next to the machine, one by the cutting table, etc) so I don't have to remember where I set it all the time. 

To anyone going to make one themselves, I would definitely advise you maybe put one more magnet on the bottom. It's fine on the stronger magnets, but when I made my gift versions I used a different brand of magnets and didn't notice that they were not as strong until I had them glued and then it was too late, so I had to add another in the center on those. Also, the fleece totally works in place of the felt pads and it makes for one less thing to buy. My fleece is still going strong after 2 years and it keeps my magnets from scratching my desk I painted.

Anyway, this feels like a silly thing to post, but this is seriously one of my favorite sewing tools so I thought I'd share. I found a slap bracelet style magnetic wrist pin cushion at Hobby Lobby (in the clearance, no less!) a month ago, and I've used it a bit but it's still no where near as convenient as the magnetic plate. For real. This project cost about $2.00 and took maybe 10 minutes total to make. Make yourself one! You won't regret it :)

Tuesday, May 19, 2015

House Update: Come See Me New Living Room...

So, this post has been a ridiculously long time coming. As in, 2 years and 3 months long. Prepare yourself for an absolute onslaught of photos, because friends ... MY LIVING ROOM IS FINISHED! This feels epic just to write, so even if no one cares, I will treasure this post, lol.

Let's begin with how this room looked when we purchased the house 2 years and 3 months ago...
This pic is ridiculously small, sorry, but this is how it looked when we toured for the first time. The house was built in 1969, but was sold (and redecorated) in 1990 before we purchased it. Oh, that nasty mauve and cream. Everything in the house was country colors: mauve, cream, country blue, butter yellow *shutter*. Oh, the awful memories.
The living room and dining room are the biggest undertaking as far as painting walls - look how tall that ceiling is! We loved the beams and the size of the room, and just how different the house is, you know? I could see the potential. We had great plans to paint and fix and decorate, and we did a bit, but then we had to move more suddenly than originally planned, filling our house with boxes of junk we didn't get to sort through, and making other more necessary fixes come first. Quickly, it all became overwhelming trying to live here, work, and fix the house all at once while still keeping our sanity. I would have small bursts of home improvement moods, but they were few and far between. We just eventually let everything sit like it was and just tried not to think about how awful it looked. Before this past January rolled around, I had manage to paint almost all of the living room, except the far wall and dining room - it was too tall for me, so the wall was the last remnant of the awful pukey mauve. 

We had a tumultuous New Year, as I've mentioned several times before. My sister, Shannon, was staying for a few months to visit over Christmas, and she decided I needed a project to get my mind off of my personal life, and that my house needed serious need of assistance. She loves fixing up houses, and she hadn't gotten to do any home improving since she left for Japan over a year before, so she was itching to paint something, lol. She lit a fire under me, and we tackled the projects I had started years before while she was visiting. I have other things to show as well, but I'm still doing the final touches. The living room though got its final finesse two weeks ago, and I've been working on this post ever since. So ...  without further ado ... here is what my living room looks like now...
This is the view as you walk in the front door and turn to the living room. Notice anything different, lol? The paint was purchased long ago from Sherwin Williams on sale. It's their Super Paint Latex paint in Sedate Gray (possibly the most depressing color name ever, ha ha) with a satin finish, and the trim is their Pro Classic Latex Acrylic paint in untinted white. This was the largest single expense of the room, and I'm guessing I spent $200 on the paint, but that was back when I still had a little money so it worked out.
This area was the first to be finished, but I've made some little additions over time. We used to have our tv in here, but back in October of last year we decided to move the tv into the cleaned out den since it's cosier in there. So, details. The metal thing on the wall came from the clearance section at Target about 1.5 years ago for $24.00. The couch and chairs were the best Craigslist score I've ever had - yes, I kid you not, they are from Craigslist. Amazing, right? A man down in Vero Beach had purchased a model house that came fully furnished, so they sold off some of the model furniture. I happened to see the listing 10 minutes after he posted the couch, and I was the first to contact him out of what would be over 50 people. My dad and I drove down that night with his truck and got this baby for $100 (I know, right?!). Since we had come so far, he said he was eventually planning to list the chairs as well, so he went ahead and let us get them as well for another $100. These chairs were almost brand new - only sat on when people toured the model house. It's still crazy when I think about it, lol, but I've had them since shortly after we purchased the house.
The side tables were ours from our condo, and the coffee table was a yard sale score at $15 - it has a small scratch on the top, but other than that it is perfect. 
The other half of the living room is pretty sparse looking at the moment. I have a coffee table that I purchased a long time ago that will become a bench for that space under the window - I'm just trying to find fabric that looks good with the other couches. The table in the window was Justin's grandparent's. I even painted the metal frames of the windows white back when I painted the bay window area and it's still holding up wonderfully :) Back when I painted this window area, I replaced the funky dirty cream colored blinds. Oddly enough the smaller windows were the most expensive because they were a custom cut size. All the blinds in this bay window cost $100.00, but it was worth every penny as it is so much brighter in here now!
Here's the little corner I previewed a few months ago when I painted this table. The table was free from a friend when she moved and I painted it Espresso brown. The lamp was thrifted for $3, the shade was a clearance grab from Target for $6, the doily was thrifted for $0.25, and the plant came from Liz when she moved. The painting is one of my favorites I found at a thrift store for $5 (more info on that below), and I put that creepy wicker monkey in the archway as a joke and he has now become a fixture - he was free.
Ugh, it's a terrible quality before photo, but this is the bay window before and after. Pretty crazy, right? I love this area now. 
As you rotate around the room, the music area is next. This area will change a little over time. The old hi-fi cabinet was inherited by my husband, along with the cabinet holding the records (the record player is on top) and about 1/3 of the records inside. Next to the hi-fi is a stack of the larger record collections from the 60s (The Longines Symphony Orchestra plays Nat King Cole, etc.) - these won't fit in the cabinet now, so I have them here until I figure something else out. On top of them is a neat Italian cookie tin that I use to hold things like record cleaner and other accessories. Eventually, I will do a little carpentry and cut out a bigger area for the record player, and set mine inside to kind of re-do the cabinet.
The other side has the record player and speakers (some day to live inside the other cabinet), along with my keyboard and piano music. The red chair will be painted another color sometime - I just haven't decided what color yet. The red chair was a thrift store score for $6.00, and it has a really neat pattern on the seat.
As soon as I positioned everything like this, my first order of business was to alphabetize my records. Before this, they were in about 4 different places in boxes and stacks, so it is AMAZING to have them not only all in one spot, but also to have them in alpha order so I can summon up any one that I want. Ah, sweet organization :) I also celebrated this new spot by playing my Wham! album. Like you do...
The next area around the room is the dining area. Gordo even posed for this shot - how lucky are you? :) Look a little different? 
The dining room has my awesome solid wood table in the center, which was given to me by a friend when we bought the house. It needs to be redone, but until then it just always has a table cloth on it. The table cloth was a sale purchase forever ago for $9, and it was actually too long. This was one of my finishing touches two weeks ago - I finally cut down the table cloth to fit the table and the leftover piece was just large enough to cover the top of the sewing machine table (the actual top is horribly rusted because its former owner kept it around their pool deck - weird, right?). The chairs are a mix of two sets - 4 are Ikea Ivar chairs that we used with our Ikea table in our old condo (that table is now in my sewing room), and the other 4 were a set that I bought at a thrift store for $15.00 just so we would have chairs. I can technically fit all 8 at the table, but it's a bit crammed, so that extra just chills in the corner unless we need it. I also replaced the blinds on all these side windows - I was worried it would be too expensive at first, but seriously lucked out. All 3 of these large windows are actually 6 smaller windows of a standard bedroom size. So I was able to buy 6 regular sized mini blinds for $3.99 each! How cool is that?! This is such a vast improvement from the horribly dirty cream colored ones. The light coming in the room is so worth the $24 these cost, no question. 
Again, sorry for the bad before picture here, but this is a before and after of the dining room. The walls were cream colored with cream trim and 2 layers of wallpaper under the chair rail. Getting all that wallpaper off was not a fun experience, and it took me a long time to decide what I wanted on the bottom. Should it be all the same color with contrasting trim? Should it be an accent color under there? I just didn't like any of the options mentioned, until Shannon suggested painting it all white and eventually making fake wainscoting. Since it was the only appealing sounding idea to me, we went for it and I really do love how it turned out. The entire area under the chair rail is painted with the same semi gloss pure white paint as all the trim, and I plan to eventually add wooden frames of the same size all the way around and paint them white to match so it looks like real wainscoting. Also, we do have a new light fixture to hang above the dining room table, but I have to wait until I can afford a professional electrician to install it for us. One of these days.
That extra chair just lives here, but it comes in handy occasionally elsewhere in the house. That gold colored chandelier belonged to my Great Grandmother, and it is at least as old as the early 1950s (I know this because my Grandmother says her mother-in-law had it before she married my Grandfather and she just remembers how much she hated cleaning it when they lived with his parents, lol). The square framed print was picked up at Marshall's (with another to match on the other side of the room) way back when we were in our condo. I plan on cutting the frames open and putting some of my shots in them from when I shot square format film during my experimental photography years.
This china hutch as well as the lovely Noritake china inside came from my Grammy - they brought it all back from when they lived in Okinawa. I have her fancy silverware in a case in there too :) The china pattern is a pretty pink rose with silver rims on the dishes. I have a crazy huge service, including 14 tea cups, lol. Now that it's finally in its place and accessible, I can actually use it for company :) The vases at the top all came from Justin's Grandma.
This cute Bistro sign was in our condo too, and I thought it was fitting to have it over the kitchen archway. And that picture is the one that matches the other frame so its print will change soon. Also, I still need to spray paint that ac vent white.
I love my gallery wall in the center of this room, but it is still a work in progress. I'm searching through my final junk room to find a few more things before I make everything a done deal up there. Everything up there is a mixture of thrift store finds, things I picked up on vacations, some of my husband's photography prints, or things I've won :) I also absolutely LOVE the sewing machine table. This was an estate sale deal that I snagged for $20 because it was still left at the end of the sale. Like I said earlier, it was kept around a pool deck before so it is pretty rusty. The bottom still looks good - it's just the awful top that has weathered boards and a metal top that is all rusted. I plan to replace the top later on, but until then the table cloth works well. 
The art work around the room are all total favorites that were great finds over the last few years. Let's start with the top corner. This is a metal hurricane map that is an enamel sign so you can get a little hurricane shaped magnet to track the storms - how cool is that? Not only that, but it's colors were awesome, and it was only $6.00 at a thrift store frame and all - it had to be mine! One of these days I'll try to find a hurricane magnet, lol. The globe map is a really recent find - originally the hurricane map was in this spot, but it looked a bit small so when I found this it was ousted. This map is this weird golden metallic iridescent print of a 15th century or so map. It has Latin writing around the edges, and the gold color shimmers and moves as you move in front of it. This also came framed, but there's no glass, and it was only $5.00. It looks great above the record player! The butterfly print is one of my favorite pieces of artwork in the house - it was another $5.00 thrift store find. This is a signed and numbered lithograph that looks to be hand colored by the artist. It's called Fantasia II by Pearl Abrams and it is number 95 out of 200. This came professionally framed from a gallery and it's a very high quality piece. I tried looking it up and it would sell for somewhere around $150 from what I can find, so that's pretty cool :) I put it next to the arch into the foyer, so it is a prime location that I pass every time I need to leave. Even the colors go great in the room. I just love this thing, lol. The coffee table has another recent item - the Buddha statue. I grabbed the statue back in March at Marshall's (of all places, right?) and he was sold as a yard ornament. My husband and I have both gotten pretty into Buddhism this past year, so I had been looking for a small Buddha to have around, and then found this randomly for $14.99 - sold! Also the plants and the neat plates they are on came from my friend Liz when she moved. They were kept outside before, plus they had plants on them, so the plates were pretty dirty. A quick cleaning though, and they are a really lovely turquoise glaze on them and they look great in the room :)
Isn't it amazing that the room once looked like this? This was during my frantic search for the perfect wall color - the room would just suck any good aspects out of any color I chose. It was something to do with the beams and the carpet and the lighting - I don't know, but it was a nightmare. I'm glad  I persevered though, because this really is the perfect wall color. I was even complimented by a friend of mine who sells paint for a living on how well the wall color went with the sofa, so I was pretty pleased :)
And just for posterity's sake, this is what the room looked like in January when Shannon had just finished the large wall and we were working on the kitchen cabinets. Yes, I lived with my room like this for weeks, lol.
And even just a month ago, the room looked like this. This was just after I finally finished painting the cabinets so I got to clear this area of painting supplies. Just this change was a major celebration, but I still had to figure out the record player placement and whatnot.
I didn't clear out all this clutter and excess furniture until just two weeks ago. Now that it's all finished and I love the room so much, I can't believe that I ever lived like this complacently. I'm addicted to clean spaces now at least. 
And, because I could, I had to post a panoramic view of the whole room :) Isn't it awesome?!
This is now one of my favorite rooms in the house and I find myself deliberately hanging out in here while I knit or read just because I can. Finishing this room also coincided with when I read Marie Kondo's book, and it really made me understand why I want to be in here. I can now honestly say that I LOVE most all of the items in this room. The furniture may not match the rest, and the carpet may not be in great shape, and the bay window is pretty stark still, etc, etc, but every one of the items I have put in this room bring me joy. It's amazing how much that simple fact changes how the room feels. Each item in here was hand picked by me, even down to the framed quotes. I have other plans, of course - I'm still digging out all of our "family pictures" we had in our condo so I can make a gallery wall next to the arch into the foyer, for example - but even in its current state I can't fully describe how much the feeling of the room has changed. Every item brings back fond memories or pleases my own personal eye, and no professional decorator could have given me that individualism in this room no matter how much money was spent. Yes it took two years, but it feels so worth it to have everything just as I like it :)

Summary:
Paint: approx. $200
Furniture: $260 (and counting)
Blinds: $124.00
Art Work and Decor: $114.25 (and counting)
Misc Hardware: $30.00 (plug, switches, plate covers, nails for pictures, etc.)
Total: $836.50

Holy crap, that's much more expensive than I thought, lol, but the fact that the price is including a new couch set, that's pretty freaking good, right? We paid more than that just for our other couches that are in the den, you know? So considering that this price is a completely custom, finished room that's really cheap. Plus this expense was spread out over the past 2 years, so it never felt like that large of an expense. By the time I get other planned projects finished up, this room will still be about $1000 - and this is technically two finished rooms :) I'm totally happy with that price.

So, if you are still reading, and you have put off doing home improvements because you think it will be too expensive, I hope this shows that it really doesn't have to cost much. It won't be quick, and it won't be without lots of hard work and labor, but I can say it is all 100% worth it. I can't wait to see how this room develops now :)

Thursday, February 26, 2015

New Year, New Needle Case (a.k.a. How To Sew Your Own Double Pointed Knitting Needle Case)

It seems I have started a new tradition for myself - it seems that the last Sunday of the year makes me want to make cases for my knitting needles, lol. In 2013, I made this case for my 6" dpn set - this is honestly one of my favorite things I have made, and definitely the best as far as how functional it is. I use that case all the time and it has held up great. This past year, I was given an 8" dpn set for Christmas (this set from Stitchberry) - it's only right to want a pretty new place to put them all :)
I purchased these fabrics last New Year's Day at The Sewing Studio sale. I was on a kick from my recent make and decided I should make cases for my regular straight needles as well. Obviously that didn't happen, but it worked out so that when I decided to make this case I knew exactly what fabrics to grab. Knowing that I wanted to make this case for bigger needles (just not knowing how big at the time), I purchased 1/2 yard cuts of both the outer fabric and lining, but only got a fat quarter for the pockets like last time. The crazy floral print is an awesome Alexander Henry fabric called "Sloane" - I chose this for the outside of my case. It's basically all my favorite things in a fabric, but I knew I probably would never wear it, so this seemed the perfect chance to see it frequently :) The gray is called Quatrefoil Mini by Riley Blake and it will be my "lining" fabric. The teal is a fat quarter of broadcloth that will be my "pockets".

I wanted to write this up as a standard "how to" style tutorial/pattern, so I decided to just use the measurements I figured for my original 6" needle case I made in 2013. You can certainly change the pattern like I did by simply adjusting the length of your pieces - not the width. All widths will stay the same if you are housing a standard set of 15 sizes of double pointed needles - 5 of each size. Literally all you have to do to lengthen the pattern is add you additional inches to the length before you cut - easy peasy :) Everything is sewn with a 1/2" seam allowance unless otherwise noted.

Materials:
  • 3 coordinating fat quarters of fabric, 1 for the outside, 1 for the inside, and 1 for the pockets and strap.
  • Medium weight, Sew-in interfacing (I used Pellon 40)
  • Snaps for closures
  • Coordinating thread
1. First thing, we need to cut out our pieces. Cut 1 outer fabric, 1 lining fabric, and 1 piece of interfacing 12" wide x 22.5" long (for my 8" case, I cut these pieces 12" wide x 24.5" long). Cut 4 pocket fabric pieces and 2 interfacing pieces that measure 12" wide x 5.5" long (for 8" case, I cut them 7.5" long). Cut 1 piece for the strap measuring 4" wide x 21" long (just cut the strap as long as your piece of fabric - I got lucky with my fat quarter and there was an extra inch there on mine). Now you're ready to start sewing!
2. Line up 2 pocket pieces with right sides together placing 1 piece of interfacing beneath them. Sew across one longer side.
Press the seam, then separate the fabric pieces, folding as close to the seam as you can and press again. This seam is the top edge of your pocket. Repeat this step for the second pocket.
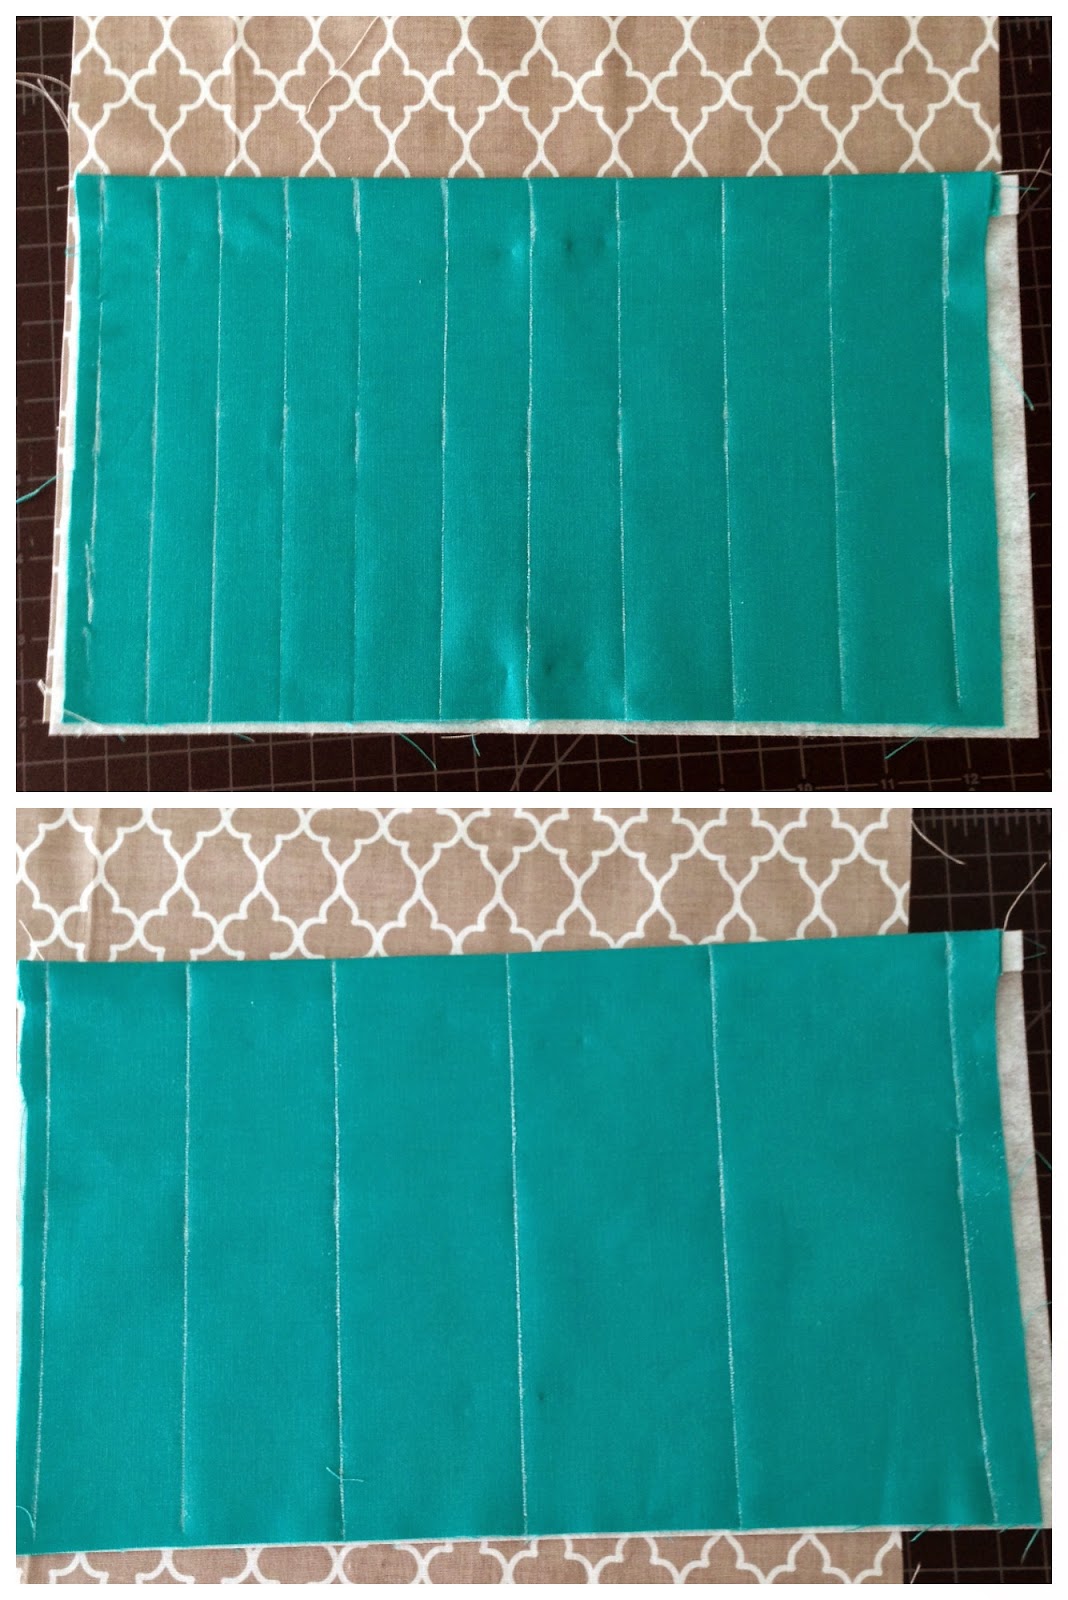
3. Lay a ruler across the top of your first pocket piece. Using a chalk marker, mark lines vertically down the front of the pocket at the following increments: 0.5", 1.2", 1.95", 2.8", 3.75", 4.85", 5.95", 7.1", 8.4", 9.75", 11.15". Next, lay the ruler across the second pocket, marking at the following increments: 0.5", 2.15", 3.9", 6", 8.4", 11.15". These measurements are exact to fit sizes 0-15 of needles, so be as precise as you can.
4. Being careful not to rub your chalk lines too much, top stitch a 1/4" seam parallel to the top edge of the pocket. Next, embroider the numbers between each of the chalk lines. The top pocket will have numbers 0-9 and the bottom pocket will have numbers 10-15. I tried to line my numbers up about 1/2" below the top stitched line at the edge of the pocket just for consistency. Be sure to trim all your threads before moving to the next step - you will not have access to the back of this piece again. *If your sewing machine does not embroider, you could certainly embroider the numbers by hand or even draw them on using a fabric marker.*
5. Line up the bottom edges of your first pocket (with numbers 0-9) with the bottom edges of your lining fabric. Pin the pocket in place between the chalk lines (don't be afraid of pins here - you really can't use too many). Starting at the top of the pocket edge, sew down each chalk line being sure to back stitch at the top. Press entire pocket to remove any remaining chalk.
6. For second pocket (with numbers 10-15), measure 7.25" above bottom edge of lining fabric and place the pocket right side down so that the bottom of the pocket is sitting straight across at the 7.25" mark. Pin the pocket in place well (again, don't be afraid of using too many - you don't want the pocket to shift), and sew using 1/4" seam allowance from the edge of the pocket bottom.
Press the seam, then flip the pocket right side up at the seam you just made, pressing across the bottom carefully as not to remove your chalk lines.
Top stitch 1/4" above the turned bottom edge of your pocket. Make sure the rest of the pocket is lined up with the lining fabric, pinning to keep in place, and stitch down each of the chalk lines making sure to back stitch at the top and bottom. Press the entire pocket to remove any remaining chalk.Your pockets should look like this:
7. Line up your piece of interfacing with the wrong side of the lining on top of it. Place the outer fabric on top of the lining right sides together to create a sandwich. Pin in place, then beginning just off the center of the top flap (the section with no pockets on it) back stitch and sew the perimeter using a 1/4" seam allowance down the long sides and 1/2" seam allowance across the top and bottom. Stop sewing 3" from where you began and backstitch, leaving a hole to turn the pieces right side out.
Cut each corner off near the seam junctions to create a sharper corner once the pieces are flipped.
8. Flip the case right side out through the hole in the top flap. Use a point turner or a chopstick to really push the corners out as much as possible.
Once you are happy with your corners and side seams, press the entire case making sure to keep the side seams straight. Fold under the excess fabric at the 3" hole and press well. Top stitch the entire perimeter of the case as close to the edge as you can.
9. Measure 6.5" from the bottom edge of the case and sew straight across the width of the case. Then measure 6.5" from the bottom edge of the 10-15 pocket and sew a straight seam again. These will help the case to fold nicely into thirds to close it up.
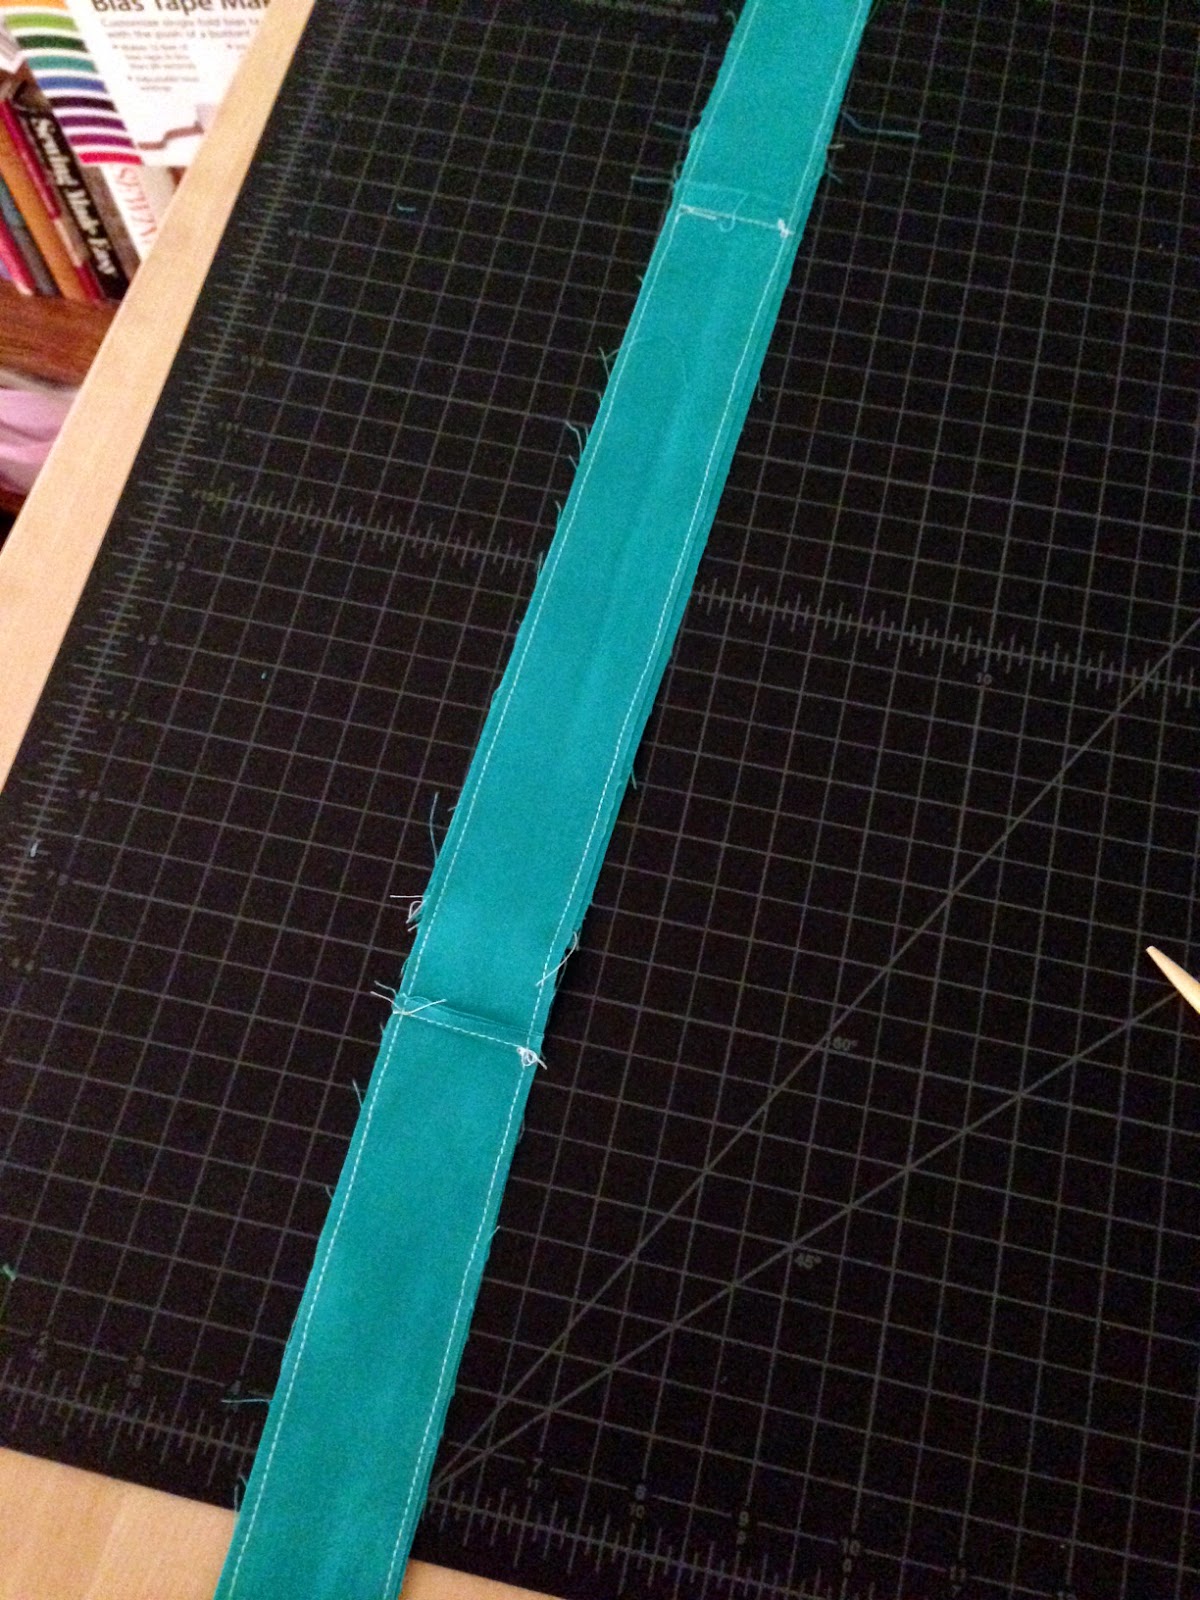
10. For the strap, fold the piece in half lengthwise with right sides together and press. Sew down the length of the piece (using 1/2" SA), then cut down the seam allowance as close as you would like to the seam. Press, then turn the tube right side out, and press being sure to keep the seams straight along the sides. Fold under about 1/4" at the top and bottom of the tube and press. Next, top stitch around the perimeter as close to the edge as you can. Press.
11. Place your strap at the center of your top flap, making sure to line up the edges. Pin the strap in place so it stays perpendicular to the side seam, and stitch a rectangle inside your strap to secure it to the top flap of the case. Try to keep the edges as even with your strap edges as possible, and pivot at the corners by keeping your needle down while lifting your presser foot to turn the fabric to stay with the edge of the fabric. Make sure the rectangle in at least 1" - 1.5" long so it is stable enough to be pulled on.
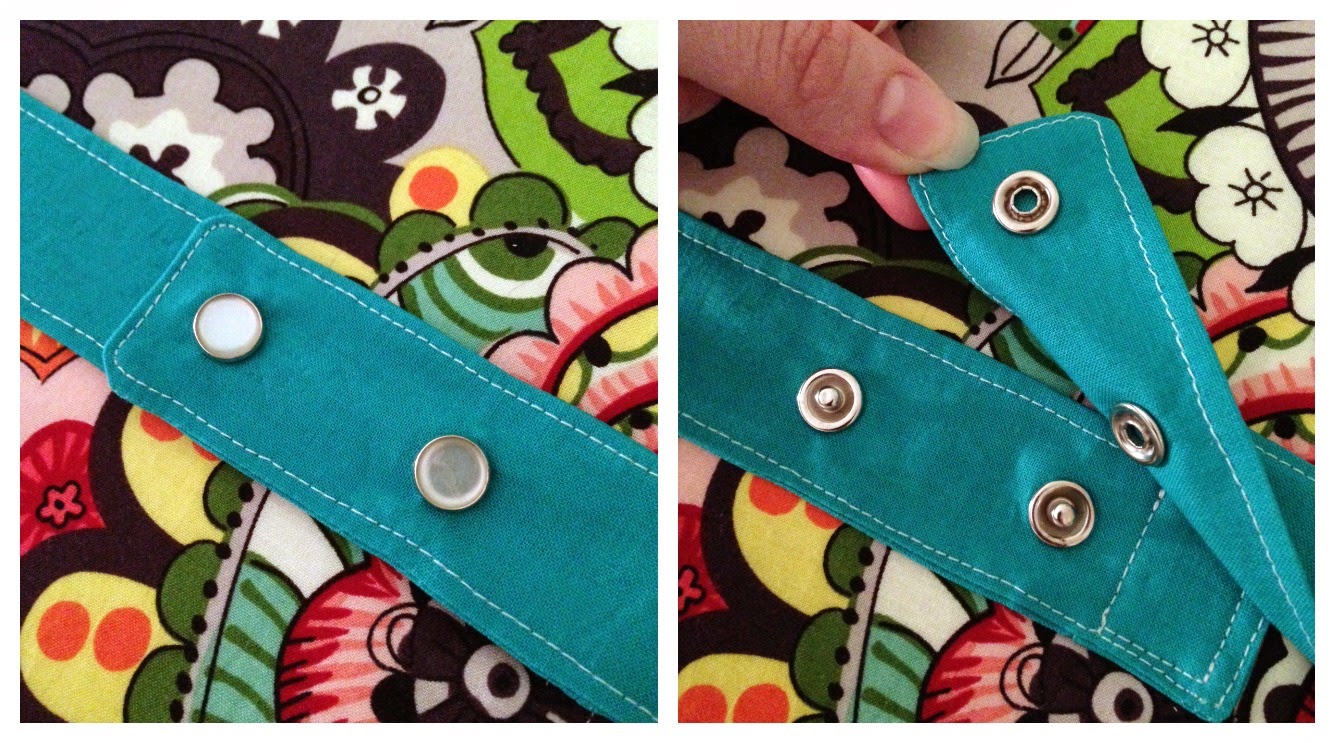
12. Before positioning the snaps, put all your needles in their respective pockets. Fold your case at the "fold seams" and line up the outside edges so you like how it sits. Next, wrap the strap around the case, overlapping it enough to hold the case snugly closed without causing it to buckle. Following the instructions on your packet of snaps, install them in the center of the strap, the first as close to the rectangle attaching the strap to the top flap as you can and the second close to the outer edge of the strap but so that you still have enough of a lip that you can easily grab the strap with your fingers to open the case. This is not an exact science, but a little extra effort will go a long way in the finished look of your case.
13. Sit back and revel in the glory of your new needle case!
Like I said at the beginning, the case in the photos is actually my 8" needle case. You can see my 6" case here. Because this case is larger, I had to do some interesting things to get my pieces cut as long as I needed, such as piecing the lining fabric together at the center and cutting my strap in multiple pieces, sewing them as one long piece, pressing the seam allowances down, and cutting it out in the length I needed in half the width using two pieces instead of just folding it over.  I positioned the joins in the strap to sit at the back of the case, and the seam in the lining is completely covered by the second pocket, so there are no unsightly seams where there should not be.

*If you would like to add an additional pocket piece to the top flap (for notions and what have you), just follow the cutting directions for an additional pocket piece, though you will need to buy extra fabric for this. You will also have to decide where you want the pocket to be separated since I have not measured that part out, but it should be easy to do :) Don't be afraid to experiment!
I absolutely love these cases! I am able to carry my needles around everywhere if I want to, or flip it open and go right to the exact size needles that I need. These cases keep everything at easy access, yet still safely contained and organized. Another cool feature is that you can open the whole case, then wrap the strap backwards and snap the strap around something like a clothes hanger or a rod and the case can hang up. You can see an example of this in the link about my original 6" case.

I hope you enjoy your cases as much as I do :) If you have any questions, please feel free to leave me a comment or shoot me an email and I will answer you the best I can!