Showing posts with label organization. Show all posts

Saturday, August 13, 2016

My Sewing Room - Banish the Beige!

 So, I moved last month (gasp!) which means I had to move my sewing room and start afresh. Before I delve into the big reveal though, let's all shed a quiet tear for the space I had to tear down: here. Man, I loved that room. I still love the wall color, but I digress. I'm renting my new space, so painting wasn't an option. I had to just stick with the awful beige and make the best of it. Here is what my new room looks like:
Not bad, eh? I can't help but feel happy when I go in here, and it's all mine :) I mean, I share with my dog and cat, but still. Personally I love stalking other people's sewing rooms to see how they organize things and all that, so I thought I'd do a detailed tour.
So, here's what you see when you stand in the doorway. My cutting table is in the middle of the room, and the walls are lined with shelves and other storage.
My cutting table is one of my favorite things in the space. This was my first kitchen table year ago, but when we got a bigger space we also got a bigger table, so I was quick to stake my claim on this one :) We bought this at Ikea preassembled in the As Is section (it was the display model). I haven't seen the table since so sadly I believe it may not be available anymore and I have no idea what it was called. The table is right at 1 yard square on the top, and the best part is that there are 2 hidden wings that you can pull out to extend the table on each side and double its length. This works fantastically for cutting things out and gives me all the space I need. I added some rod holders on one side to keep my medical exam paper within easy access for tracing. A friend of mine gave me 3 of these white closet organizer drawer units when she moved and they are the perfect height for me to raise up my table. I just have the table sitting on top of the units now, but it makes the table nice and tall (I'm 5'7") so it doesn't hurt my back to cut fabric anymore. The other side of the drawer units has all my rulers. I attached some mini Command hooks to the sides so all the rulers are an easy grab away. I also keep my blocking boards for knitting and my small cutting board in the space between the drawer units under the table. The drawers are also very useful - one holds my tracing paper and tacking tools, another has WIPs in bags, and another is full or crocheted stuffed animals I made a long time ago but don't have space to display while the other 3 drawers all hold yarn. The table really does so much more than a table needs to, and I love it for that.
Storage wide, the first thing you see when you come in is my big étagère in the corner. This was a big painting project of mine years back (see post here) for my other sewing room, and it fits really well in my new space as well - yay! This holds some of my favorite knitting books as well as some of my favorite knitted and crocheted animals. I love how the animals add fun pops of color. This also always holds my tv and bluray player (eventually it will hold the cable box, but my cord isn't quite long enough at the moment). The bottom cabinet holds my old sewing machine and other random tools and such. Also, you can see my yarn swift on the floor - it usually lives in the corner but I hadn't noticed that it fell over before the picture, Oops.
To the right I have a little drawer unit stack filled with tools. I got these drawers at a yard sale for $5 and they're a great size. The drawers are organized as: glues and magnets; stay tapes and fusible notions; snaps, grommets, setting tools, etc; shoulder pads, pocket lining, velcro, elastic, belting, etc; extra scissors and seam rippers; my Sizzix Paddle Punch set. My tower fan is an absolute must since I'm always hot, and the stand up lamp is just the $10 one from Ikea with 2 lights.
My dresser was another piece I painted (posted here) and it holds more notions and tools. The drawers are: knitting needle sets, crochet hook sets, clear tape, and washi tape; yarn winder, post its, ric rac, etc; button stash (shown in above photo); decorative trims and elastics, extra pins; fold over elastic, animal eyes, sewing machine feet; bias tape maker machine and tips, embroidery hoops, heat set crystals and tool. There are other random things mixed in, but that's the gist of it.
The wall above is pretty fun too :) I have my neutral colored threads, a shelf with hanging bins (that I still haven't put anything in, lol), a bulletin board, some paper flowers, a faux milk glass dish, and art work. I also hang my rotary cutter on the shelf because it's really convenient. The little art work is all meaningful to me - the pin cushion one at the top is actually a card my husband gave me, and the kitty with the diamond ring is a postcard I bought at Epcot in Japan when I was a teenager (and I still had it!). The canvas is a photo I took with my Holga back when I was obsessed with weird film photography and then I did an inkjet transfer onto this canvas. I still haven't decided where to hang it, so it's just sitting on the dresser right now. I also splurged a few months ago on a Capri Blue Volcano candle so now my sewing room smells like Anthropologie on command :) The cup on the desk holds my pencils and colored pens for tracing as well as a loop turner, chop stick, and bodkin.
The cork board was given to me by a friend and most of my pins are actual lapel pine or costume jewelry earrings I thought were neat but can't wear. The clock one is actually a button cover, but I hot glued a pin to the back :) And you can see the magnetic Crazy Cat Lady on the desk in this photo. She's fun to stack with her little cats when I want a change, lol.
This is the other side of my sewing room. My dress form hangs out in front of my book shelves, but she rolls easily. Usually my ironing board is set up in front of the book shelves as well (I put it up to look fancy, lol).
Keep going to the right and you see the other big shelf unit. There shelves were in my office at my house before I moved, but since my new place only has 2 rooms these needed a new occupation. And who doesn't need move shelving in a sewing room, I ask you?! The pink bins on the bottom of the shelf hold bins with embroidery/cross stitch supplies and thrifted sweaters I plan to unravel. The shelf above those with all the boxes have elastic, ribbon, old wooden thread spools, fat quarters, and my bead box from my pre-teen days (my friend and I used to sell beaded bracelet and I still have a fancy sticker on the box with our prices #entrepreneur). The bottom of the other shelf has by clear bag full of yarn for when I want to work on crochet or knitted animals that take multiple colors as well as my distilled water for my iron. The shelf above that holds my tatting bag (maybe I'll actually figure that out one day, lol, I had high hopes at one time) as well as some knitting projects in bags.
The top shelves I used more for decorative purposes :) I do have various craft books (sewing, knitting, crochet, embroidery, etc) as well as my Eucalan and Soak washes, a darning tool, my clothing shaver, and little bits and bobs, but I love being able to see my fox, tree, and Well Dressed Pig as I iron, lol. The two sheep are some thrift store finds that I couldn't resist. I am a knitter, after all.
The other shelf has some white baskets I use to hold small knitting WIPs. Below that is a shelf with my PDF patterns (which I keep in file folders) as well as a yarn holder and my basket of pressing tools (the hams are in there, you just can't see them). Below that is my sewing basket with all my little tools and hand sewing needles (typical basket stuff) and my iron and spray starch. And on top of the shelves I have some pretty sewing baskets I just really like and a fancy wig box - because. And my letter M that I spray painted years ago sits here too. It used to hang on the wall, but that thing is a beast to hang (there are 2 holes on the back, but they are not level plus it's really heavy so it needs anchors, ugh). It's cute up there though, so I'm not worried about it :)
Next is my desk area. I deliberately put the desk here because I found I was a little paranoid with my back to the door all the time in my old sewing room. At least now I can greet Gordo and Daisy as they come to visit (my dog and cat). The desk used to be a boring computer desk, and was actually my first custom painting project - I even stenciled it (posted here). The desktop itself holds my sewing machine (a Singer Quantum Stylist 9960) and my Ott Lite (because I'm getting old). The little shelf in the corner keeps my bobbins (in plastic cases), extra machine needles, and manuals at easy access. On the shelf I keep a mug with pens, seam rippers, chop sticks, seam gauges, and more. My magnetic pen plate and wrist pin cushion also live here near my note pad so I can quickly take notes as I'm sewing or weighing out yarn. The milk glass lamp is the real deal and it still works! I was given a matching set and I just love them in my sewing space. Above the desk I have a magnetic strip from Ikea to hold my scissors (clearly organized by type so I don't accidentally grab my sewing scissors for paper).
And now is a good time to show some art work :) Back over by the TV is this awesome electric sewing machine ad from a ladies' magazine from 1919 I picked up at an estate sale. The frame was thrifted and I painted it white. The Simplicity posted came from Simplicity a few years ago and I just really love the design. Back over by my desk I have my Pretty Little Paris cross stitch that my sister gave me for my birthday last year. Aren't the colors fun?! And above the desk itself are my colored threads and serger threads as well as these really cool Marie Antoinette postcards from Versailles that I picked up on Yerdle (posted here) and the frame they are in is one I've had for over 10 years that I just spray painted the same coral as my desk. I also spray painted those thread racks.
Back over to the other side of the room, there's another little storage area. The shelf holds my dtraight knitting needles and circulars (inside the basket) plus my sewing machine bank (it's a bank!) and some animals. The shelves hold a basket with project bags in it (what can I say, I really like project bags, lol) and folders and magazine holders filled with knitting patterns, craftsy patterns and class materials, etc. The drawer unit is the same as the ones under my table and it is full of yarn. The mini drawer unit has things like buckles, snaps, and other random little items (I really need to go through this again and get rid of things. One drawer has feathers in it?) My other milk glass lamp is on top of these to spread the light evenly since this room has no ceiling light fixture.
I'm pretty proud of my little mini curtain above the window too. Since the place has vertical blinds, there is a matching "valance" at the top, but those are just so unbearably boring. I had this cute coral eyelet that I salvaged from an old bed skirt that a friend gave me a long time ago and it's a great match to bring the coral color to this side of the room. I just measured it out and cut it, then folded the edges over twice and top stitched around the edges. I made a little dart for the corners et voilà! I know it's a crappy picture, but it's just enough to make me happy :)
The other wall has a huge closet, but that can be kind of boring just left on its own. I had collected quite a few vintage doilies from thrift stores just because I liked them, but I ever did anything with them. They are really perfect to go above the closet! Now I can enjoy these old pieces of crochet every day. The mirror is kind of a funny story. I knew I needed a full length mirror in the room, so I deliberately left this space next to the closet empty and planned to buy a mirror when I could spare the $8 later on. That same night I was walking my dog around the complex and what did I find in the trash alcove? A perfectly fine full length mirror! It's like a little gift from the sewing gods to reward my hanging everything up that night, ha ha. 
The closet itself holds ... my fabric stash! You knew it was hiding around in here somewhere, right? A good friend of mine gave me two huge Ikea shelf units she used as a desk like a year and a half ago, and they fit perfectly in a standard closet, but this closet is more like a 1.5 length closet than a double even though it has 2 sets of doors. This measn one of the doors cuts the shelf unit in half, which can be pretty annoying. When I want to search through that side, I ususally take the doors off. Also these shelves fill the entire area, which means these shelves have another layer behind what you see (don't judge). I try to keep the shelves organized by fabric type, and I must confess I heavily neatened things up before taking this photo, lol. On top of the fabric I have buckets with yarn (I organize by type and size) as well as ... more fabric! I use the shelf in the top of the closet to hols my buckets of zippers and interfacing as well as some Craftsy boxes with yarn and fabric in them. The other side of the closet has boxes of thrifted clothing to refashion and a little more fabric, lol. It's everywhere! At least it can be nicely tucked into the closet and close the door. 
The only area that is not really "maximized" is the space between the étagère and the drawer unit under the window. I used to keep my patterns in a large filing cabinet at my house, but even there I couldn't fit it into my actual sewing room. So when I moved and couldn't fit it in the new room either, I wasn't too broken up about it. At the moment, my patterns are all just in paper shopping bags as they wait for a solution. There are also two boxes of yarn and a serger I need to get a part for. I'm hoping to figure out some type of shelf unit or something that they will all fit in. We shall see.

So that's my sewing room :) It's always a work in progress, but I'm pretty happy with the current iteration. If you have any questions, please leave a comment!

Wednesday, May 6, 2015

Book Review: The Life-Changing Magic of Tidying Up by Marie Kondo

Wow - I just finished this book and I am so excited about it that I had to write up my review right away while it is all still fresh in my mind!

I first heard about this book through other sewing bloggers (I can't remember if the first mention was from Andrea Schewe or Roobeedoo), and that little mention planted the seed of interest. I've always been a very "untidy" person. I "collected" things as a kid and had a hard time parting with them, even if it had no value at all. I went through a period of depression in my mid-twenties that even lead to severe hoarding, which I am still trying to counteract. I had some life-changing events occur as this year began, and one of the things my family did to help me get my mind off of things was to help me clean some things out. That event at the New Year shook me up enough to let all these old things go. I was getting rid of things, and doing lots of long planned home improvements suddenly (which are entirely credited to my sister, Shannon, for lighting a fire under my ass), and the more my surroundings improved, the more I wanted to do for them. I have been so much happier in my home since I started making these changes a part of my everyday life, and the biggest challenge still yet to come is finally digging out our "room of doom" as we call it. I have a bedroom in my house that is entirely filled with boxes of heaven-knows-what. Each time we have moved, we just keep moving all these old boxes with us, and our busy/lazy lives have lead us to just stick them all in a room together and ignore them for years. Well, no more. This will be the year that I finally tackle this room,along with the rest of the clutter in my house. I can feel such a palpable difference in the atmosphere of my home in the finished rooms - even my dog is happier and more playful! So in preparation for the vast war I plan to wage against our excess belongings, I knew that this book would be a nice chance to really learn how to deal with the mounds of junk.

The Life-Changing Magic of Tidying Up by Marie Kondo is a wonderful guideline for those who have never really had any true knowledge of how keep their house in order. She details the types of reasons we keep things, and how to mentally allow ourselves to let them go. What I really love about the KonMari method (the title the author gives her plan) is that it is entirely focused on positivity. She has you write in detail why you want to declutter, then explain it down further and further until you come to the inevitable conclusion - that you want to be happier. She has you declutter in categories and in a specific order, always discarding things first. She has you pick up and hold each and every item in your space, and ask yourself, "Does this spark joy?" If the answer is yes, then you keep the item. Simple. If whatever it is does not bring you joy, you get rid of it. The result is not only that you have less items cluttering up your house, but that after you are done you are surrounded only by things that you truly love. Isn't that a wonderful thought? I recently finished the long-standing project of painting, decorating, and organizing my living room, and I can now honestly sit in that room and look at each item in it knowing that they are all things that I love. I want to be in that room all the time now, and I know this feeling can grow into the other rooms of my house as well. I feel that this small book has given me a basic knowledge of how to attain that goal.

This was a quick read, but cram packed with clear and concise information and advise. This book affected me so much that I have already begun at the first category - clothing. I got rid of things I have carried with me since high school because they were sentimental. Just that fact alone shows me what an impact this book has made on me, and I know I can refer back to it frequently when I run into trouble. I'm tired of my life being weighed down by the burden of all the "stuff" I have accumulated throughout my life. I am ready to change :) I give this book 5 out of 5 stars.

Thursday, February 26, 2015

New Year, New Needle Case (a.k.a. How To Sew Your Own Double Pointed Knitting Needle Case)

It seems I have started a new tradition for myself - it seems that the last Sunday of the year makes me want to make cases for my knitting needles, lol. In 2013, I made this case for my 6" dpn set - this is honestly one of my favorite things I have made, and definitely the best as far as how functional it is. I use that case all the time and it has held up great. This past year, I was given an 8" dpn set for Christmas (this set from Stitchberry) - it's only right to want a pretty new place to put them all :)
I purchased these fabrics last New Year's Day at The Sewing Studio sale. I was on a kick from my recent make and decided I should make cases for my regular straight needles as well. Obviously that didn't happen, but it worked out so that when I decided to make this case I knew exactly what fabrics to grab. Knowing that I wanted to make this case for bigger needles (just not knowing how big at the time), I purchased 1/2 yard cuts of both the outer fabric and lining, but only got a fat quarter for the pockets like last time. The crazy floral print is an awesome Alexander Henry fabric called "Sloane" - I chose this for the outside of my case. It's basically all my favorite things in a fabric, but I knew I probably would never wear it, so this seemed the perfect chance to see it frequently :) The gray is called Quatrefoil Mini by Riley Blake and it will be my "lining" fabric. The teal is a fat quarter of broadcloth that will be my "pockets".

I wanted to write this up as a standard "how to" style tutorial/pattern, so I decided to just use the measurements I figured for my original 6" needle case I made in 2013. You can certainly change the pattern like I did by simply adjusting the length of your pieces - not the width. All widths will stay the same if you are housing a standard set of 15 sizes of double pointed needles - 5 of each size. Literally all you have to do to lengthen the pattern is add you additional inches to the length before you cut - easy peasy :) Everything is sewn with a 1/2" seam allowance unless otherwise noted.

Materials:
  • 3 coordinating fat quarters of fabric, 1 for the outside, 1 for the inside, and 1 for the pockets and strap.
  • Medium weight, Sew-in interfacing (I used Pellon 40)
  • Snaps for closures
  • Coordinating thread
1. First thing, we need to cut out our pieces. Cut 1 outer fabric, 1 lining fabric, and 1 piece of interfacing 12" wide x 22.5" long (for my 8" case, I cut these pieces 12" wide x 24.5" long). Cut 4 pocket fabric pieces and 2 interfacing pieces that measure 12" wide x 5.5" long (for 8" case, I cut them 7.5" long). Cut 1 piece for the strap measuring 4" wide x 21" long (just cut the strap as long as your piece of fabric - I got lucky with my fat quarter and there was an extra inch there on mine). Now you're ready to start sewing!
2. Line up 2 pocket pieces with right sides together placing 1 piece of interfacing beneath them. Sew across one longer side.
Press the seam, then separate the fabric pieces, folding as close to the seam as you can and press again. This seam is the top edge of your pocket. Repeat this step for the second pocket.
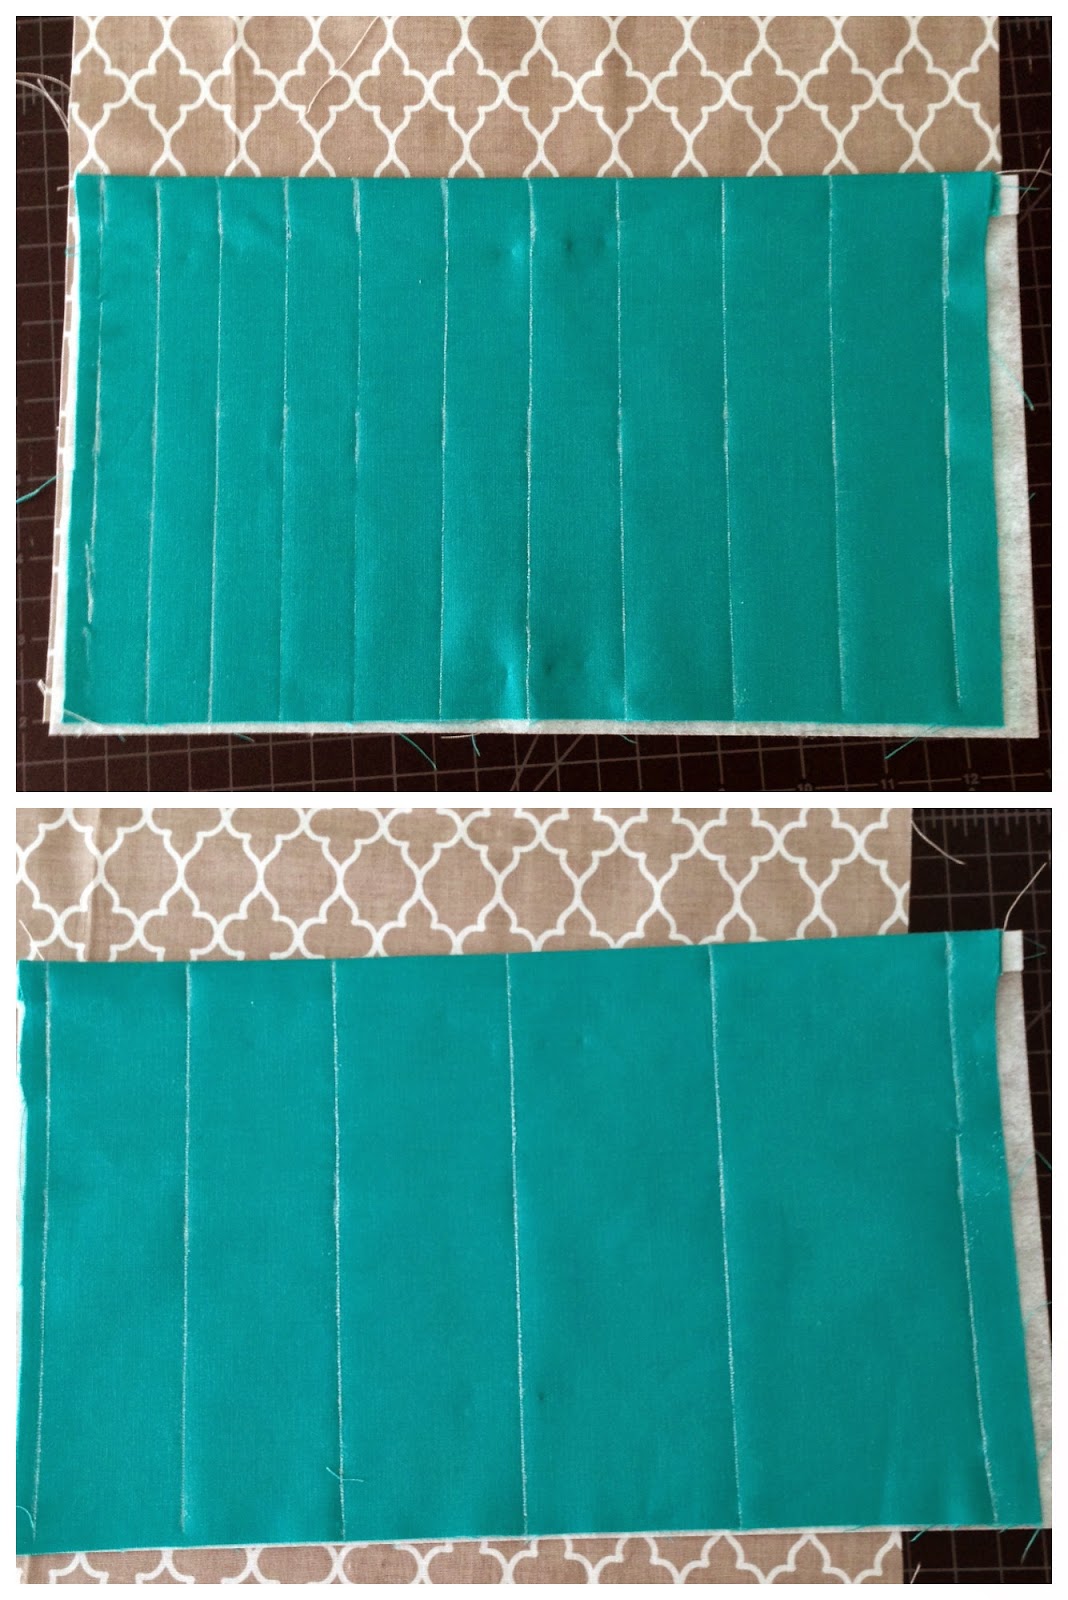
3. Lay a ruler across the top of your first pocket piece. Using a chalk marker, mark lines vertically down the front of the pocket at the following increments: 0.5", 1.2", 1.95", 2.8", 3.75", 4.85", 5.95", 7.1", 8.4", 9.75", 11.15". Next, lay the ruler across the second pocket, marking at the following increments: 0.5", 2.15", 3.9", 6", 8.4", 11.15". These measurements are exact to fit sizes 0-15 of needles, so be as precise as you can.
4. Being careful not to rub your chalk lines too much, top stitch a 1/4" seam parallel to the top edge of the pocket. Next, embroider the numbers between each of the chalk lines. The top pocket will have numbers 0-9 and the bottom pocket will have numbers 10-15. I tried to line my numbers up about 1/2" below the top stitched line at the edge of the pocket just for consistency. Be sure to trim all your threads before moving to the next step - you will not have access to the back of this piece again. *If your sewing machine does not embroider, you could certainly embroider the numbers by hand or even draw them on using a fabric marker.*
5. Line up the bottom edges of your first pocket (with numbers 0-9) with the bottom edges of your lining fabric. Pin the pocket in place between the chalk lines (don't be afraid of pins here - you really can't use too many). Starting at the top of the pocket edge, sew down each chalk line being sure to back stitch at the top. Press entire pocket to remove any remaining chalk.
6. For second pocket (with numbers 10-15), measure 7.25" above bottom edge of lining fabric and place the pocket right side down so that the bottom of the pocket is sitting straight across at the 7.25" mark. Pin the pocket in place well (again, don't be afraid of using too many - you don't want the pocket to shift), and sew using 1/4" seam allowance from the edge of the pocket bottom.
Press the seam, then flip the pocket right side up at the seam you just made, pressing across the bottom carefully as not to remove your chalk lines.
Top stitch 1/4" above the turned bottom edge of your pocket. Make sure the rest of the pocket is lined up with the lining fabric, pinning to keep in place, and stitch down each of the chalk lines making sure to back stitch at the top and bottom. Press the entire pocket to remove any remaining chalk.Your pockets should look like this:
7. Line up your piece of interfacing with the wrong side of the lining on top of it. Place the outer fabric on top of the lining right sides together to create a sandwich. Pin in place, then beginning just off the center of the top flap (the section with no pockets on it) back stitch and sew the perimeter using a 1/4" seam allowance down the long sides and 1/2" seam allowance across the top and bottom. Stop sewing 3" from where you began and backstitch, leaving a hole to turn the pieces right side out.
Cut each corner off near the seam junctions to create a sharper corner once the pieces are flipped.
8. Flip the case right side out through the hole in the top flap. Use a point turner or a chopstick to really push the corners out as much as possible.
Once you are happy with your corners and side seams, press the entire case making sure to keep the side seams straight. Fold under the excess fabric at the 3" hole and press well. Top stitch the entire perimeter of the case as close to the edge as you can.
9. Measure 6.5" from the bottom edge of the case and sew straight across the width of the case. Then measure 6.5" from the bottom edge of the 10-15 pocket and sew a straight seam again. These will help the case to fold nicely into thirds to close it up.
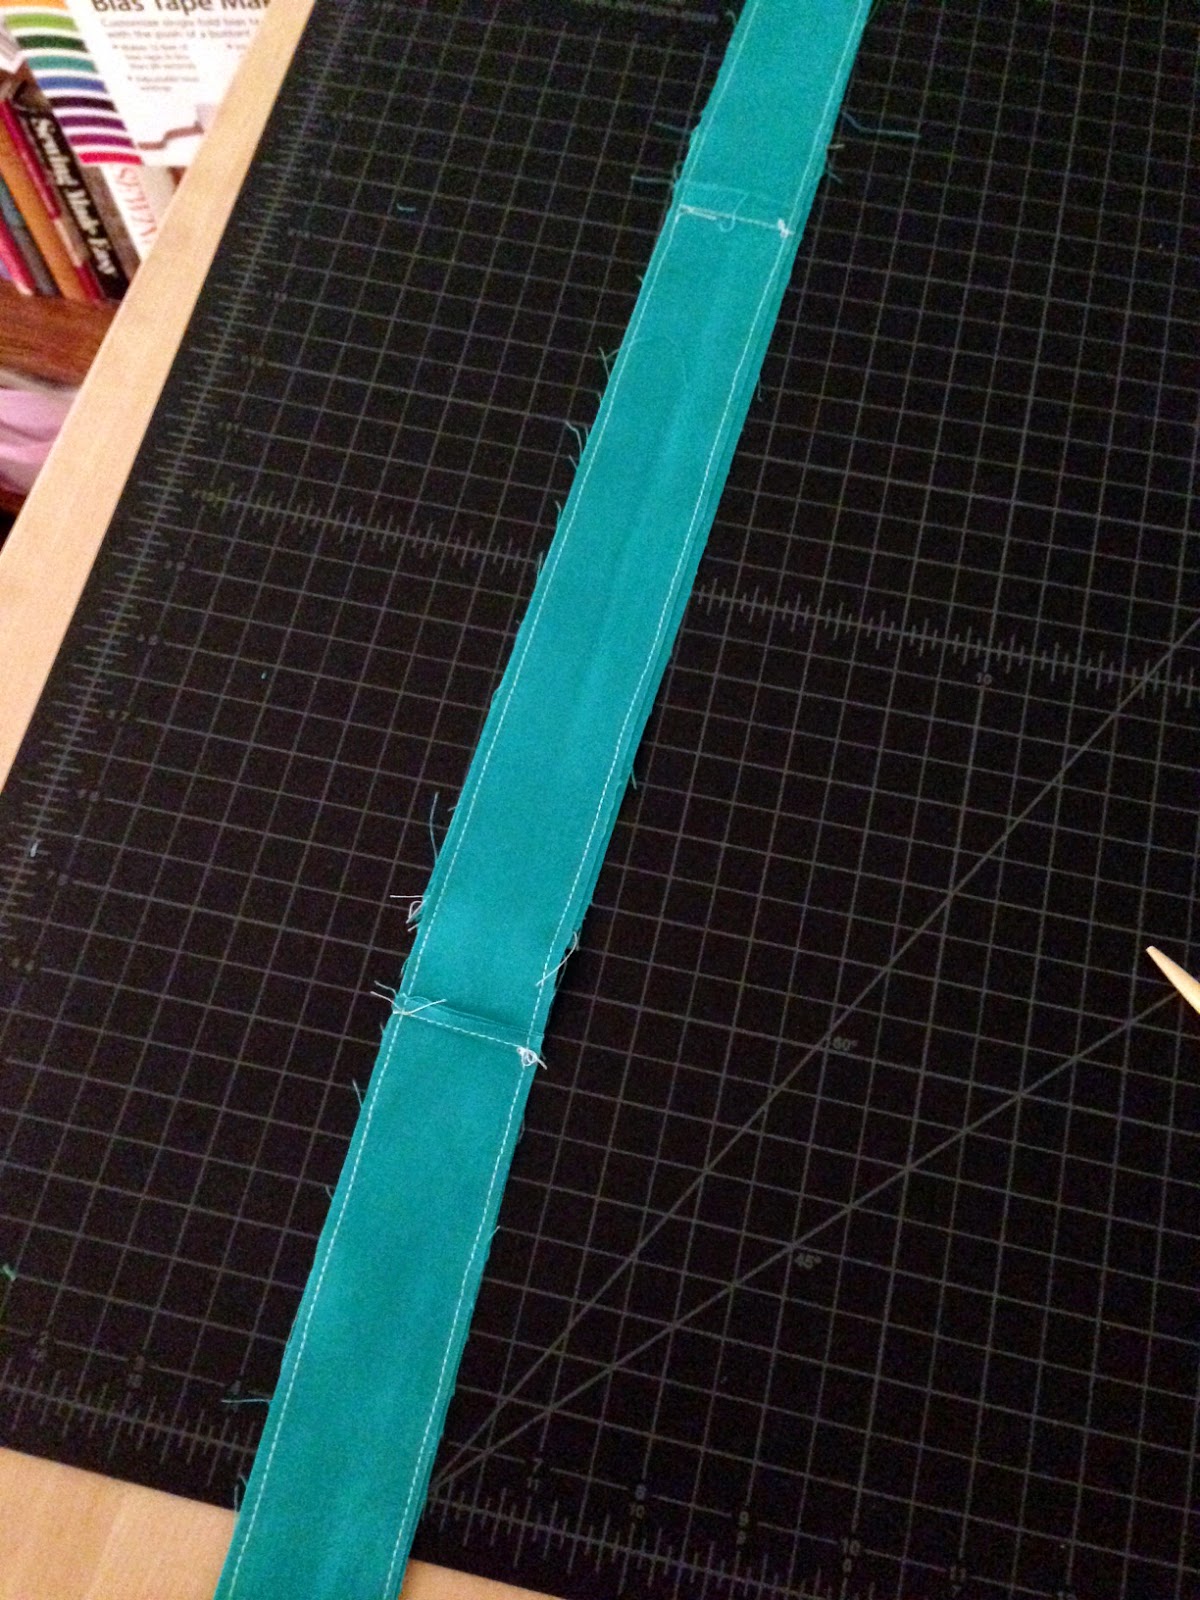
10. For the strap, fold the piece in half lengthwise with right sides together and press. Sew down the length of the piece (using 1/2" SA), then cut down the seam allowance as close as you would like to the seam. Press, then turn the tube right side out, and press being sure to keep the seams straight along the sides. Fold under about 1/4" at the top and bottom of the tube and press. Next, top stitch around the perimeter as close to the edge as you can. Press.
11. Place your strap at the center of your top flap, making sure to line up the edges. Pin the strap in place so it stays perpendicular to the side seam, and stitch a rectangle inside your strap to secure it to the top flap of the case. Try to keep the edges as even with your strap edges as possible, and pivot at the corners by keeping your needle down while lifting your presser foot to turn the fabric to stay with the edge of the fabric. Make sure the rectangle in at least 1" - 1.5" long so it is stable enough to be pulled on.
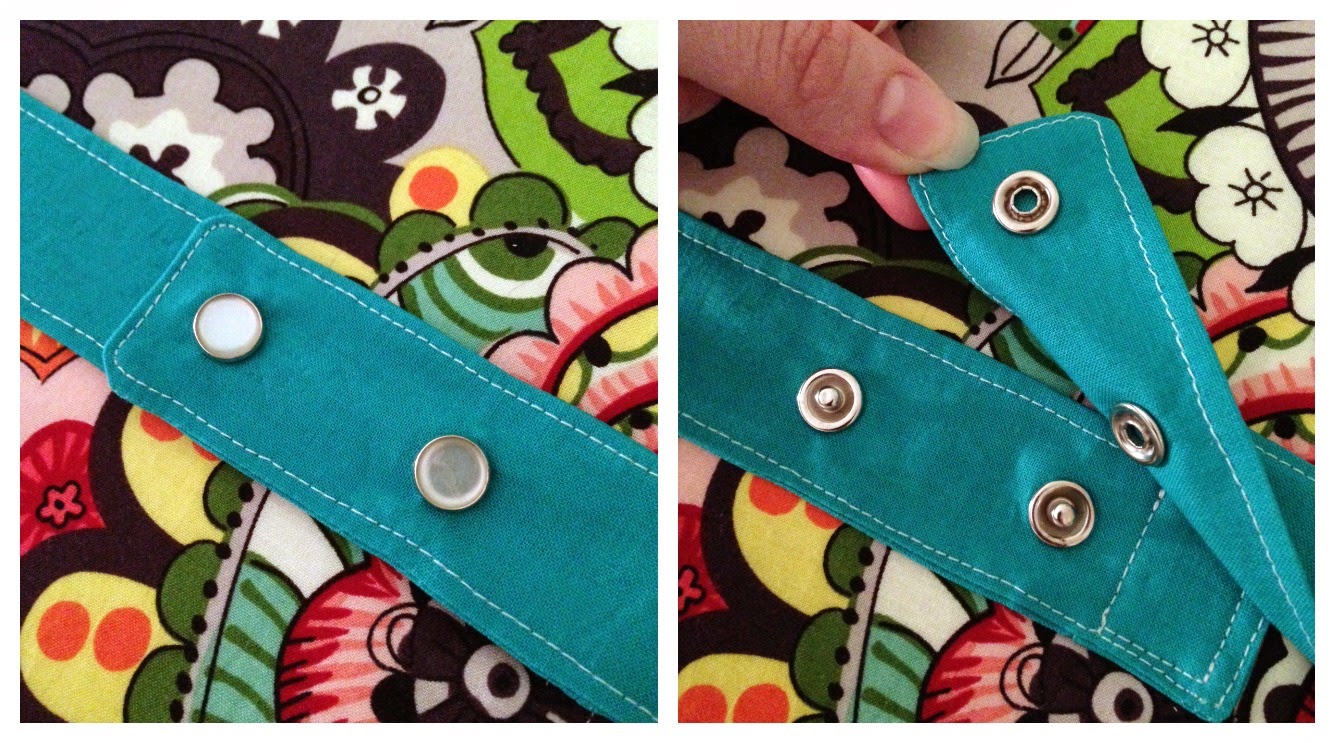
12. Before positioning the snaps, put all your needles in their respective pockets. Fold your case at the "fold seams" and line up the outside edges so you like how it sits. Next, wrap the strap around the case, overlapping it enough to hold the case snugly closed without causing it to buckle. Following the instructions on your packet of snaps, install them in the center of the strap, the first as close to the rectangle attaching the strap to the top flap as you can and the second close to the outer edge of the strap but so that you still have enough of a lip that you can easily grab the strap with your fingers to open the case. This is not an exact science, but a little extra effort will go a long way in the finished look of your case.
13. Sit back and revel in the glory of your new needle case!
Like I said at the beginning, the case in the photos is actually my 8" needle case. You can see my 6" case here. Because this case is larger, I had to do some interesting things to get my pieces cut as long as I needed, such as piecing the lining fabric together at the center and cutting my strap in multiple pieces, sewing them as one long piece, pressing the seam allowances down, and cutting it out in the length I needed in half the width using two pieces instead of just folding it over.  I positioned the joins in the strap to sit at the back of the case, and the seam in the lining is completely covered by the second pocket, so there are no unsightly seams where there should not be.

*If you would like to add an additional pocket piece to the top flap (for notions and what have you), just follow the cutting directions for an additional pocket piece, though you will need to buy extra fabric for this. You will also have to decide where you want the pocket to be separated since I have not measured that part out, but it should be easy to do :) Don't be afraid to experiment!
I absolutely love these cases! I am able to carry my needles around everywhere if I want to, or flip it open and go right to the exact size needles that I need. These cases keep everything at easy access, yet still safely contained and organized. Another cool feature is that you can open the whole case, then wrap the strap backwards and snap the strap around something like a clothes hanger or a rod and the case can hang up. You can see an example of this in the link about my original 6" case.

I hope you enjoy your cases as much as I do :) If you have any questions, please feel free to leave me a comment or shoot me an email and I will answer you the best I can!

Friday, October 24, 2014

Actual House Progress: The Pink Bathroom

Guys, I'll level with you. I'm basically the worst homeowner ever. I used to be so gung-ho about fixing things when we first moved in ... then suddenly we found more and more problems that we had to fix before other more aesthetic things could be done.

One of these problems was the pink bathroom (a.k.a. the main bathroom we use right now). I pulled all the cheap wire shelves out of the closet so I could replace them and paint the walls (it's just drywall in there). Upon closer inspection it turned out that the paint from the walls that came into the edge of the unpainted closet was peeling up in reasonable sized sheets. When I talked to my trusty Sherwin Williams man, he said that this means the drywall hadn't been primed ... and judging by the chipping of the paint around holes from old wall anchors, the rest of the room hadn't either ... which means it will eventually all peel off the walls! Ugh! Turns out the only way to fix this is to literally scrape all the paint off the walls and ceiling in the entire room and prime then paint it all again. Yeah, I think you can guess how excited I was about that prospective task. The worst part of all was that all of the items I had to hand up on the walls had to wait around and take up space in other parts of my house.

Well, last Sunday I decided I'd had enough. Sure, there are still holes in the walls that need to be fixed and I still have to scrape the paint, but I have no impending plans to get that done. Why not at least enjoy a little organization in the meantime? So I spent a little time and finally hung things up ;)
Ta Da! I didn't take a before picture, but imagine it exactly the same just without anything on the walls and much dirtier, lol. I decided over a year ago to embrace the pink tile and it has since grown on me - I actually like it now :) Anyway, my progression around the room began in the shower:
We bought one of those corner bars with multiple shelves on it last July, but no joke it didn't last until November. I was standing in the shower one day and it fell on me - the spring had no tension. I always intended to take it back to Target and say "What The Heck?" but it's not exactly easy to bring something in that's so large. Anyway, fast forward to before last Sunday and we've been setting all of our shampoo and whatnot on the towel bar and in the corners of the tub ever since. I had this small glass shelf from our condo that I had above our kitchen sink - it hasn't been used since we moved. So I thought it would be a great replacement :) It's mounted just above the tile, so it's kind of high but luckily my husband and I are reasonably tall so it's not a problem for us. Now everything is out of the way yet easy to get to and we don't risk bumping other things off the narrow towel bar to fall to their death. Also, I got a small white hook to hang our "to be used imminently" towel on while we are in the shower. I hung it between the tile and the window - again out of the way but easily accessed. Now  no more slightly damp towels when we need to dry off and we don't have to set our towels on the sink and lean over almost slipping to our own death. Look how much death was avoided with these small changes :)
Next came this Ikea shelf unit - again this was in our guest bath at our condo and has sat in our spare room since we moved. I really wanted to get something else in this bathroom since I felt this looked too wimpy in here (I was envisioning an actual cabinet), but I haven't found anything yet and I already have this. Up it went! I decided to hang it above the toilet instead of centered in the space on the wall, which gave a little sliver of wall that is perfect to hang up this little porcelain flower piece that belonged to my Great Grandmother. Incidentally this porcelain piece also lived in our guest bath at the condo, but it works really well with the other colors in here I think.
The final piece I hung was this sweet Ikea mirror. I've loved this mirror ever since I was first introduced to Ikea furniture, but I never had any place to put one. When we decided to go with a black and white and floral scheme in this bathroom, this mirror was the first purchase I made :) Nothing like finally having an excuse to get something you want. I admit it's a bit ornate on such a small wall, but I don't care, lol. While I love this mirror as a decorative item, I have to level with you - this was the most awful thing I have ever tried to hang in my whole life. I am meticulous about hanging things - I always center and level everything, sometimes even coordinating gallery walls. Hands down, this thing was harder than all those combined. There are no angles, very little even-ness, and it has those stupid little plastic holes on the back that the screws have to line up with perfectly. I spent at least 30 minutes just measuring and marking before I figured how to hang it up and still center it on the wall; even then I was just barely off and I had already drilled anchors and everything. I was able to just whack the anchored screw to the side a few millimeters and it sunk right in (never to be moved). I even managed to get the bottom point perfectly centered in the tile grout :) I bashed the crap out of my finger, but in the end I won and now I finally have this up on my wall. Success!

It may not seem like much, but when you've lived with blank white hole filled walls in a room you use multiple times a day for over a year the difference is amazing. It's a downright pleasure to hang out in the bathroom now :) I gained not only better looks but also better organization. Sure there are plenty more things I want to do to this room, but I think it's safe to call this a Stage 1 renovation that I can appreciate for now. The funniest part of all this is now that I see these pictures, that window is screaming for a curtain - it just looks so naked! Luckily I have quit ea bit of black fabric in my stash, I just have to decide on a design.

Hooray for actually making progress on my house!

Tuesday, June 25, 2013

Weekend Update: Organization

I've been slowly but surely buying more organization tools for around the house, but didn't get a chance to do anything with them until this past weekend. We went to Ikea on my birthday specifically to get another Kilby Bookcase for our office. It's the cheapest one they have, but we already had 3 so we just decided to go with it and get another of the same. Finally I could make that side of the room match the other! 
This wasn't just a put-it-together-and-put-it-in-its-place type job. After building the bookcase, I screwed it to the one we already had (it's on the other side so it's not so visible) - I had to do this with the others since they were leaning away from each other over time. Also, since they are on a carpeted floor (unlike the tile that they were on in our old condo), so they really like to lean forward away from the wall. To fix this, I mounted little L brackets at the top and bottom and screwed them into the wall. These babies ain't goin' no where :) I'm really pleased with how they came out now that they are all attached - it gives the look of a built in shelf. And look at how much more book storage space we get!

Another thing I've been meaning to do for months is to change out the plugs in the room. The whole house has almond colored sockets and face plates which not only look old and dirty, but also the color really doesn't match our general color scheme. So we have been changing them out little by little. We changed a few a while back that big furniture would be covering (our big shelf unit and bookcases on the other side of the room), but before I could mount these new bookcases to this side I needed to change out that socket you see by the floor. It's still usable even with that bookcase and doesn't it look nice?! It didn't have a face plate before, so it really looks good now :) I guess you have to have lived with them looking nasty to really appreciate this change. So once I got the socket changed and the bookcase in, I decided to keep my momentum going and change out all the sockets in the sewing room too! Here's an example of what they looked like before:
Yuck, right? So I went around the room and changed out all 4 plugs and 2 switches - all by myself! I watched my husband to the others we did before and I knew I would be able to do it. It's surprising how easy they are to change out if you have the right tools. One of the switches was even hard wired so I had to actual cut the wire and re-strip it to change it out. Seriously, you should never pay an electrician to do this. It was very easy. I was able to complete all 6 in the sewing room in about an hour. There is still an ugly old phone jack, but I didn't have a white replacement yet. I'm sure it's only a matter of time before I tackle that one too :) I didn't take any close up pictures of the finished sockets, but you can see them in the pictures coming up.

While I was in the sewing room, I installed a few more organization items. We picked up another fun item at Ikea the other day - the Fintorp Magnetic Knife Rack. I knew it would be handy for my sewing scissors. I mounted it just behind my desk so they are always within easy access and I don't have to open my sewing box to get them like I did before.
Take a closer look! lol I did a little embellishing with a few things that have been sitting around. The owl magnets at the ends were actually from the birthday card my husband gave me. The other two items are actually buttons! The little round owl is from FreshStitches and then the other is my favorite Grumpy Cat meme - Le Miserable. lol. I found that in this Etsy shop - these are handmade custom buttons and they are seriously so fun :) I just had to buy the Grumpy Cat one when I saw it. Now it's decorating my room!
The card from my husband has 3 owl magnets, so for now the littlest one is on my letter M. And look at that nice light switch!
And I hung up my newest ruler :) And the other light switch!
After all my DIY-ing, I had to go to Hobby Lobby to get some things for my teaching foray tomorrow (I'll report on that in a few days), and of course I can't go into that store without getting something for myself. Among the other items I bought (it may or may not be more yarn - no comment), I was struck with genius when I saw these little containers.
These embroidery thread organizers were only $1.99 each. With all the sewing machine feet I already had plus the ones I just got for my birthday, I needed something to organize them better. They have been in a baggy since I got the machine and I had to pour out the whole bag and sift through to find the one I need. Now, they are all separated and I can see them at a glance :) I even kept like feet together (i.e. zipper feet in the same slot, etc.) I think I will eventually label them too so I don't have to consult the manual to identify which one is which all the time. It may seem silly, but I just love to look at how organized it is now!
Also, I found a use for the little pink box I painted :) It now holds my animal eyes! They too have been sitting in a bag and I had to dump them all out to find the right size - now they are organized by the size so I can get to them easier.
I also designated a box for all my new noise maker toy inserts - yes, those are cat toys! lol I plan on trying them in an animal soon to see how they work out. The others are all the ones Justin got me for my birthday.
And just for the heck of it, here is a picture of where my new butterfly hangs out in my sewing room :) 

It's definitely coming along! I love each new thing that goes up on the wall and I no joke just sit and look around the room sometimes :) I'm a big nerd.