Showing posts with label jennifer lauren handmade. Show all posts

Friday, February 6, 2026

Video: Gable Top Sewing Nightmare


Sometimes our sewing projects don't go as smoothly as we envision they will, and this video documents the downfall of a should-have-been-simple sewing project. Come watch as I have to deal with machine malfunctions and finally figure out the culprit. Click below to watch now :)


Monday, October 30, 2023

FO: Witchy Gable Top


I'm jumping the line by posting this since it's actually my most recent make, but since it's Halloween this week I figured I'm justified. Are you tired of seeing Gable tops yet? Hopefully not because this will not be the last, lol. 

I found this fabric in the clearance at Joann's back in July and they had 2 yards left and I paid $8 for it all. This is a cotton spandex jersey from their Pop! line. Normally orange is not a color I ever wear, but this had witch legs, hats, and cauldrons, so ... it was going to happen.
This time around with the pattern, I managed to mix up the front and the back, so I had to unpick the neckline and sew it again after I figured that out. Don't be like me and think that you will still have the notches - you're going to cut them off. Put a pin in the back or something. You can thank me later.
Since I don't ever wear this color, I didn't have any matching thread. I just decided to go with white thread all over and I think it looks nice. I made my same alterations on this version - narrowed the shoulders by about 3/4 inch each side, narrowed the sleeves, and shortened the length with a 2 inch deep hem.
My girls and I wore out Halloween shirts to school and work one day, so we stopped by the local pumpkin patch for some photos.

They both love going to the pumpkin patch, so having us all dressed for the occasion was extra fun for them. We looked around for the most warty pumpkin and had a great time.

This has turned into my Halloween "costume" this year since I let myself off the hook on the Reency dress. I'm glad about it though, this was cute at our church Trunk of Treat party on Saturday and I just added my butterfly wings from last year (which will be my eternal fall back costume now). Gable top + linen Fiore + thrifted witchy shoes = Halloween done :) This one was cute and comfy and I'm so glad I managed to get it made up.

Summary:

Fabric: 1.5 yards Scattered Witch Jersey Knit from Joann - $8.00

Pattern: Gable Top by Jennifer Lauren Handmade

Notions: Twill tape - Free

Time: 3 hours

Total Cost: $ 8.00

Monday, September 25, 2023

FO: White Gable Top

And finally the Gable top that started me sewing Gables! This shirt was the one I wanted so much that I made the other versions to test with. I just love a slash neck and it seems that I am always in need of simple white shirts because I have a lot of colored and patterned bottoms, so it really goes with everything. Being an avid thrifter (at this point I can't even imagine paying full price for new clothing - like... how do you do that?), I have to admit that good white shirts are notoriously hard to come by in good condition. They always seem to have holes or stains. I mean... they're white, you known? So when I saw that The Sewing Studio had their white Laguna Jersey in their clearance section, I bought 6 yards to I can make myself as many white t-shirts as my heart desires. I specifically had this pattern in mind when buying this fabric, so it's only fitting that it be one of the first things I make when I start sewing again, right?
So the Laguna Jersey has a bit of a tighter recovery than my Prickly Gable or my Purple Roses Gable did. This shirt was cut at the same time and in the same way as the Purple Roses version, but this one came out much more fitted. Not badly so, just obviously more snug. It's still comfy, so I am fine with the difference. I just need to remember to account for the recovery next time.
You can see the difference mostly in the back. Still not bad though. 
Funny enough, the arms were still too loose and I had to take them in a bit and they are still a bit loose at the hem. I guess my forearms are thinner than the pattern is drafted for in my bust size? I'm learning how oddly sized my body is more and more with each make, lol . It's all good though.
The neckline is great - maybe a tiny bit too tall. This knit wanted to roll much more than the other 2 did, so it was harder to get it rolled down enough. Still a good height - just something to consider next time. I did narrow the shoulders again, but again it could use that extra 1/4 inch narrower. I'm going to have to pull out the pattern pieces and make this adjustment on the paper itself so I remember.
I used twill tape in the shoulders again, but I decided to use a fancy flower ribbon from my stash to mark as the tag, because why not? I figured the floral might show through on the shoulders, but in the back my hair would cover it anyway. This also has a  inch deep hem, which helps the shirt lay nicely when I tuck it in.
This shirt is the perfect blank canvas for my new skirts I've made recently. Like... literally everything matches a white skirt. It's such a versatile piece and I'm so thrilled to finally have this made up. That said ... now I'm wondering if it's a little too plain. I've been obsessed with Irish crochet lately and I'm contemplating maybe making a few white motifs to sew on the neck area? OR maybe I just need to make a second top and leave this one totally plain? We'll see. For now, I love having this one as it is.
So that's the final piece of my trio of Gable tops! I made all of these in just a few evenings and I've loved having every single one of them in my wardrobe. It's always nice to have something so immediately useful to wear, isn't it? It's probably not the most editorial shirt to look at, but I can't recommend a white t-shirt enough. And now I have enough fabric to make more if I (inevitably) stain this one, lol.


Summary:

Fabric: 1.25 yards Laguna Cotton Jersey - $6.00

Pattern: Gable Top by Jennifer Lauren Handmade 

Notions: twill tape, thread - Free

Time: 2 hours

Total Cost: $6.00

Monday, September 18, 2023

FO: Purple Roses Gable Top


After the success of my Prickly Gable Top, I immediately and excitedly cut out  more. Technically the one coming up next was cut out first, but this one was finished first, so it gets first billing lol. While thrifting about a week before making this top, I was at the cashier buying some things and noticed a bucket tucked under a table near the front that said Fabric $4 Per Bag. I always must look in these bins, but I really only found this interlock knit. Since I was buying a bunch of other things, the woman just let me have the fabric for free, lol. It was a 2 yard cut, 60 inches wide. It's definitely mostly cotton, but there's probably something else blended in there (I just try not to think about it now that I've been trying to change to natural fibers, lol). 

This fabric is really cute, but it is the type of print that could easily go wrong if you're not careful with the finished garment style. I thought that a Gable Top was the perfect combo, and I still think I was right :) I made the size 16 and narrowed the shoulder by 3/4 inch like my previous version. This knit isn't as tight of a stretch as the cactus print, so it came out with a looser fit that is very comfy while still looking fitted.

For this version, I decided to secure the shoulders on both seam allowances, not just one like the instructions call for. I used a pretty printed ribbon form my stash for the shoulders as well as the back "tag" so I can make sure I get it on right. I cut this one shorter, but I still made a 1 inch hem.

I particularly love the neckline on this version. It's just the right height and it holds its shape smoothly a bit more than the other 2 I've made. The shoulders are still that smidge too wide, so I need to go a full 1 inch narrower next time. Not bad though. I also narrowed the arms a bit on this one so they are more fitted like the body and I like how they came out.

I really love the print of this shirt, and the little yellow flowers make it match my mustard linen Fiore skirt perfectly. It's made for a very cute outfit that I continually reach for.
So this was a pretty quick and simple make, but a great wardrobe staple for me. It looks cute but not childish - very much me, lol. I have about a yard of this left that I want to use to make something for my girls to match me. How cute would we all be?!

Summary:

Fabric: 1 yard purple floral print jersey - Free

Pattern: Gable Top by Jennifer Lauren Handmade 

Notions: ribbon, thread - Free

Time: 2 hours

Total Cost: Free

Monday, September 11, 2023

FO: Prickly Gable Top


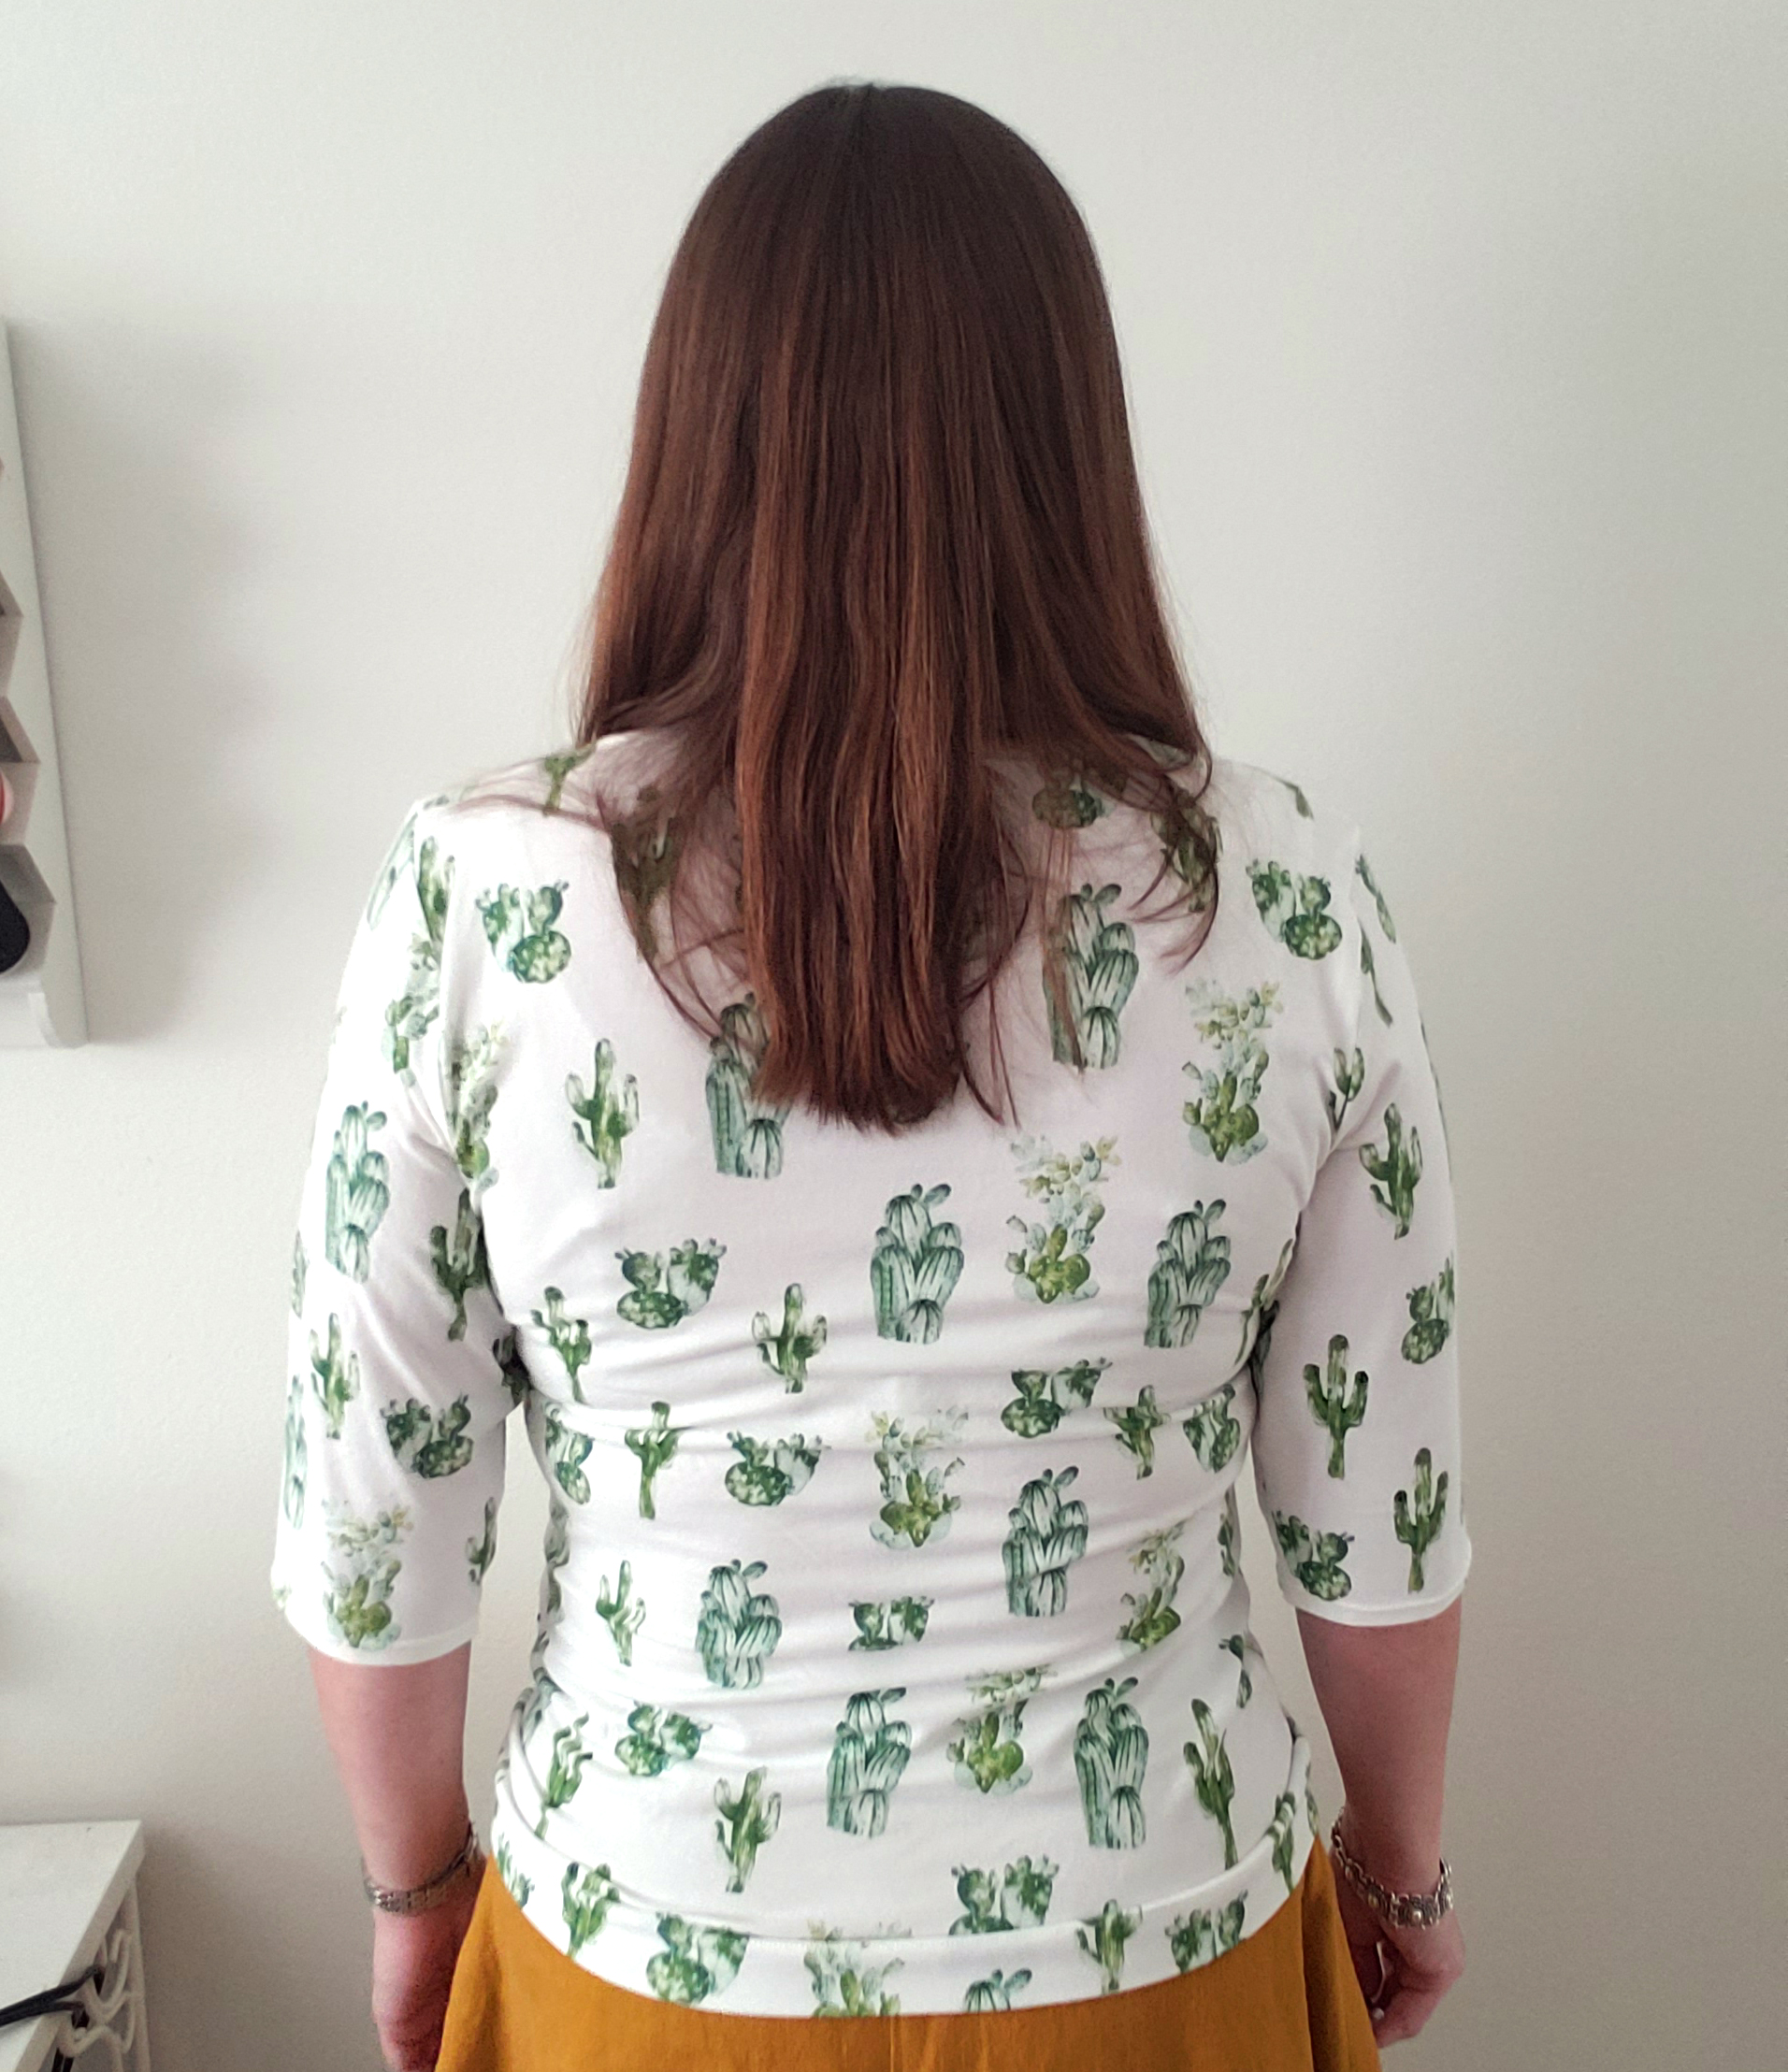
High on the success of my Cielo and Fiore sewing adventures, I decided to revisit a pattern I'd tried and failed at making about a year ago. I tried to get back into sewing clothes by tackling the Gable Top by Jennifer Lauren Handmade. A simple t-shirt seamed just the ticket for an easy and quick make, so I traced off a 20/22 size according to my bust measurement  (this was kind of an exercise in body positivity because I had gained 40 lbs in just a few months and I was very depressed about it - I just measured and tried to ignore the number and make it up without judgement). I traced the pattern and cut it out in this cactus cotton jersey I picked up in the clearance section of Hobby Lobby for a few dollar per yard and started sewing. It turned out HUGE in the shoulders - like over an inch too wide on each side - yet the tummy area was too snug for me to want to wear it. I tried to take in the shoulders, but it just distorted the shape with each change I made. I tried to alter it, but it just wasn't working, so I chucked it to the side and stopped trying to sew. Now that I've lost that excess weight and feel better in my body, and with the success of my other makes, I decided to retrace this pattern in the correct size and make it work. This is the wearable muslin from that :)

So this is the Gable Top :) I seriously love all of Jennifer Lauren's patterns. I've been a pattern tester for her in the past and I just love her simple but vintage style design. They are just exactly my aesthetic. This pattern is a 50s style slash neck t-shirt with a fitted body and several sleeve options. The pattern is only 3 pieces and it tells how to get the right neckline height and stabilize the shoulders so they don't stretch out. I went with 3/4-ish length sleeves - this was the longest I could get with the fabric I had left after the previous failure a year before, but this worked just fine for me.
The body fits me snug but not too tight, which is great. I think the back looks just fine :) 
The sleeves were oddly a bit loose for the length. It wasn't drastic, so I just left them, but it's just a little looser than I like for the body being so fitted. A lot of this is the fabric stretch (as I learned on later versions), but something to think of in the future.
I did have to take in the shoulders on this version, which I've just learned is a standard for me. The frame of my shoulders is narrower than the build of my torso, which isn't a big deal - just something I need to account for in all tops. I wound up taking these shoulders in 3/4 inch on each side and they are still a smidge too wide.
I used twill tape to stabilize the shoulder seams, so I used a little loop of it to mark the back like a tag. This is very handy when putting it on because the front and back look exactly the same. The top did come out very long, which I'm sure is in part so it can be tucked in, but still very long for me. I shortened it about 1 inch and still took a 2 inch deep hem and it's a bit long. I don't mind because this way I could easily tuck it in, and when I don't I just scrunch it up on my waist a bit.
So that's my cactus printed Gable Top :) This is the first of many and I honestly struggle to not just whip up all of my knit stash in this pattern. Comfy, flattering, and vintage style. Love it.

Summary:

Fabric: 3 yards cotton spandex cactus print jersey - $12.00

Pattern: Gable Top by Jennifer Lauren Handmade - $10.00

Notions: twill tape, thread - Free

Time: 3 hours

Total Cost: $22.00

Sunday, November 11, 2018

FO: Sorrel Dress

I'm a little late for release day, but yay for the Sorrel Dress! I can finally share this dress that has been a few months in the making :) I was thrilled to be chosen as a tester for the new Sorrel Dress pattern by Jennifer Lauren Handmade. The pattern is a vintage style shirt dress with kimono sleeves, a fold back lapel, release darts at the waist for the bodice and the skirt, and a more straight silhouette. This was a little out of my style comfort zone, to be honest. I'm more of a fit and flare girl by nature, so I was hoping for that shape when I signed on, but the pattern sent only had a straight style skirt. I also have been skeptical of kimono sleeves for years. I'm very picky about sleeve styles as I just feel like some make my arms look bigger - I always thought kimono sleeves would be one of those unfortunate styles because they always seem like cap sleeves in line drawings. This dress has proved my suspicions unfounded!
When it came time to make up my final version, I was a little at a loss as to what fabric to use. This design is very open ended with the suggestions on fabric, and I knew I wanted to stay in my stash. In the end I chose a fabric that I had actually tried to sell a little while ago. I had this up on my Instagram destash, but I went with the inspiration and took it down :) The fabric is a mystery woven I got at a thrift store a while back. The overall fabric is navy blue with a subtle textured stripe in the weave as well as single strands of white thread woven in to create very light flecks in stripes throughout. I did a burn test and I know it's a natural fiber because it ignites and keeps on burning with no beading (just ash), but that's as far as I know. It seems to have some rayon content just judging by how shifty and difficult it was to cut. Whatever it is, I really like it. I'm glad I found a use for it at last.
For my initial muslin, I made it up as drafted except that I added 1.5" to the waist length since that is a standard adjustment for me with Jennifer Lauren patterns. My muslin seemed a bit too long in the waist, so I shortened it by 1/2" for my final version. I also made a 1" forward shoulder adjustment and let out the waist a little by sewing at a 3/8" allowance instead of 5/8". I think the weight of my fabric affected the fit on my final version and now even with shortening a little I think it's still a bit long. The waist does sit at my natural waist, but it just looks a bit too long to my eye - maybe this style would look better on me just above the natural waist. Anyway, I had to do some adjusting to make it look more fitted like it's supposed to. I had to take in my addition to the waist just a bit at each side seam, then I extended my darts on the bodice and the skirt by 1" each to take up some of the excess fabric and smooth things on my stomach. In the end I decided to add a sash at the waist to help snug things up and help the excess fabric blouse up a bit to look more intentional. All these things are based on my own "going rogue" with this pattern - the pattern itself was great! I always love Jen's instructions and drafting, and I have yet to have any type of issue with her designs. (and I'm totally not required to say anything like that, that is just my opinion - her patterns are always a pleasure.)
As with all of Jen's designs, this one includes pockets :) And I always add pockets when possible. This fabric is a bit heavy and drapey for them and they possibly add a bit of girth to my hip area, but I don't care because pockets. Incidentally I think the dress looks very flattering with my hands IN the pockets, lol. My waist tie is just the full width of the fabric and 3 inches wide - I angled the edges down just for a bit of style. It's a little bi short, so I can only tie it once, but I like the effect.
Here you can see the stripes of flecks (flecks of stripes?) in the fabric. I actually accidentally cut the lapel facings upside down, and in my sewing room the back from the front of this fabric was quite obvious, but I did not want to cut new pieces and I figured no one will notice but me. Can you even tell that the strips on the collar are slightly more pronounced than the rest of the dress? I figured not. Keeping with my stash, I used some plain navy buttons that I have a whole bucket of from a Sewing Studio deal. At first I was less than thrilled by them, but now I really like that they blend in so well.
The actual "collar" is non-existent on this dress - it's just a lapel that folds back to give the illusion of a collar. This made the construction so much easier than a true collar would be, but I still get the look of having one - a win win :)
Here's how short my tie turned out, lol. I don't hate the look without the belt, it just doesn't help accentuate my waist, which is my preferred look, so I like to snug things up with the belt. This fabric was quite fray-proned, so I used my serger on all of the seams inside (yay serger, lol).
My fingers are at my natural waist in this picture. The seam sits fine, but not that I've worn it I can tell that I only needed that extra length in the front, not the back, which may be causing my issues. Anyway, these are small things. I've already worn the dress and aside from it being a little too short to sit on the floor for me, it felt great.
Here's a close-up to show the weave in the fabric. Isn't it cool? The fabric is also a little heavier than I typically wear in Florida, but I think it will be a nice "winter" dress (at least as winter as it ever gets here). It's still breathable, so I think it will work well for all seasons.
And here's a direct sunlight photo just because. This one is also without the waist tie. I'm on the fence. Do you think I should wear it with the tie? Should I make a new tie? A belt? Let me know your thoughts!

I'm really glad I had this project to get me sewing a little. It's been hard to carve out time for sewing, but it's so nice to have a finished piece to wear around that I like so much :) Thanks, Jen, for letting me test this pattern, and if you're interested there is a whole Kickstarter campaign going right now to help fund paper patterns from Jennifer Lauren Handmade! Isn't that exciting?! At the moment, you can only get the Sorrel through that campaign, but it will be available next year. The project is more than fully funded now, so she is starting to sell preorders of other patterns in paper as well. So fun. Head over here to see the campaign and grab a pattern for yourself!

Summary:
Fabric: 2.5 yards of mystery woven fabric - $1.00 (thrifted)
Pattern: Sorrel Dress by Jennifer Lauren Handmade
Notions: 1 yard Pellon SF101 interfacing - $1.00, navy thread - $1.00, 10 plain navy buttons - $ 0.20
Time: 12 hours (with testing and muslin making included)
Total Cost: $ 3.20

* I received this pattern free of charge in exchange for testing it pre-release. All opinions are 100% my own and uninfluenced.

Tuesday, July 31, 2018

FO: Pippi Pinafore

It seems I am just not great about planning when I sign up to do reviews, lol. The lovely Jen of Jennifer Lauren Handmade asked for reviewers for her Pippi Pinafore pattern back in May, and thinking that surely 2 months was enough time to make anything even considering that I needed to move in that time, I signed up and was chosen for my size bracket. Then I had to break down my sewing room completely and move, plus I had to fix and paint and all kinds of fun things at my house in my spare time as well as the added interest of taking care of a pair of lovely twin 3 month olds once a week in that time as well. It was a perfect disaster as far as getting to sew anything in that 2 month period. The same thing happened when I reviewed the Mayberry Dress pattern - I signed up to make it over Christmas which is my busiest time of year at work PLUS I was making all of my Christmas gifts and I have a large family, lol. So sorry, Jen! Maybe one day I will sign up to review for her and I will actually plan accordingly. So here I am on the last day of the review period posting this cute finished Pinafore :)
This is my version of the Pippi Pinafore by Jennifer Lauren Handmade. I've been skeptical of the overalls/pinafore trend for quite a while now, but out of all the patterns of this type available this is definitely my favorite (and I felt that way before I was given the pattern). What makes it different is that there are darts at the bust, a fitted waistband, and tucks on the skirt - all these elements help to nip the look in at the waist to avoid it looking like children's overalls in my opinion. I figured if I was going to try this trend, this pattern would be my best bet (and I was right). I'm still on the fence about whether I am a pinafore person, but if comfort is the deciding factor I will be since this is super comfy, lol.
I don't think I've ever said this about any garment before, but I think this is most flattering when viewed from the side. The shaping really stands out from this angle. Also here you can see the cute button waist detail. Check out the pockets too! They are nice and large, which is super practical but also adds a cute detail. The pockets are lined with my lining fabric too, so they always sit flat and don't catch on the main skirt fabric. I love a good pocket and I especially love when they don't add bulk - a total win.
And here is the back view - sorry my straps are a little skewed.  I did hit a bit of a self created snag which makes my straps slightly off what they should be. Originally I signed up as a size 18 bust and 20 waist because that's what I was for the Mayberry dress. I measured myself just before cutting this out though and I have gained a little weight in my waist :/ Since this is fitted in the waist area I didn't want to be uncomfortable, so I went up to the 20 bib and the 22 waist and skirt. This worked fine in that everything fit, but I forgot to alter the notches on the waistband piece to work with the 20 on top and the 22 below. I did not realize this issue until after I had already sewed and serged my straps in place, so there was no going back. Now if my bib is centered, my straps are slightly off center. It's not a big deal, and I don't think anyone will think it's anything other than the straps shifting around when I wear it. Also this is totally black and slubby so I don't think you can even see most of the details anyway, lol.
I had to go from my stash for this project, and I had surprisingly little to choose from that I felt was a weight I could wear now in the blazing heat of Florida summer - I have several options for cooler weather, so I may revisit that idea later in the fall. I also wasn't making a muslin (meaning I didn't want to use anything too precious), so I went with this black linen I grabbed at a thrift store for $1 a while back. It was actually a tablecloth, and the linen is a bit sheer (particularly when backlit) as it's a looser weave, so to keep things in stash I used a cheap black acetate lining (also thrifted) and I continued the lining in the skirt as well for opacity - the pattern has you line the waist and bodice only. I will say that if I make another I would not go with such a slick lining fabric since the bib likes to shift around against my shirt and I was constantly adjusting as I moved when taking these pictures. So probably a grabby fabric like cotton would be best for the lining in this. Since I don't know if I can really ~do~ the overall thing, I went with buttonholes to connect the straps to the bib. I love that the pattern has this option not only because I don't love the overall trend, but also because you don't need any special hardware to make it up :)
Here are some close ups of the details. One piece of advice I would give when making the bib - the pattern shows that you make small squares of interfacing and put them at certain spots on the inside to beef it up for the straps. This works fine if you are using overall clips since the button would be on the bib, but if you are making the button holes, you need to interface a much larger area. My buttonholes are almost not interfaced and there was nothing I could do because everything was enclosed by the time I figured it out. Just something to keep in mind. I used some black buttons I grabbed in Hancock's closing sale for super cheap. I love how you create the button facing at the waist. It's like a button fly extension but at your hip - very clever. You get the look of buttons at the waist, but it doesn't add any bulk in that area and lays smooth along your hip curve. I top stitched everywhere even though you can't see it well in this black slubby fabric, but it helps keep things laying nice and flat.
Here is the full lining. This got a little tricky to add due to the button side opening, plus I made it when I was pretty tired and I managed to serge the wrong side closed before I realized what was happening. I had no choice but to trim off the serged edge and sew it again, making it tighter than it should be. This turned out to be a good thing though because this meant I could keep the lining open and away from the buttonhole area at the waist - I secured the skirt lining when I enclosed the waistband lining and it all worked out great. I needed all the length I could get (I thought it was long enough when I tissue fit, but I didn't have the bib in the right place it would seem), so I just serged the edge of my linen, turned up a 1/2", and top stitched the hem. Obviously next time I would make it a bit longer - I'm long waisted (which wasn't an issue on this pattern) and I'm 5'7" tall just for reference. For the lining I just came up about 1.5" above the outer hem and serged the edge. Incidentally - this was my first project with my serger and I am absolutely in love. I serged every piece of this project and it looks so nice and finished inside! I just love it.
So that's my Pippi Pinafore :) I'm not sure it's the most flattering look on me, and I still don't know if I'm a "pinafore person", but this was a lovely pattern to sew. I love all the extra details Jen adds to her designs. The instructions are always well written and I tend to learn something new on each of her projects. Maybe this will make a pinafore believer out of me! That will be the real test, lol. I need to make more shirts to wear with this, so then maybe I will fall in love. We shall see!

Summary:
Fabric: 1.5 yards black linen - $0.50 (thrifted), 1.75 yards black acetate lining - $0.53 (thrifted)
Pattern: Pippi Pinafore from Jennifer Lauren Handmade
Notions: 1 yard Pellon SF101 interfacing - $1.00, black thread - $2.00, 6 black buttons - $2.00
Time: 10 hours
Total Cost: $ 6.03

*I was give the Pippi Pinafore pattern free of charge to review with no expectation of the outcome. All opinions are 100% my own and honest based off my experience. 

Sunday, December 31, 2017

FO: The Mayberry Dress

I'm interrupting my year end round ups and jumping my blog posting queue to show you my cute new dress :)
A few months ago, Jennifer Lauren of Jennifer Lauren Handmade (or Jennifer Lauren Vintage as it was called) put out a call for reviewers on her patterns. She offered the opportunity to receive a specific pattern and make it up within a certain timeline to review on social media. She has done this with a few patterns already, but she announced that the next would be the Mayberry Dress and that you could have 2 months (instead of the previous 1 month) to review it on your blog if chosen. Feeling that I could certainly make this happen over the course of 2 months, I signed up and was chosen as a reviewer :) I was thrilled and honored. I printed my pattern and got things ready, but then I had to make the 60s dress followed by lots of Christmas gift sewing. Before I knew it, it was the week of Christmas and I had yet to even assemble my pattern. The review had to be up by December 31st - yikes! Thankfully I finished all my gifts in time for Christmas, so immediately after I started work on this pattern. I put it together the 26th, made a muslin the 28th, cut out my fabric and began sewing the 29th, and finished sewing the 30th with just enough time for me to get blog photos and post this today, on the 31st. Phew! Talk about procrastination! I feel terrible that I let the project wait this long, but I'm still glad I was at least able to keep the deadline - and now I have a cute new dress :) Lesson learned - never take on any personal projects with deadlines around Christmas. You'd think I would know this by now. Anyway, Let's look at this cute dress.
The Mayberry dress is a shirtwaist dress with a vintage twist. It has an off center button placket that ends at the waist. There are 3 sleeve length options (short, 3/4/, and long). The neat twist with this design is the drawstring waist that allows you to gather it up as much as you would like at the waist. After deciding to make my dress with 3/4 sleeves, I assembled the pattern, traced off a size 18 C at the bust and arms grading to a 20 at the waist and hip (according to my measurements on the chart), and set to making a muslin. I made my muslin from a vintage poly cotton sheet and decided to add 2: to the length of the bodice as well as the skirt (normal alterations for me), but I made no other changes. The fit was very nice off the bat as this is a looser design - since the darts were in the right place I called it good and proceeded with my fashion fabric.
I feel like this dress is even flattering from the back, which is not usually the case with me. This pattern is very versatile with choice of fabric. The instructions list that you can use most any woven fabric "with some drape", giving examples of linen, lawn, voile or poplin for more structure or rayon, silk, or sheer fabric for a more summer dress. Seeing that I live in Florida and I wanted something I could wear most of the year, I went with this lovely floral rayon challis from my stash. I bought 4 yards of it at a Sewing Studio sale back in 2012 when I first started sewing clothes only to have no idea what I would make with it, so it's sat ever since. I thought it was just the thing for a design like this - slightly vintage pattern in a cooler color palette with a nice drape. The fabric was light enough for summer yet also opaque enough to not need a lining. It even has just the slightest mechanical stretch, which was nice when sewing around curved areas. It's bouncy and flowy and lovely. I'm glad that former me bought this even though I had no idea it was such nice fabric at the time, lol. I'm glad it's a dress at long last.
Construction wise, every thing went wonderfully smooth. The instructions are great, even adding in extra tips for beginners if you need that. I appreciated that the facing pattern pieces said "Cut in 1 interfacing with glue side up" as this acted as a good reminder without me having to check the pattern again before cutting. There are lots of thoughtful things like that. You construct the bodice first, even adding the button holes which was much easier without the added bulk of the skirt fabric to contend with. Next you add the sleeves and the 3/4 length has a cuff to finish it off. This part was a little fiddly, but the instructions were very thorough so it went together well. Next you make the skirt, though I had made buttonholes for the drawstring back when I made them on the bodice since the machine was already set up. This dress even has pockets! Love it. Next you sew the bodice and skirt together, creating the casing for the drawstring waist at the same time. I appreciate that this was all one step with no extra pieces - no skinny casing pieces to deal with and turn edges under - this was all accomplished with just the bodice and skirt pieces. Very clever. After a hem and button sewing, this baby was done :)
Since I was using this slinky rayon, I did use spray starch on the bust darts, which worked wonderfully. I had my starch at the ready in case other areas needed the stabilization, but there was no need. The fabric behaved very well overall, even on the cuffs and hem. I think I stretched the sleeve a bit with handling since I did not stay stitch the edge, but it was no problem since you ease the sleeve cap in anyway. This fabric took sleeve setting like a champ, by the way. This might be the nicest sleeve insertion I've ever done - the stretch in the fabric and the drape meant I have no puckers whatsoever. Woo hoo. For finishing the seams inside, I have a few seams that are pinked but most of them are trimmed and overcast. This rayon likes to fray, so I'm hoping this will be enough to keep it from getting too bad. Hopefully I keep my goal of getting a serger going and I can go back over this later on.
I  tried out several button colors before settling on these plain navy ones. I looked at other finished versions of this dress, and I liked it better when the button stood out from the fabric. This can be easier said that done on a patterned fabric like this, so I wanted something contrasting. The navy buttons tie into the darker blue dots in the abstract floral but definitely still stand out. This also influences my choice of a navy poly satin ribbon at the waist. I happened to have this 3/8" wide roll on hand that was given to me from a friend's friend's grandmother's stash and it was the perfect size and color. I originally thought I'd use cotton cord, but I love that the ribbon is so flat that there is no added bulk at the waist plus I could just melt the edges of the ribbon slightly to avoid fraying. A win win :)
As far as the fit, I'm really happy with it. I think maybe I added a bit too much length to the bodice though. This rayon definitely hangs heavier than the poly cotton I used in my muslin, so what hit me at the waist in the cotton is decidedly low in the rayon. If this didn't have that drawstring waist it would look pretty silly being that long, but thankfully I can just tie the waist where I want it and it's fine. I like that it's a bit blousey on top, though the button placket makes it stick out a bit far just in that one spot. These are small issues though, and they are all from my alterations I made to the pattern. I would probably only add 1" next time I make this. The only thing I feel is a bit big that was drafted that way is the sleeve cuff - I wouldn't want it tight against my arm, but this is big enough that it doesn't even touch my arm at all. This would be a simple adjustment, but I didn't think of it at the time. It doesn't bother me enough to unpick it though, so maybe this is just a me thing. Now that I see these photos it looks like a complete non-issue. Otherwise, I love everything about how this fits. While the button placket is fully functional, I don't even have to open it up to get this dress on - one of the benefits of a smaller bust I guess. I just slip it on over my head and tie the waist and I'm good to go. It's super comfy due to the fit plus the soft and drapey fabric. And I love that if I'm having a "large day", I can just tie the waist looser and no one would be the wiser. Plus pockets!
I'm very happy with this new dress! It's been so long since I made a dress at all since they tend to be more restrictive on my body type, but this one does not have that issue at all. Since this even has pockets I might even wear this one to work - which is a huge deal as I never wear dresses at work since I hate fiddling with them. Wearing this I feel comfortable, cute, and somewhat modern even. My husband said I looked slightly hipster, lol. I don't care because it's just so comfy and I love this fabric. I've also just seen a version where the button front is changed to just a standard bodice, which gives me even more ideas since I love the fit of this so much. I'm glad I was able to review this pattern, and I would definitely recommend it if you want an effortless yet cute dress to add to your wardrobe :)

And with that I wish you all a very Happy New Year! I'll talk to you in 2018!

Summary:
Fabric: 3 yards of floral print rayon challis, $12 (?) from The Sewing Studio
Pattern: Mayberry Dress by Jennifer Lauren Handmade
Notions: thread - $0.50, Pellon SF101 interfacing - $0.50, 5 navy blue buttons - $0.10, navy blue poly satin ribbon - $0.10
Time: 12 hours
Total Cost: $13.20

*I received the Mayberry Dress pattern at no charge in exchange for my honest review. All opinions are 100% my own and not influenced in any way. I just really like this dress :)*